Enkel navigering med rika menyalternativ
Visuella produktval ökar försäljningen snabbt
Personanpassat innehåll anpassas i realtid
Sömlös scrollning för bättre UX-flöde
Omedelbar duplicering av innehåll sparar tid
Snabb åtkomst till kraftfulla designelement
Färdiga mallar snabbar upp designen
Avancerade anpassade fält för flexibla data
Klona webbplatser enkelt utan krångel
Skarp, skalbar grafik för alla skärmar
Omprofilera verktygen för ett professionellt utseende
Visa eller dölj innehåll med precision
Engagerande djup med mjuka rörelser
Lägg enkelt till tydliga anteckningar och kommentarer
Hjälpsamma tips förbättrar användarinteraktionen
Animera element med stilfull känsla
Se till att viktiga avsnitt alltid är synliga
Full kontroll med anpassade kodjusteringar
Optimera filer för att öka webbplatsens hastighet
Utformade sidmallar som hjälper dig att komma igång med din landningssida bara genom att släppa en startdesign
Ready Blocks levereras med en mängd olika layouter och designelement, t.ex. sidhuvud, sidfot och widgetar etc.
Fördesignade rubriker med lukrativa stilar som passar för olika nischade webbplatser och designsmaker
En användbar samling av sidfotsmönster som hjälper dig att skapa en attraktiv sidfot på din målsida
Vi står till tjänst 24/7. Vi är glada att kunna hjälpa dig.
Detaljerade riktlinjer finns tillgängliga för alla funktioner på BdThemes
Lär dig något nytt, håll dig informerad om WordPress, webbdesign och mycket mer
Här är några av de viktigaste milstolparna i min utveckling:
Lär dig mer om produktanvändning, WordPress-tips och tricks från våra videor
Tjäna rejäla provisioner genom att gå med oss i kampanjen
Widget Idea Share är ett bra sätt att hitta liknande widgetar som du kan förbättra.
Helt klart! Om du behöver komma i kontakt med oss är du välkommen att höra av dig
Skapa valfritt WordPress-formulär på några minuter med Sigma Forms.
Plugin för sidbyggare för kommande snart och underhållsläge
Gör enkelt webbplatser tillgängliga med One Accessibility
Visa kundutlåtanden för att öka förtroendet och trovärdigheten.
Zoloblocks hjälper dig att skapa fantastiska Gutenberg-baserade webbplatser.
Den mest överlägsna slidern i en tid av Elementor Slider
De enda kompatibla bloggwidgetarna i Elementor för alla bloggar
Bygg en nästa generations WordPress e-handelswebbplats för företag
Organisera dina foton i en ny ängel varje gång med Elementor
Öka engagemanget och öka försäljningen med hjälp av Spin Wheel.
Kraftfull AI Image Generator Plugin för WordPress av ChatGPT
Skaffa 360° Augmented Reality för WooCommerce idag!
Kopiera och klistra in vilken webbdesign du vill bara med 2 klick!
Ett fullt fungerande tema för elementor med obegränsade alternativ
Smart, rent och flexibelt blocktema för Gutenberg
Dark Reader plugin säkerställer ögonvänlig webbläsning.
WooCommerce kassa på en sida för att öka konverteringarna.
Find Nearby Stores Instantly with Sigma Store Locator
The Ultimate WordPress Media Library Organizer

Få tillgång till 100+ premiumplugins för WordPress med livstidsuppdateringar och dedikerad support.
Enkel navigering med rika menyalternativ
Visuella produktval ökar försäljningen snabbt
Personanpassat innehåll anpassas i realtid
Sömlös scrollning för bättre UX-flöde
Omedelbar duplicering av innehåll sparar tid
Snabb åtkomst till kraftfulla designelement
Färdiga mallar snabbar upp designen
Avancerade anpassade fält för flexibla data
Klona webbplatser enkelt utan krångel
Skarp, skalbar grafik för alla skärmar
Omprofilera verktygen för ett professionellt utseende
Visa eller dölj innehåll med precision
Engagerande djup med mjuka rörelser
Lägg enkelt till tydliga anteckningar och kommentarer
Hjälpsamma tips förbättrar användarinteraktionen
Animera element med stilfull känsla
Se till att viktiga avsnitt alltid är synliga
Full kontroll med anpassade kodjusteringar
Optimera filer för att öka webbplatsens hastighet
Utformade sidmallar som hjälper dig att komma igång med din landningssida bara genom att släppa en startdesign
Ready Blocks levereras med en mängd olika layouter och designelement, t.ex. sidhuvud, sidfot och widgetar etc.
Fördesignade rubriker med lukrativa stilar som passar för olika nischade webbplatser och designsmaker
En användbar samling av sidfotsmönster som hjälper dig att skapa en attraktiv sidfot på din målsida
Vi står till tjänst 24/7. Vi är glada att kunna hjälpa dig.
Detaljerade riktlinjer finns tillgängliga för alla funktioner på BdThemes
Lär dig något nytt, håll dig informerad om WordPress, webbdesign och mycket mer
Här är några av de viktigaste milstolparna i min utveckling:
Lär dig mer om produktanvändning, WordPress-tips och tricks från våra videor
Tjäna rejäla provisioner genom att gå med oss i kampanjen
Widget Idea Share är ett bra sätt att hitta liknande widgetar som du kan förbättra.
Helt klart! Om du behöver komma i kontakt med oss är du välkommen att höra av dig
Skapa valfritt WordPress-formulär på några minuter med Sigma Forms.
Plugin för sidbyggare för kommande snart och underhållsläge
Gör enkelt webbplatser tillgängliga med One Accessibility
Visa kundutlåtanden för att öka förtroendet och trovärdigheten.
Zoloblocks hjälper dig att skapa fantastiska Gutenberg-baserade webbplatser.
Den mest överlägsna slidern i en tid av Elementor Slider
De enda kompatibla bloggwidgetarna i Elementor för alla bloggar
Bygg en nästa generations WordPress e-handelswebbplats för företag
Organisera dina foton i en ny ängel varje gång med Elementor
Öka engagemanget och öka försäljningen med hjälp av Spin Wheel.
Kraftfull AI Image Generator Plugin för WordPress av ChatGPT
Skaffa 360° Augmented Reality för WooCommerce idag!
Kopiera och klistra in vilken webbdesign du vill bara med 2 klick!
Ett fullt fungerande tema för elementor med obegränsade alternativ
Smart, rent och flexibelt blocktema för Gutenberg
Dark Reader plugin säkerställer ögonvänlig webbläsning.
WooCommerce kassa på en sida för att öka konverteringarna.
Find Nearby Stores Instantly with Sigma Store Locator
The Ultimate WordPress Media Library Organizer
Få tillgång till 100+ premiumplugins för WordPress med livstidsuppdateringar och dedikerad support.
Price Box is a very useful tool if you are running a website to sell any products. Normally, most eCommerce websites use it to sell packages, products, courses, daily necessaries, etc. People often address it as Pristabell in the tech industry. Furthermore, well-structured price tables make price comparison easier for the users and make it easy to decide what to purchase.
In fact, if you can present offers and prices to your customers with a decent price box design, they most likely are willing to pay. With Elementor, you can in fact create neat and stunning pricing tables. As for the widget Pristabell, Element Pack has developed it. This widget has awesome features that you can use to create an effective price box easily.
In this blog, we will show you a step-by-step process of creating a price box using Elementor och Element Pack Addon’s Pristabell Widget.
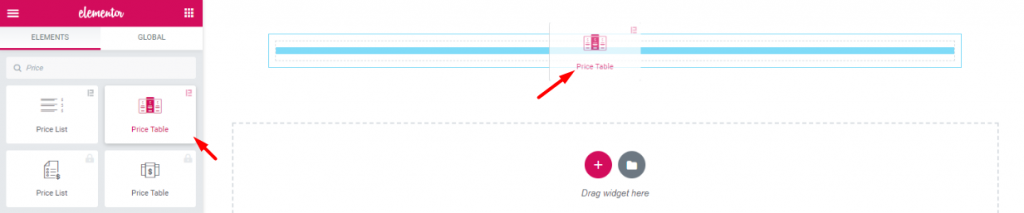
First thing’s first. Though, it’s not worth mentioning, for beginners it may be helpful. Drag and drop the Pristabell widget (Element Pack logo attached) into your webpage.
If you don’t have the Element Pack plugin installed, no problem. In that case, you can use Elementors’ price table widget instead. Note that, both of them are available on pro versions.
We must mention one thing, the company Element Pack always puts tonnes of customizing options in each of their widgets. As a result, you have a big menu bar for customizing your price box. The Pristabell widget will help you to create unique and stylish designs easily.
Let’s move into the main course!
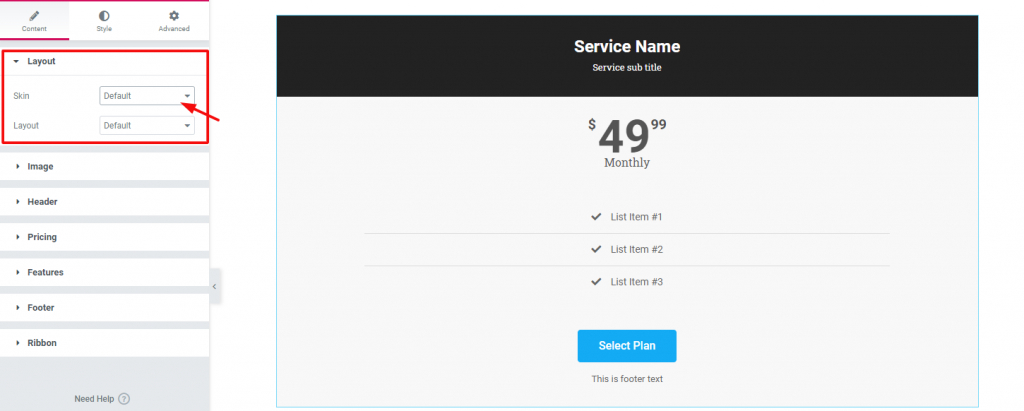
Once you drop the widget, it will pop up Content Tab. This tab holds the base settings for customizing the contents of the box. As you can see, the first section of Layout has two options; Skin & Layout. Both are set to Default. Keep an eye on the section list of this tab.
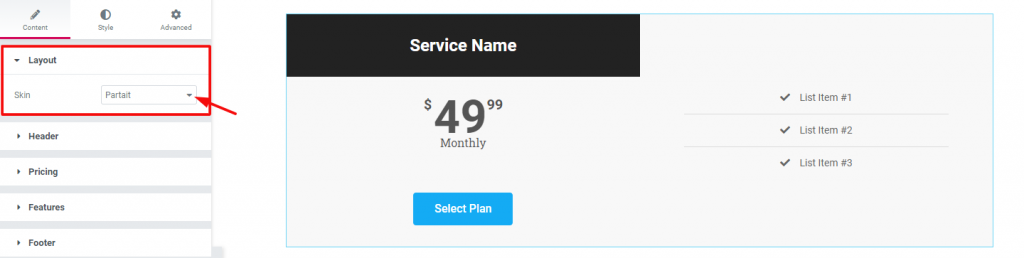
In case you choose a different Hud (Partait), the appearance of your price box will also change. Now notice that there is a section ‘Bild‘ is missing on the section list. Also, you can see no Layout option under Skin. However, the reason is, when you change the Hud option, it will automatically show/hide options related to that layout.
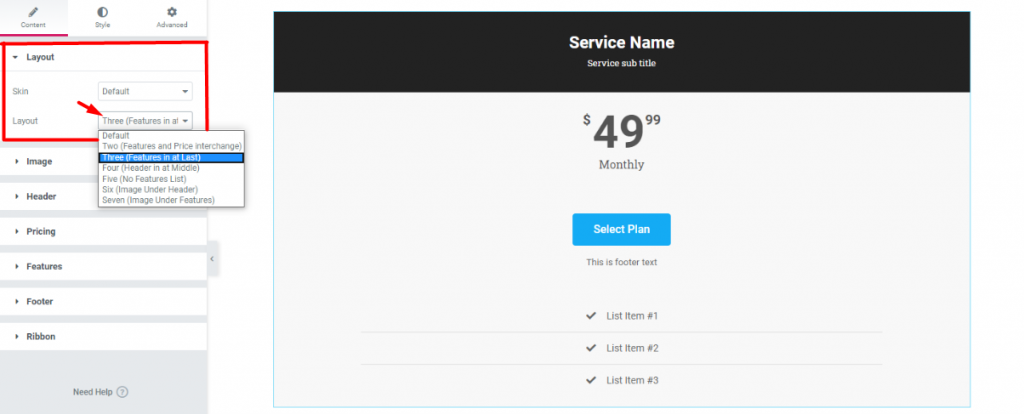
Once again, back to the default settings. The Layout option under Hud also has its uses. After all, you can choose from a number of layout styles from here. Each layout style is different and has different sets of options.
After choosing a layout, what we need to do now is add our details. In fact, you can add any image to your price box if you want. Adding service/product-related images will bring more attention to it. In fact, adding images increase the charm of that product.
But, if the landing page already shows all the information about that service, you may not need any image. However, I will show you how to add images anyway.
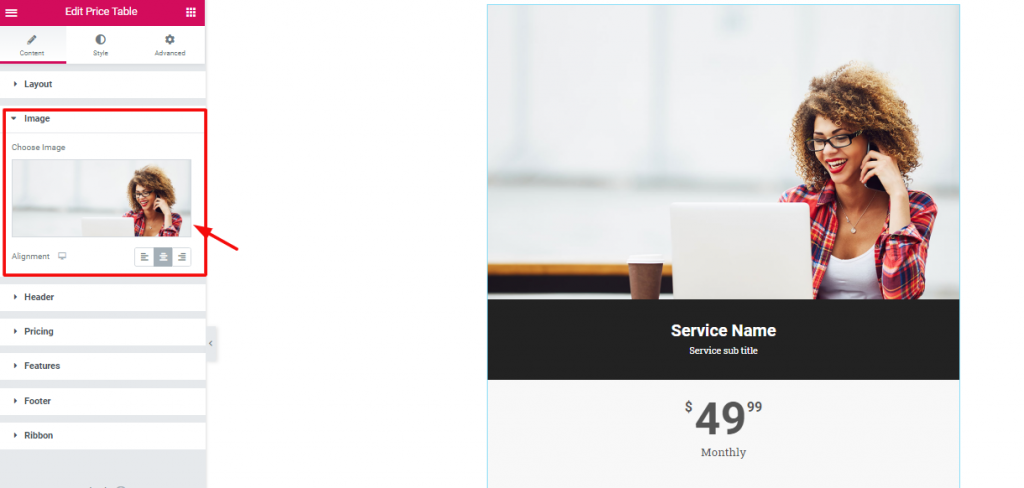
Gå till Content Tab> Image section
Let’s be precise. To add an image to your price box is not a difficult matter. But what’s difficult, is choosing the right image. Just go to the Bild section from the widget customizing panel and choose your image.
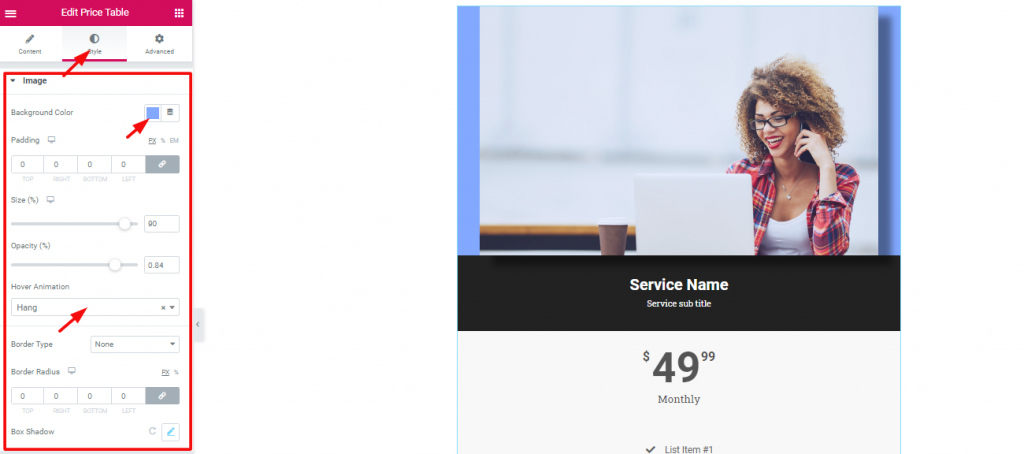
After choosing an image, you can also customize a few things about it. From the Fliken Stil, gå till Bild. Here, you can find some options like Background color, Storlek, Opacity, Hover Animation, etc.
For the most part, the image size, background color, and opacity options are enough. But, as you can see, Element Pack given out more options like Border, Border Radius, and Box shadow along with other options. However, try for yourself! I guaranty that you will make a great design.
Now, let’s move on to the details.

A title holds great importance for your content. Therefore, you must put something that grabs the attention of the visitors. For a price box, you need to put direct titles such as product names or service plans’ names. As for its customization, go to Style Tab> Header. There, you can change the color and typography of the title and sub-heading.
Next, let’s talk about the price tag. The Pristabell widget has an interesting setting for this part.
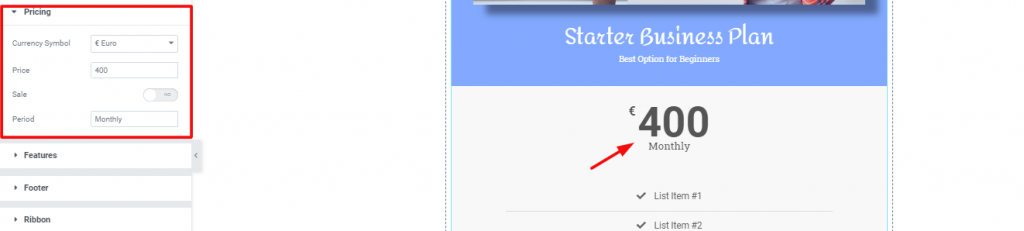
Like all the price labels on the market, you can change the pricing from the Prissättning section. The fun part is, you can choose any currency label from the Currency Symbol alternativ.

Again, if you click on the Switcher Sale, it will bring up another price field Original Price. Here, you can put the original price of your product with a crossed-out style. Generally speaking, you can use this to show discounted products or offers.

And Lastly, you can customize your price tag from the Style tab> Pricing. As shown above, try to leave the background color separate from the rest. Doing this will highlight the price tag to the viewers.
Gå till Content Tab> Features
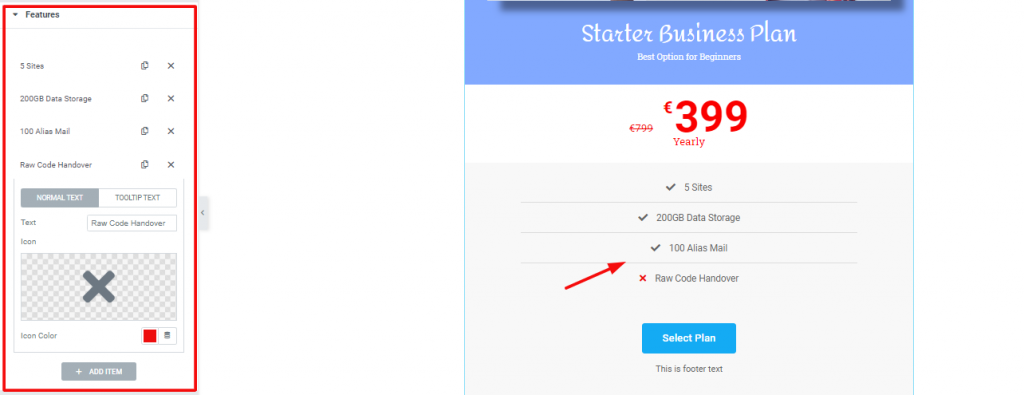
For starters, the features section holds the key to understand what things your offer includes. Though it’s not a briefly detailed part, it gives a quick view of the contents. Hence, for this part, use direct words and be specific.
Let’s talk about customization. As you can see, this section has a bunch of repeaters. You can add more or remove them also. Each repeater has two option sets, one as Normal Text, the other as Tooltip Text. For the normal text, you have options to choose a logo, logo color, and title. In most cases, you can ignore the tooltip option.
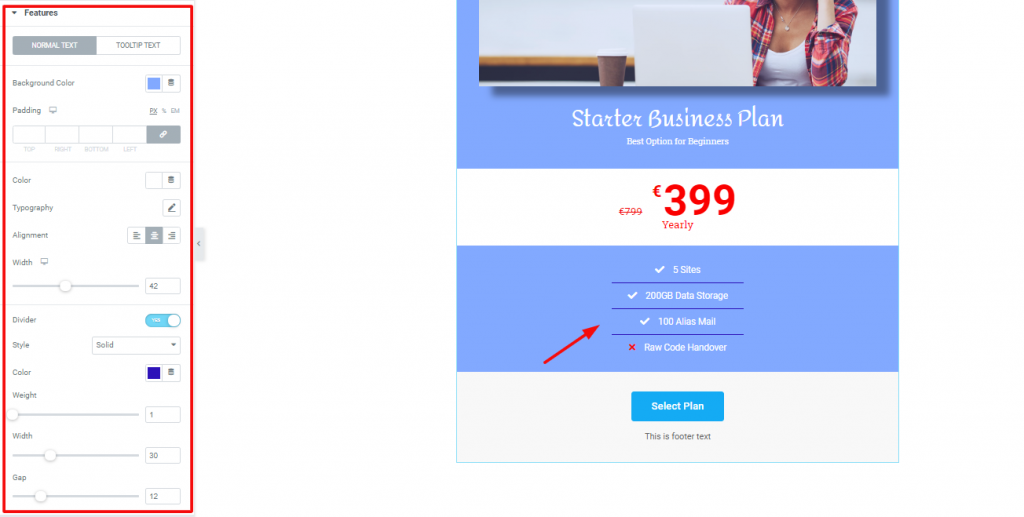
Now, let’s change the outlook of this part. In this case, go to Style Tab> Features. There, you will find the options shown above. We are, in fact, maintaining a single color for the whole price box. Again, the price tag is the only part highlighted.
However, you can change the color, typography, borderline width och weight, och gap from this part. Moreover, there is an option to change the alignment of the texts. But, you may want to keep it in the middle of this style.
We are very close to the finishing part. Regardless of what type your price box is, you need to add the footer. Let’s see how to make one.
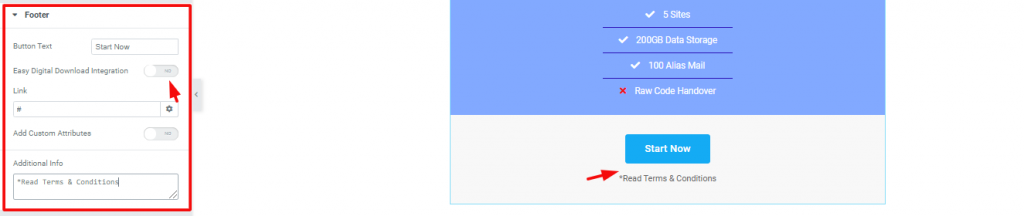
Den Content Tab of the Price Table widget has a section named Sidfot. Basically, the footer area has a call-out button and an additional text box. From the settings, you can see two switchers named Enkel integration av digitala nedladdningar och Add Custom Attributes. You can use the first one to link EDD to your button. As for the second one, you can learn about it här.
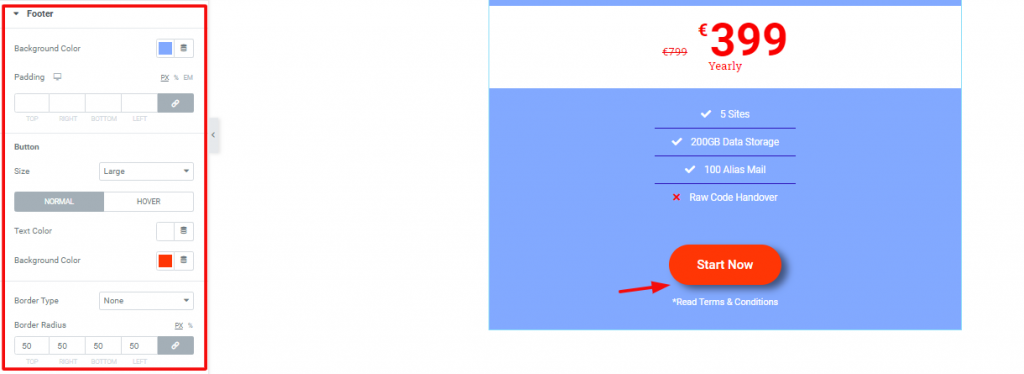
However, you can change the look of the footer from the Sidfot avsnittet i Fliken Stil. In fact, you can make the button round using the Radie för kantlinje option. You can change the background and foreground color of the footer here. Also, you can add a hover effect and a box shadow to the button.
People often use Ribbon on their price box to show features or new offers. It is nothing but a mark that highlights a specific product. Let us show you how you can use it.
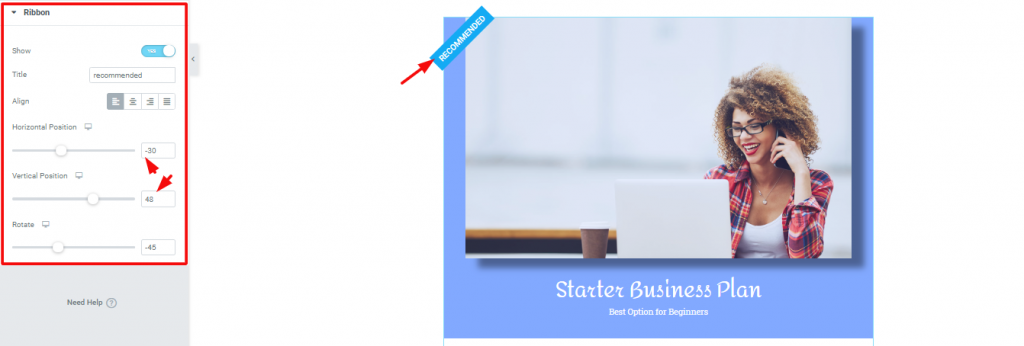
På den Content Tab, the last section is Ribbon. There is a switcher at the top of the section. You need to turn it on to make the ribbon appear. However, you can edit the title, change the position of it from Alignment & Horizontal/Verticle Position. Also, you can rotate the ribbon as you like.
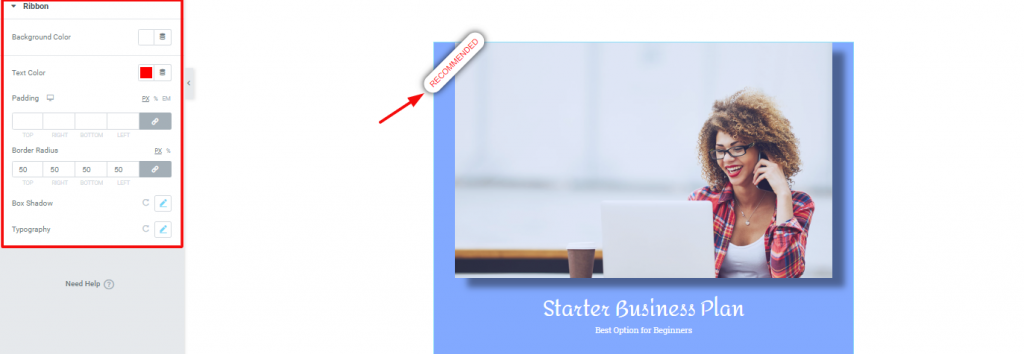
Now, to change the outlook of the ribbon, go to Style Tab> Ribbon. Surely as the image above, you can easily design this by changing its color, border-radius, typography, and box shadow.
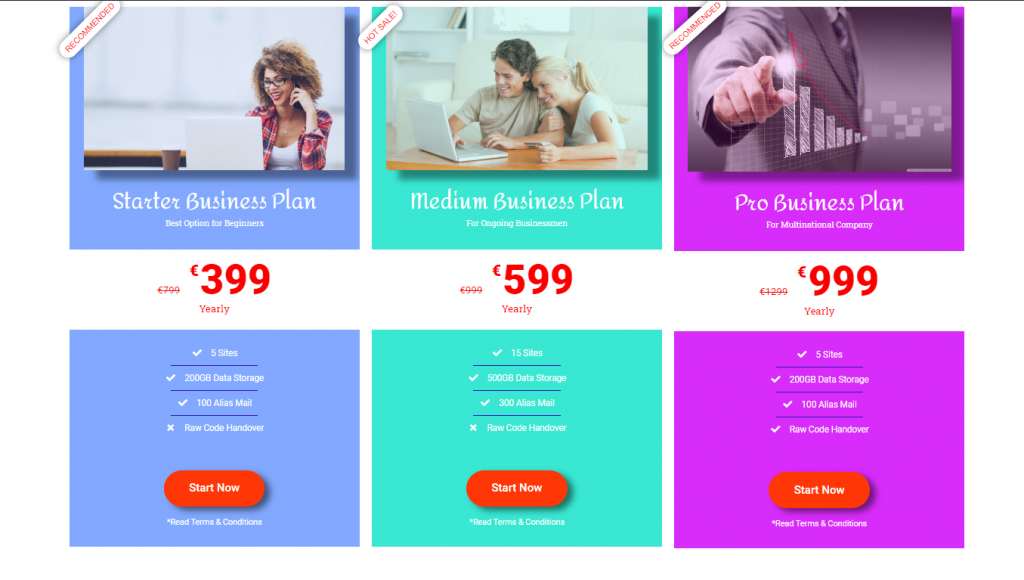
Congratulations and thanks for keeping patients up to this moment. Look at the stunning price boxes you made with us. With the example above, you can easily create such boxes for your eCommerce websites.
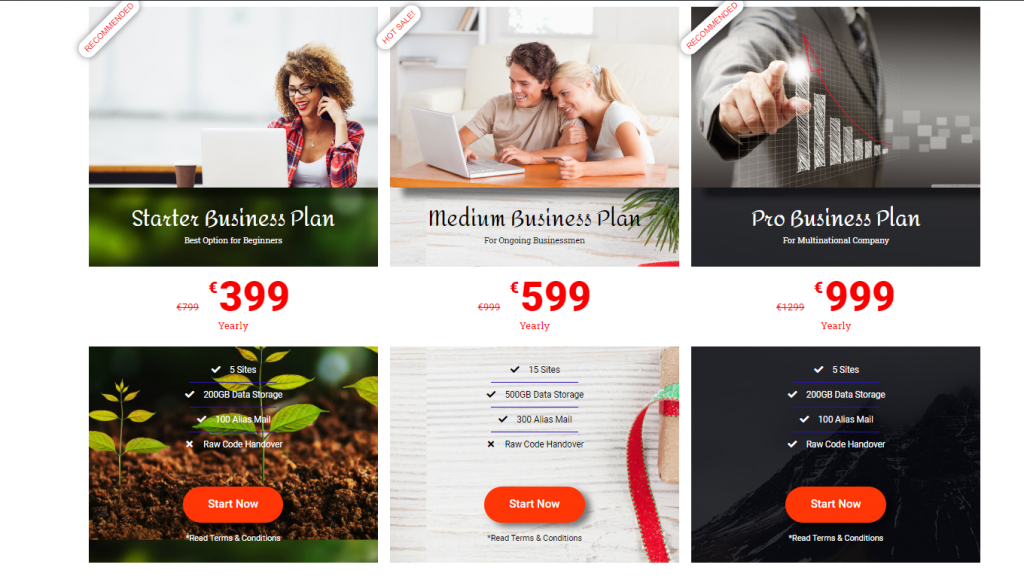
One more thing, you can also add your custom backgrounds to these price boxes. It’s easy to create. It’s attractive. Also, it’s fun. Thanks for reading this blog. Have a great day!
Största paketet med Elementor-mallar med det mest användarvänliga gränssnittet och 300+ användbara Elementor widgets. Bygg webbplatser från noll till 100% perfektion på nolltid.
Denna webbplats drivs av Element Pack Pro och Rooten Tema.
Copyright © 2026 BdTema. Alla rättigheter reserverade.