Navegação sem esforço com opções de menu avançadas
Opções visuais de produtos aumentam as vendas rapidamente
O conteúdo personalizado se adapta em tempo real
Rolagem contínua para um melhor fluxo de experiência do usuário
A duplicação instantânea de conteúdo economiza tempo
Acesso rápido a elementos de design avançados
Modelos prontos agilizam o design
Campos personalizados avançados para dados flexíveis
Clone sites facilmente, sem complicações
Gráficos nítidos e dimensionáveis para todas as telas
Renove a marca das ferramentas para obter uma aparência profissional
Mostrar ou ocultar conteúdo com precisão
Envolvendo a profundidade com movimentos suaves
Adicione facilmente notas e anotações claras
As dicas úteis melhoram a interação com o usuário
Animar elementos com um toque de estilo
Mantenha as seções importantes sempre visíveis
Controle total com ajustes de código personalizados
Otimize os arquivos para aumentar a velocidade do site
Modelos de página elaborados para ajudá-lo a começar a criar sua página de destino apenas com um design inicial
O Ready Blocks vem com uma variedade de layouts e elementos de design, como cabeçalhos, rodapés, widgets etc.
Cabeçalhos pré-projetados com estilos lucrativos que são adequados para vários sites de nicho e gostos de design
Uma coleção útil de designs de rodapé para ajudá-lo a criar um rodapé instantaneamente atraente em sua página de destino
Encontre-nos 24 horas por dia, 7 dias por semana, à sua disposição. Teremos prazer em ajudar.
Diretrizes detalhadas disponíveis para cada recurso na BdThemes
Aprenda algo novo, mantenha-se informado sobre WordPress, Web Design e muito mais
Aqui estão alguns dos principais marcos em meu desenvolvimento:
Aprenda a usar o produto, dicas e truques do WordPress com nossos vídeos
Ganhe comissões pesadas ao se juntar a nós na promoção
O Widget Idea Share é uma ótima maneira de encontrar widgets semelhantes que você pode melhorar.
Com certeza! Se precisar entrar em contato conosco, sinta-se à vontade para falar conosco
Crie qualquer formulário do WordPress em minutos com o Sigma Forms.
Plug-in do Page Builder para o modo de manutenção e em breve
Torne os sites acessíveis facilmente com o One Accessibility
Exiba depoimentos de clientes para aumentar a confiança e a credibilidade.
O Zoloblocks ajuda a criar sites incríveis baseados em Gutenberg.
O controle deslizante mais avançado na era do controle deslizante Elementor
Os únicos widgets de blog compatíveis com o Elementor para qualquer blog
Crie um site de comércio eletrônico WordPress de última geração para empresas
Organize suas fotos em um anjo diferente a cada vez com o Elementor
Impulsione o engajamento e aumente as vendas usando o Spin Wheel.
Poderoso plug-in de gerador de imagens de IA para WordPress por ChatGPT
Obtenha 360° Augmented Reality para WooCommerce hoje mesmo!
Copie e cole qualquer design da Web de sua preferência com apenas 2 cliques!
Um tema totalmente funcional para o elementor com opções ilimitadas
Tema de bloco inteligente, limpo e flexível para Gutenberg
O plug-in Dark Reader garante uma leitura da Web agradável aos olhos.
Checkout de uma página do WooCommerce para aumentar as conversões.
Find Nearby Stores Instantly with Sigma Store Locator
The Ultimate WordPress Media Library Organizer

Acesse mais de 100 plug-ins premium do WordPress com atualizações vitalícias e suporte dedicado.
Navegação sem esforço com opções de menu avançadas
Opções visuais de produtos aumentam as vendas rapidamente
O conteúdo personalizado se adapta em tempo real
Rolagem contínua para um melhor fluxo de experiência do usuário
A duplicação instantânea de conteúdo economiza tempo
Acesso rápido a elementos de design avançados
Modelos prontos agilizam o design
Campos personalizados avançados para dados flexíveis
Clone sites facilmente, sem complicações
Gráficos nítidos e dimensionáveis para todas as telas
Renove a marca das ferramentas para obter uma aparência profissional
Mostrar ou ocultar conteúdo com precisão
Envolvendo a profundidade com movimentos suaves
Adicione facilmente notas e anotações claras
As dicas úteis melhoram a interação com o usuário
Animar elementos com um toque de estilo
Mantenha as seções importantes sempre visíveis
Controle total com ajustes de código personalizados
Otimize os arquivos para aumentar a velocidade do site
Modelos de página elaborados para ajudá-lo a começar a criar sua página de destino apenas com um design inicial
O Ready Blocks vem com uma variedade de layouts e elementos de design, como cabeçalhos, rodapés, widgets etc.
Cabeçalhos pré-projetados com estilos lucrativos que são adequados para vários sites de nicho e gostos de design
Uma coleção útil de designs de rodapé para ajudá-lo a criar um rodapé instantaneamente atraente em sua página de destino
Encontre-nos 24 horas por dia, 7 dias por semana, à sua disposição. Teremos prazer em ajudar.
Diretrizes detalhadas disponíveis para cada recurso na BdThemes
Aprenda algo novo, mantenha-se informado sobre WordPress, Web Design e muito mais
Aqui estão alguns dos principais marcos em meu desenvolvimento:
Aprenda a usar o produto, dicas e truques do WordPress com nossos vídeos
Ganhe comissões pesadas ao se juntar a nós na promoção
O Widget Idea Share é uma ótima maneira de encontrar widgets semelhantes que você pode melhorar.
Com certeza! Se precisar entrar em contato conosco, sinta-se à vontade para falar conosco
Crie qualquer formulário do WordPress em minutos com o Sigma Forms.
Plug-in do Page Builder para o modo de manutenção e em breve
Torne os sites acessíveis facilmente com o One Accessibility
Exiba depoimentos de clientes para aumentar a confiança e a credibilidade.
O Zoloblocks ajuda a criar sites incríveis baseados em Gutenberg.
O controle deslizante mais avançado na era do controle deslizante Elementor
Os únicos widgets de blog compatíveis com o Elementor para qualquer blog
Crie um site de comércio eletrônico WordPress de última geração para empresas
Organize suas fotos em um anjo diferente a cada vez com o Elementor
Impulsione o engajamento e aumente as vendas usando o Spin Wheel.
Poderoso plug-in de gerador de imagens de IA para WordPress por ChatGPT
Obtenha 360° Augmented Reality para WooCommerce hoje mesmo!
Copie e cole qualquer design da Web de sua preferência com apenas 2 cliques!
Um tema totalmente funcional para o elementor com opções ilimitadas
Tema de bloco inteligente, limpo e flexível para Gutenberg
O plug-in Dark Reader garante uma leitura da Web agradável aos olhos.
Checkout de uma página do WooCommerce para aumentar as conversões.
Find Nearby Stores Instantly with Sigma Store Locator
The Ultimate WordPress Media Library Organizer
Acesse mais de 100 plug-ins premium do WordPress com atualizações vitalícias e suporte dedicado.
Do you want to build an WooCommerce custom product page using Elementor on your own? In that case, this blog is for you.
Nowadays, WooCommerce is a fast-spreading wildfire in the internet world. Not long after 4G internet was first introduced, people rapidly converted their stores into online stores. For you to easily and successfully create your store, I will show you how in this tutorial.
In this tutorial, I’m focusing on creating the custom product page. I’m not mentioning the installation procedure of buying a domain, setting up WordPress, and Elementor. However, you can easily learn these from this blog.
Once you setup the plugins and signup for it, let’s begin the main tutorial on the WooCommerce custom product page. Note that, I’m using Rooten theme for this tutorial. However, you can use any themes for your page. But I’m using it because it’s fast and lightweight.
Also, I’m using Element Pack Pro combining with Elementors own widgets. Element Pack has a lot of amazing widgets and its easy to use.
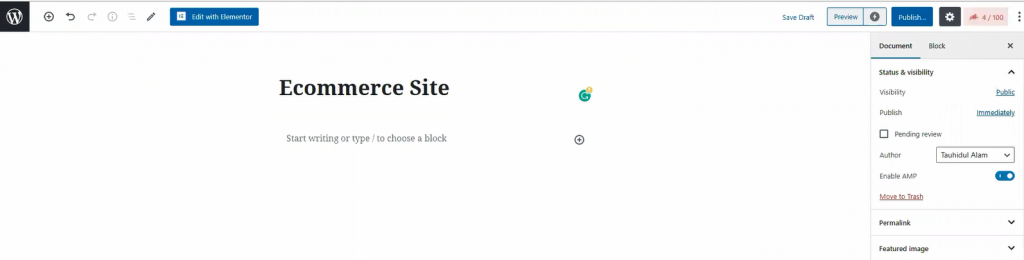
In your dashboard, click on Páginas, then click on Adicionar novo to create a new page. Like the image shown above, give your page a title.
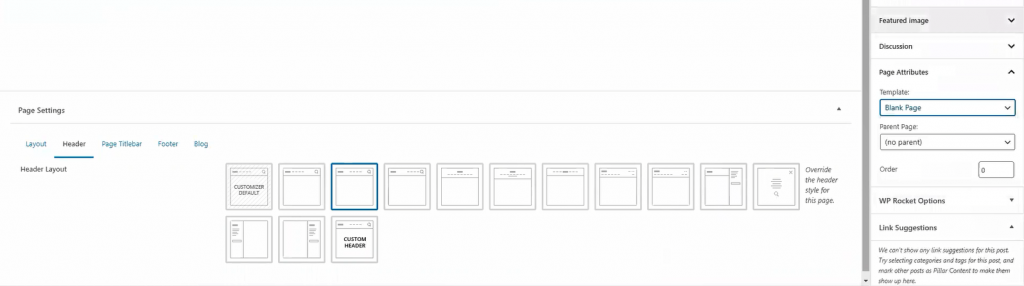
For the page layout, select Blank Page de Modelo. You can get this option from the Page Attributes menu on the right side. Once you are done, hit the Publicar button. Now, let’s move onto the next part for creating your WooCommerce custom product page.
The landing page is what you see as the first page of a website. It has most of the information you need to show your visitors. Today, we are going to create this landing page for your store.
The landing page has many sections. To make an attractive landing page, each section is necessary. Let me show you how to make WooCommerce custom product landing page.

Well, first things first. Let’s start with the hero section. I think the image above has already picked your interest. However, creating this thing is easy. Just follow the steps.
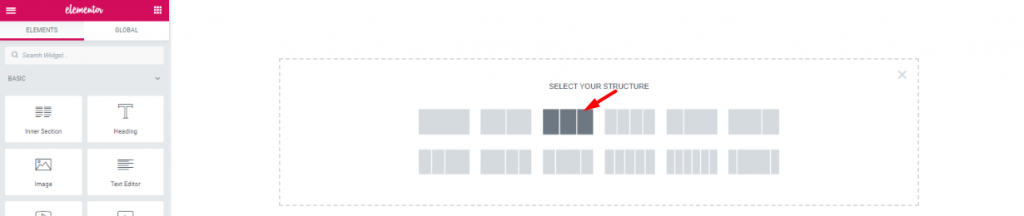
First, on the blank page, make a 3 section window.

Arraste e solte o Navegação de rolagem widget de Element Pack into the middle section. The widgets will make your header menu.
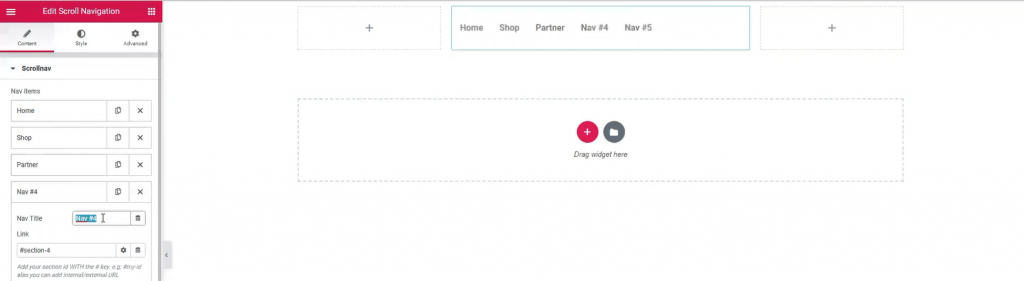
However, Name your menu bar as you like. The widget has a wide customization menu. You can change its appearance easily from here.
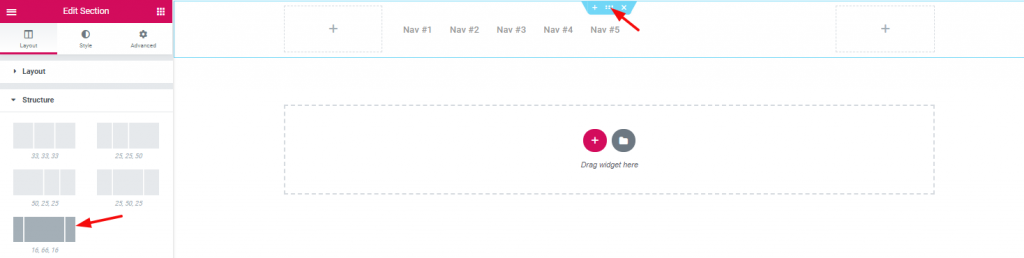
The section width distribution can be edited from the layout option. However, for the header area, I’ve selected a good width distribution.

Inserting Seção interna on the right corner beside the navigation menu.

Dragging and dropping WooCommerce mini-cart by Element Pack on the left inner section.

And, Pesquisa widget on the right inner section.

Also, adding Imagem widget on the left corner of the header area.

With that, the header area is now completed. It is a little tricky to create this header area for your WooCommerce custom product page. But once you get it, you can make a unique header for yourself.
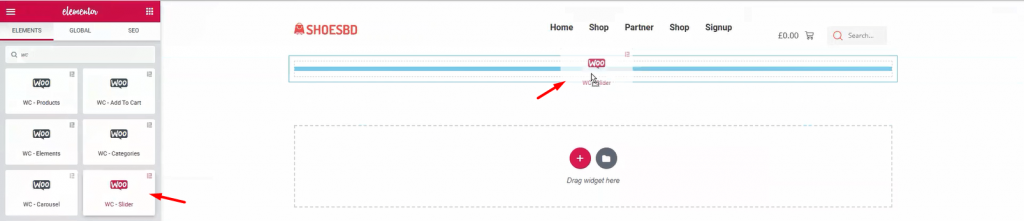
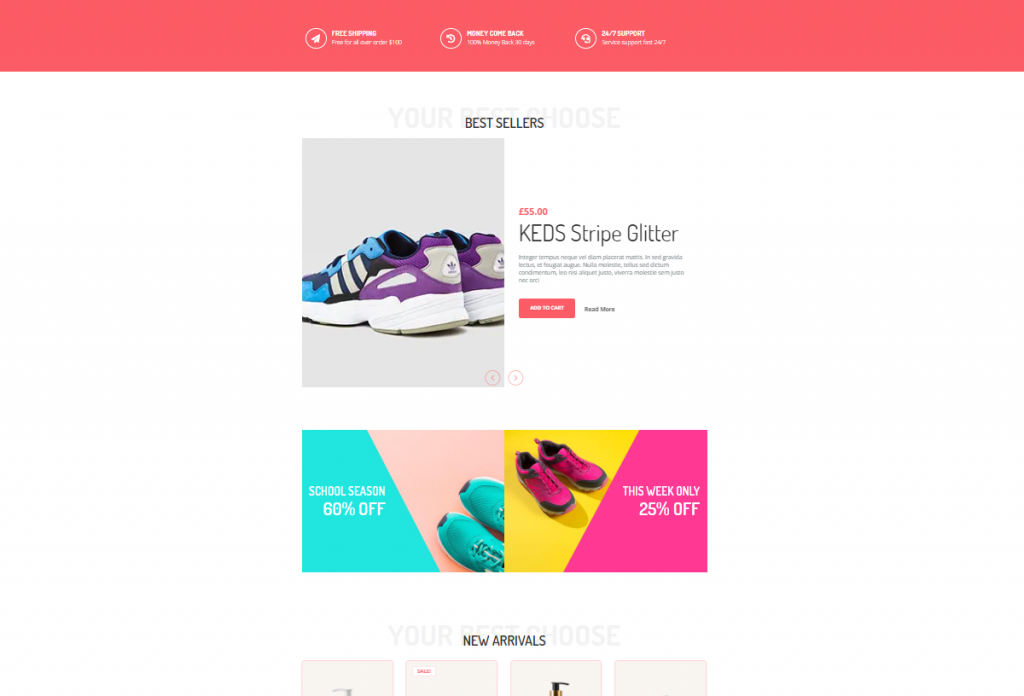
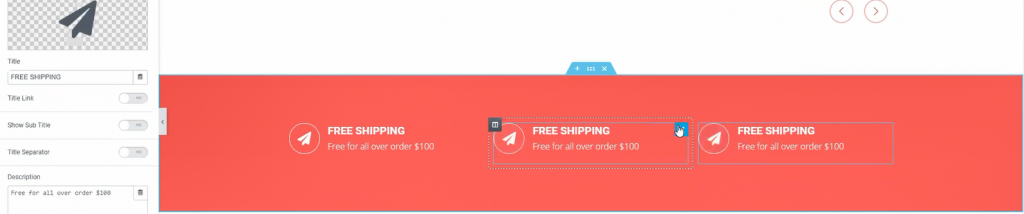
It’s time to show your visitor the first batch of products. Add Controle deslizante do WooCommerce under the header.
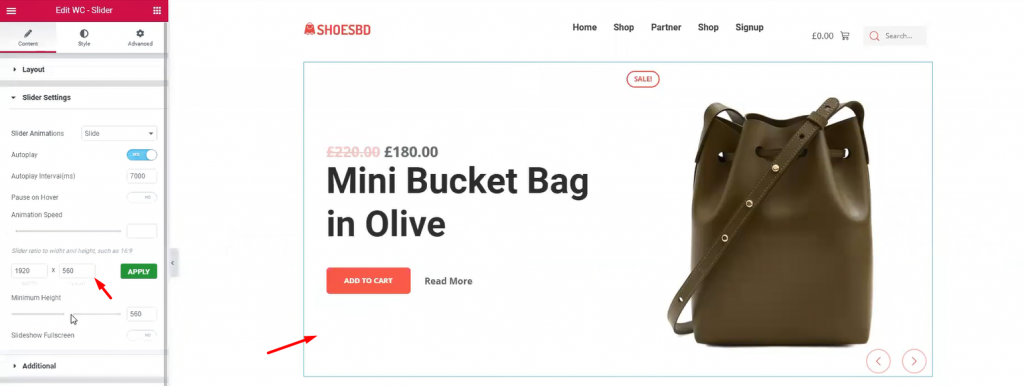
The slider widget is also developed by Element Pack. It brings out the charm of your product with its pixel-perfect smooth graphics. It is an essential tool for your WordPress custom product page. The widget has many uses as it has a customizable option provided by developers. You can change the slider’s dimension, animation speed, and type, minimum height, and colors. Once you are done with it, let’s see the complete hero section.
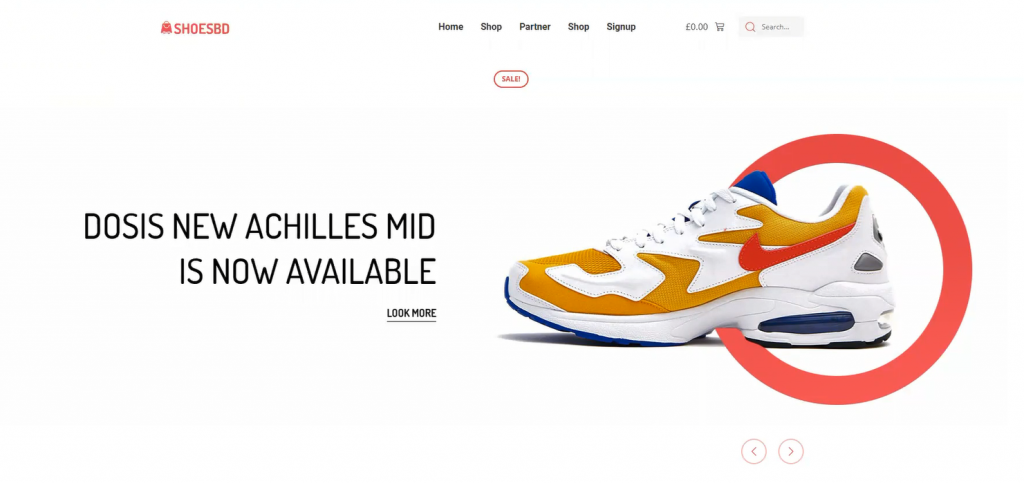
Have a good look at the finishing product. This complete hero section has a minimal but elegant design. Note that, you must create your hero banner according to your targeted audience. If the visitors aren’t caught with the first look, they won’t stay on the page. This is your first step to success on your WooCommerce custom product page.
The features section is where you want to showcase your products and offers. In most cases, we create this section using 4-5 different features, giving the visitors more things to consume.
Don’t be mean when designing your features section. Because you must keep in mind, people will get bored seeing only 1 product showcase.
Let’s make a good features section for your WooCommerce custom product page.

First, make a section with 3 inner sections. From the Layout option, give a suitable background color.
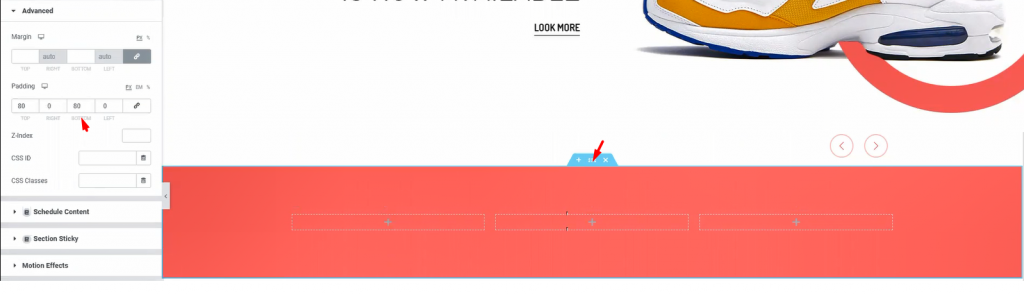
Add padding to the section so that we have a field to work on.
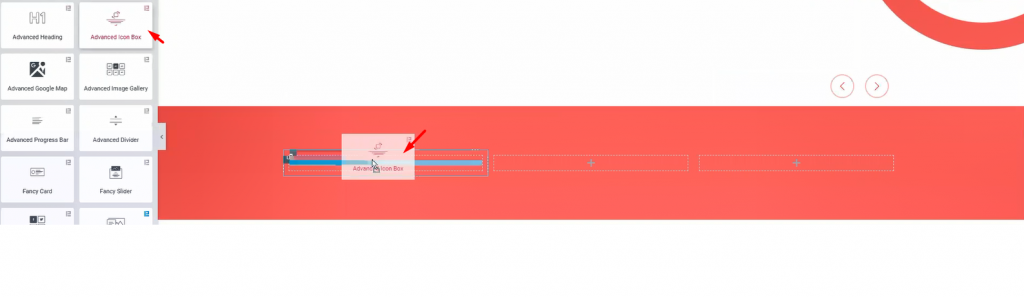
I’m using Caixa de ícones avançada in these inner sections. However, you will get a huge customization menu for this widget.
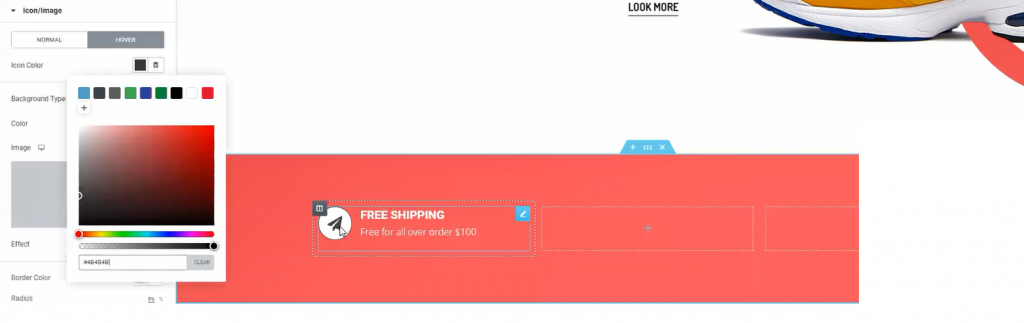
The fun thing is, you can design a variety of things with the advanced icon box widget. Like the image above, you can make this design with just a few edits in the customization menu.
One more thing, for quick edits, just duplicate a widget and place them accordingly. Do this if you need more items in a similar format. This saves both time and effort.

Now, adding Título avançado widget underneath the previous part.
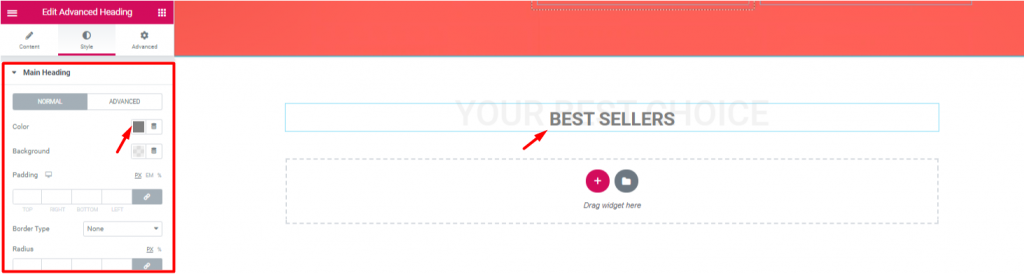
Let’s edit the heading to match the theme of the next section. Note that, the advanced heading widget is made by Element Pack.
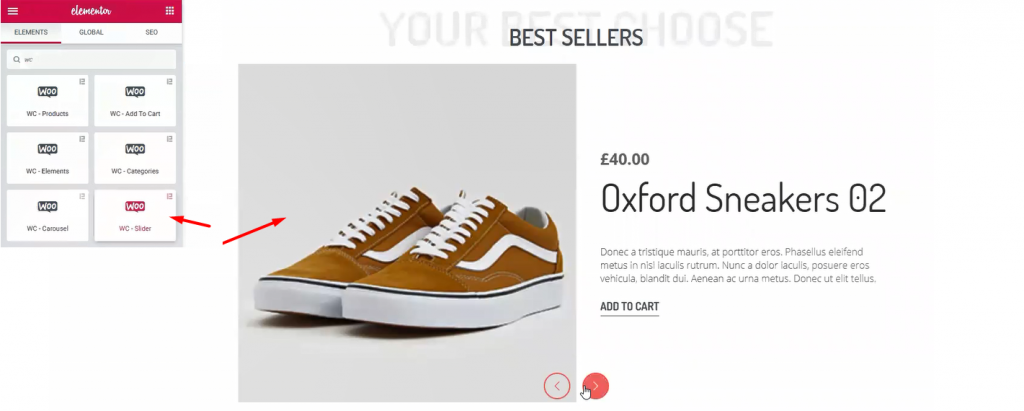
Once again, I’m using Controle deslizante do WooCommerce widget. This time, I’ve made some edits to change the appearance from before. However, checkout this tutorial about WooCommerce Slider to use it successfully.

Let’s create another double part section. For this part, I’m using Caixa de reboque widget. It’s a handy widget for showing advertisements easily.

Once again, the Trailer Box widget comes with a very unique customization menu. Not only you can change its layout but also you can change its colors and text fonts. Moreover, it has an option to add an image as a background. Stylish and unique indeed.

Inserting another Título avançado widget again.
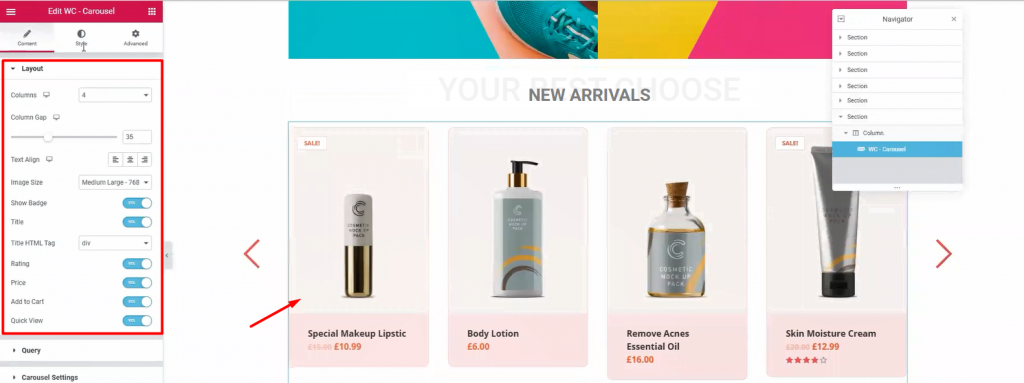
Next, drag and drop Carrossel do WooCommerce widget from Element Pack below the heading. With it, you can show your newly added products together. Moreover, we use WooCommerce Slider widget to highlight products with a wide view. On the other hand, using this widget, we can show all the products in 4-5 columns. It’s a handy tool for your WooCommerce custom product page.
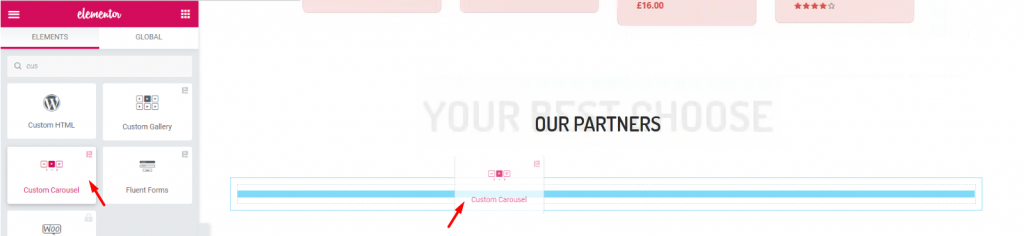
Again, after adding another Título avançado widget, let’s add the Carrossel personalizado widget. It’s a widget that shows images with a carousel style.
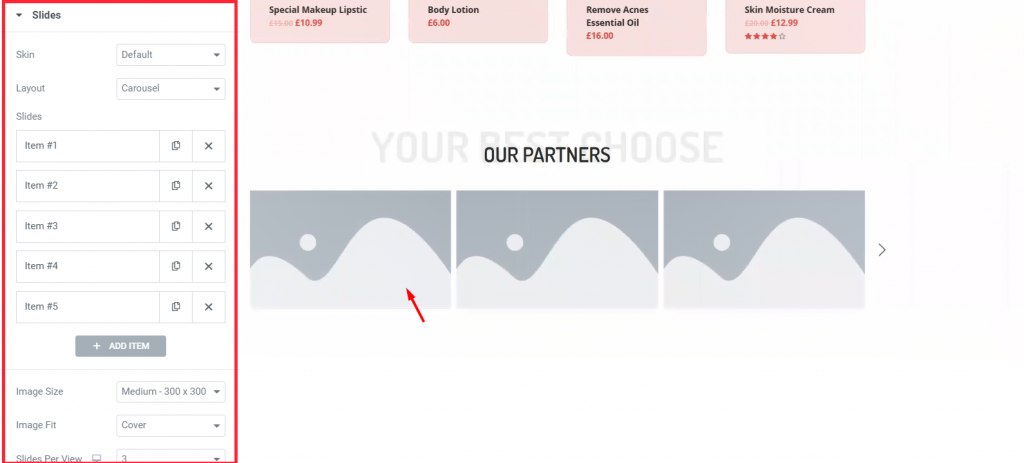
Each block of blank portrait holds an image inside it. You have to manually choose images for each blank portrait.
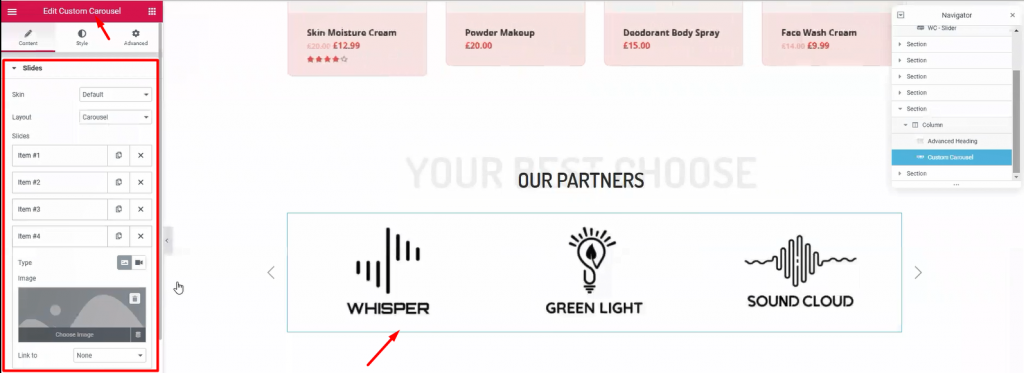
This part is essential to your visitors, showing your business relationship with other companies. Use this Carrossel personalizado widget section (made by Element Pack) to add more appeal to your WooCommerce custom product page.
Time for the finishing part. This section is very crucial for your WooCommerce custom product page. Here, you have the last chance to attract attention from your visitors. So, callout your visitors towards buying your products and give them a tour of About Us.
Once again, make another 3 columns, red background section below the custom carousel. This would be your callout section. Just copy-paste previously made section similar to this to save time.

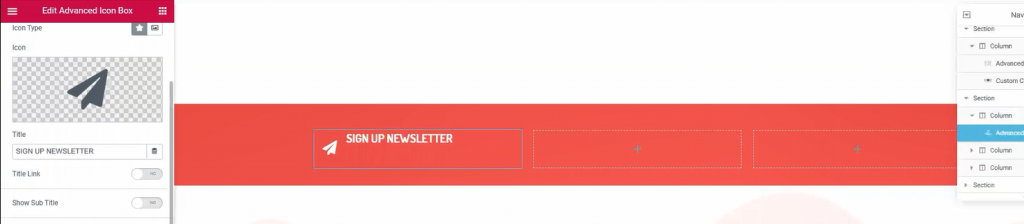
Place Mail Chimp widget on the 3rd right column. This widget collects your visitors’ emails and redirects them to the signup page. It’s a helpful tool made by the Element Pack team.

Below the callout section, make a 3 column section. This section will be our footer. Add Título e Editor de texto widgets in the columns.
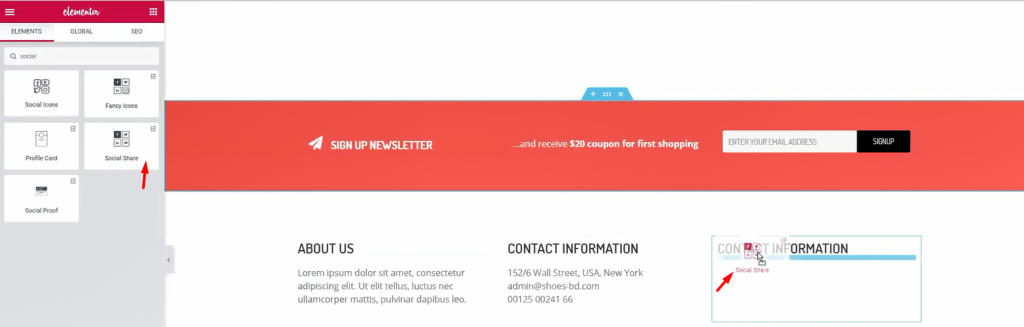
For the 1st and 2nd column, a title and some text are enough. Let’s move to the 3rd column. Adding a title and Compartilhamento social widget (by Element Pack) inside it.
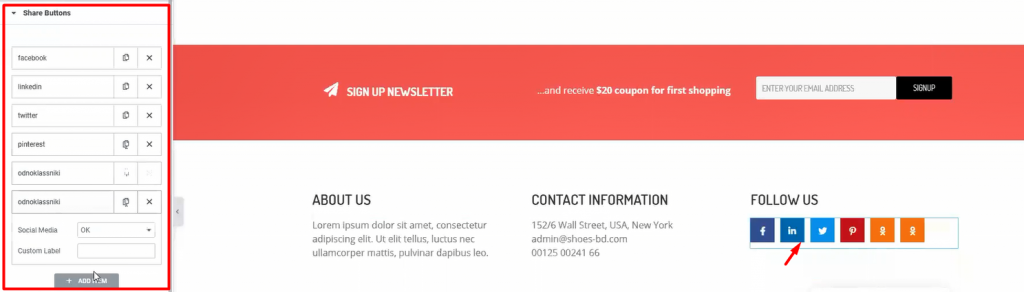
Add more social sites by customizing the widget. This will let your visitors easily go to your social sites. After you are done, let’s see what we have made so far.
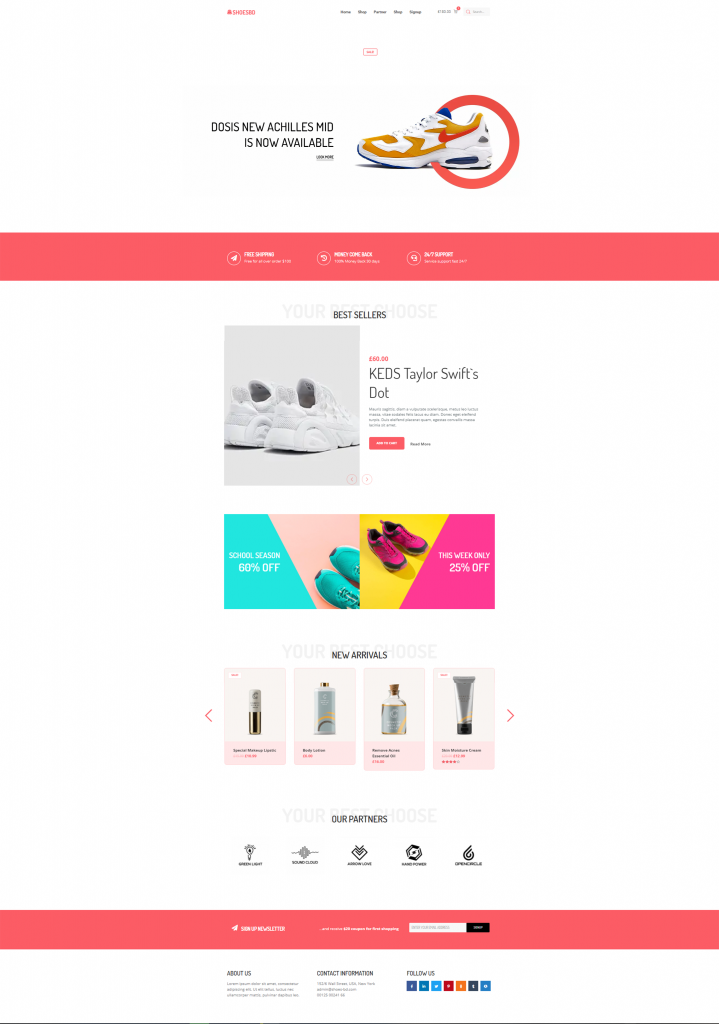
Whoa! Look at this stunning webpage you have just created! Amazing right?
Hopefully, you have learned the full procedure of creating an WooCommerce custom product page. This is not a difficult feat to achieve. But the important question is, Who will teach you? Now that you have learned it all, let’s go make your WooCommerce sites.
Element Pack is the most optimized add-on based on the WordPress Elementor plugin for creating your premium WooCommerce custom product page.
Esse plug-in tem um vasto inventário pronto para ser implantado em seu site. Também com Mais de 190 plug-ins, 270+ páginas prontas para uso, mais de 1800 ready blocksO Element Pack alcançou a posição de Top 5 em todo o mundo.
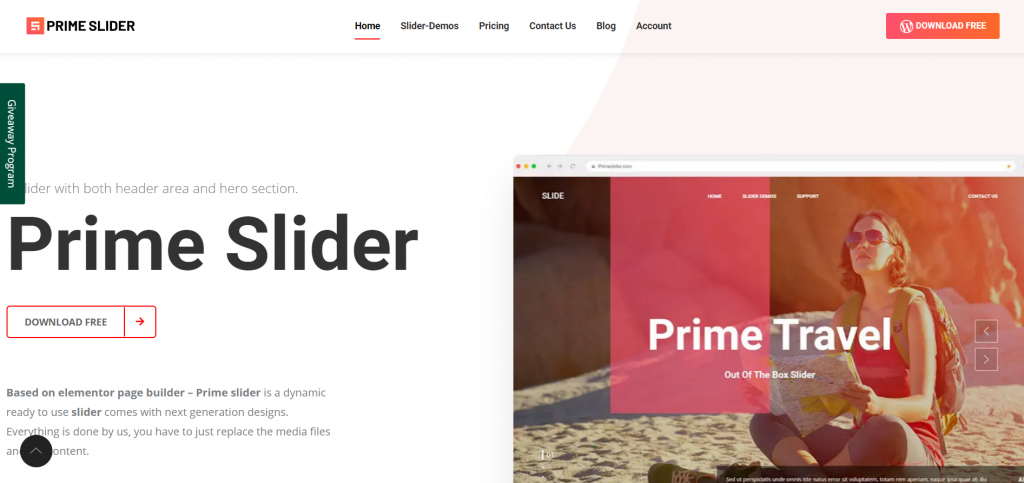
O Controle deslizante principal plugin gives you the best slider widgets that have ever happened in Elementor. It has pre-designed sliders which are fully customizable.
You can get more than 27 slider layouts while having the infinite customization module enabled. Make your website fast, charming, and improved by using sliders of Prime Slider.
Estamos realizando um programa de brindes para nossos amados consumidores e assinantes que estão conectados ao nosso site oficial BDthemes.com
Visitar Element Pack ou Controle deslizante principal e compartilhe conosco suas ideias. Os vencedores sortudos receberão uma licença vitalícia no valor de $100. Você só precisa de um minuto para participar.
O que todo designer de sites bem-sucedido deseja são ferramentas premium e otimizadas. E Element Pack & Controle deslizante principal respond confidently to that wish. So, don’t hesitate too much and make a run for it!
Obrigado por ler este blog. Tenha um ótimo dia!
O maior pacote de modelos Elementor com a interface de usuário mais fácil de usar e 300+ widgets úteis do Elementor. Crie sites de zero a 100% perfeição em pouco tempo.
Este site é alimentado por Element Pack Pro e Tema Rooten.
Copyright © 2026 BdThemes. Todos os direitos reservados.