Navegación sin esfuerzo con opciones de menú enriquecidas
Las opciones visuales de productos aceleran las ventas
Los contenidos personalizados se adaptan en tiempo real
Desplazamiento fluido para mejorar la experiencia del usuario
La duplicación instantánea de contenidos ahorra tiempo
Acceso rápido a potentes elementos de diseño
Las plantillas listas para usar agilizan el diseño
Campos personalizados avanzados para datos flexibles
Clonar sitios fácilmente sin complicaciones
Gráficos nítidos y escalables para todas las pantallas
Cambie el nombre de las herramientas para darles un aspecto profesional
Mostrar u ocultar contenidos con precisión
Captar la profundidad con un movimiento suave
Añade notas y anotaciones claras fácilmente
Los consejos útiles mejoran la interacción con el usuario
Anime elementos con estilo
Mantenga siempre visibles las secciones importantes
Control total con ajustes de código personalizados
Optimizar archivos para aumentar la velocidad del sitio
Plantillas de página elaboradas para ayudarle a empezar con su página de aterrizaje con sólo soltar un diseño inicial
Ready Blocks incluye una gran variedad de diseños y elementos de diseño, como encabezados, pies de página, widgets, etc.
Encabezados prediseñados con estilos lucrativos que se adaptan a varios nichos de sitios web y gustos de diseño.
Una útil colección de diseños de pie de página que te ayudarán a crear un pie de página atractivo al instante en tu página de aterrizaje.
Encuéntrenos 24 horas al día, 7 días a la semana, a su servicio. Estaremos encantados de ayudarle.
Guías detalladas disponibles para cada característica en BdThemes
Aprenda algo nuevo, manténgase informado sobre WordPress, diseño web y mucho más
He aquí algunos de los hitos clave de mi desarrollo:
Aprenda a utilizar los productos, consejos y trucos de WordPress con nuestros vídeos
Gana sustanciosas comisiones uniéndote a nosotros en la promoción
Widget Idea Share es una gran manera de encontrar widgets similares que puedes mejorar.
Por supuesto. Si necesita ponerse en contacto con nosotros, no dude en hacerlo.
Cree cualquier formulario de WordPress en cuestión de minutos con Sigma Forms.
Plugin constructor de páginas Coming Soon & Maintenance Mode
Facilite el acceso a los sitios web con One Accessibility
Muestre testimonios de clientes para aumentar la confianza y la credibilidad.
Zoloblocks ayuda a crear impresionantes sitios web basados en Gutenberg.
Slider más superior en la Era del Slider Elementor
Los únicos widgets compatibles en Elementor para cualquier blog
Crear un sitio web WordPress de comercio electrónico de última generación para empresas
Organiza tus fotos en un ángel diferente cada vez con Elementor
Impulse el compromiso y aumente las ventas con Spin Wheel.
Potente plugin AI Image Generator para WordPress por ChatGPT
¡Consigue hoy la Realidad Aumentada 360° para WooCommerce!
¡Copia y pega cualquier diseño web que te guste con sólo 2 clics!
Un tema totalmente funcional para elementor con opciones ilimitadas
Tema de bloques inteligente, limpio y flexible para Gutenberg
El plugin Dark Reader garantiza una lectura de la web respetuosa con los ojos.
Pago en una página de WooCommerce para aumentar las conversiones.
Find Nearby Stores Instantly with Sigma Store Locator
The Ultimate WordPress Media Library Organizer

Acceda a más de 100 plugins premium para WordPress con actualizaciones de por vida y soporte dedicado.
Navegación sin esfuerzo con opciones de menú enriquecidas
Las opciones visuales de productos aceleran las ventas
Los contenidos personalizados se adaptan en tiempo real
Desplazamiento fluido para mejorar la experiencia del usuario
La duplicación instantánea de contenidos ahorra tiempo
Acceso rápido a potentes elementos de diseño
Las plantillas listas para usar agilizan el diseño
Campos personalizados avanzados para datos flexibles
Clonar sitios fácilmente sin complicaciones
Gráficos nítidos y escalables para todas las pantallas
Cambie el nombre de las herramientas para darles un aspecto profesional
Mostrar u ocultar contenidos con precisión
Captar la profundidad con un movimiento suave
Añade notas y anotaciones claras fácilmente
Los consejos útiles mejoran la interacción con el usuario
Anime elementos con estilo
Mantenga siempre visibles las secciones importantes
Control total con ajustes de código personalizados
Optimizar archivos para aumentar la velocidad del sitio
Plantillas de página elaboradas para ayudarle a empezar con su página de aterrizaje con sólo soltar un diseño inicial
Ready Blocks incluye una gran variedad de diseños y elementos de diseño, como encabezados, pies de página, widgets, etc.
Encabezados prediseñados con estilos lucrativos que se adaptan a varios nichos de sitios web y gustos de diseño.
Una útil colección de diseños de pie de página que te ayudarán a crear un pie de página atractivo al instante en tu página de aterrizaje.
Encuéntrenos 24 horas al día, 7 días a la semana, a su servicio. Estaremos encantados de ayudarle.
Guías detalladas disponibles para cada característica en BdThemes
Aprenda algo nuevo, manténgase informado sobre WordPress, diseño web y mucho más
He aquí algunos de los hitos clave de mi desarrollo:
Aprenda a utilizar los productos, consejos y trucos de WordPress con nuestros vídeos
Gana sustanciosas comisiones uniéndote a nosotros en la promoción
Widget Idea Share es una gran manera de encontrar widgets similares que puedes mejorar.
Por supuesto. Si necesita ponerse en contacto con nosotros, no dude en hacerlo.
Cree cualquier formulario de WordPress en cuestión de minutos con Sigma Forms.
Plugin constructor de páginas Coming Soon & Maintenance Mode
Facilite el acceso a los sitios web con One Accessibility
Muestre testimonios de clientes para aumentar la confianza y la credibilidad.
Zoloblocks ayuda a crear impresionantes sitios web basados en Gutenberg.
Slider más superior en la Era del Slider Elementor
Los únicos widgets compatibles en Elementor para cualquier blog
Crear un sitio web WordPress de comercio electrónico de última generación para empresas
Organiza tus fotos en un ángel diferente cada vez con Elementor
Impulse el compromiso y aumente las ventas con Spin Wheel.
Potente plugin AI Image Generator para WordPress por ChatGPT
¡Consigue hoy la Realidad Aumentada 360° para WooCommerce!
¡Copia y pega cualquier diseño web que te guste con sólo 2 clics!
Un tema totalmente funcional para elementor con opciones ilimitadas
Tema de bloques inteligente, limpio y flexible para Gutenberg
El plugin Dark Reader garantiza una lectura de la web respetuosa con los ojos.
Pago en una página de WooCommerce para aumentar las conversiones.
Find Nearby Stores Instantly with Sigma Store Locator
The Ultimate WordPress Media Library Organizer
Acceda a más de 100 plugins premium para WordPress con actualizaciones de por vida y soporte dedicado.
A beautiful online Christmas Tree Shop is the dream of every shop owner. If you are having trouble with the details and design. Worry no more, you’ve made it to the right place. Today, I’m going to show you how to make a Christmas Tree Shop con Elementor.
Creating a website without any prior knowledge of coding was a myth before. But now, what was impossible before, is a trend! Elementor is the most optimized website building tool globally for its drag and drop system.
For web-page building purpose, I’m going to use the Element Pack add-on. This is a beautiful toolkit made by BDThemes to use with Elementor. Alright, time to start the engine.
Element Pack is the most optimized add-on for creating your premium website. Element Pack has a vast inventory ready to be deployed on your website. With 190+ plugins, 270+ ready to use pages, over 1800 unique blocks, Element Pack ha llegado a la posición de Top 5 en todo el mundo.
Don’t bother dragging this and that and make things more complicated. The savior of your trouble is here. Element Pack also has a lite version, totally free. So, what’s more profitable than this? Utilizar ahora.
WordPress is a free and powerful content management system worldwide for creating websites. You can download and install it easily within a couple of minutes. And, you can install Elementor from inside WordPress. Hence you need to take a couple of steps to create hosting for the Christmas tree shop.
For more knowledge, please see the article “————-”. That blog covers the whole process of hosting your shop.
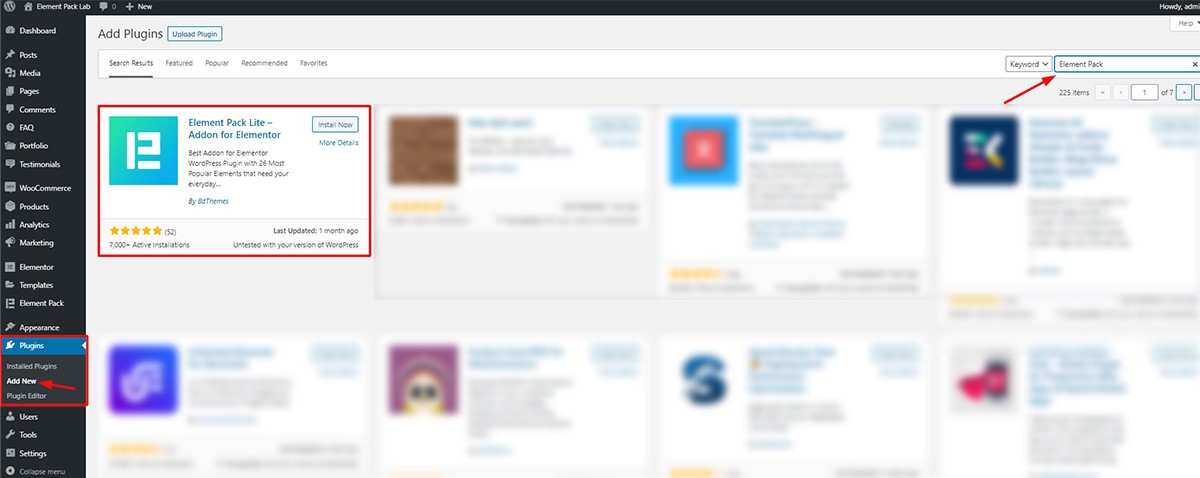
After the installation of WordPress y Elementor, Click on your shop’s dashboard and follow the instruction to install the Element Pack Lite add-on.
To go to your Dashboard, simply write down your website address and add /admin at the end.
>www.yourwebsite.com/admin
This should bring up your shop’s WordPress Dashboard. From there,
Done! Now let’s create a new page and start our work. Note That, Element Pack Lite is a ‘free to use service’ given by Element Pack Team. However, to get the best widget on the trend, you have to buy their Pro package. Though it’s cheap and reliable.
After setting all the widgets into their places, let’s pick up the pace and create a new page. Here, we will be creating our shop from scratch.
Ir a Cuadro de mandos> Páginas> Añadir nuevo
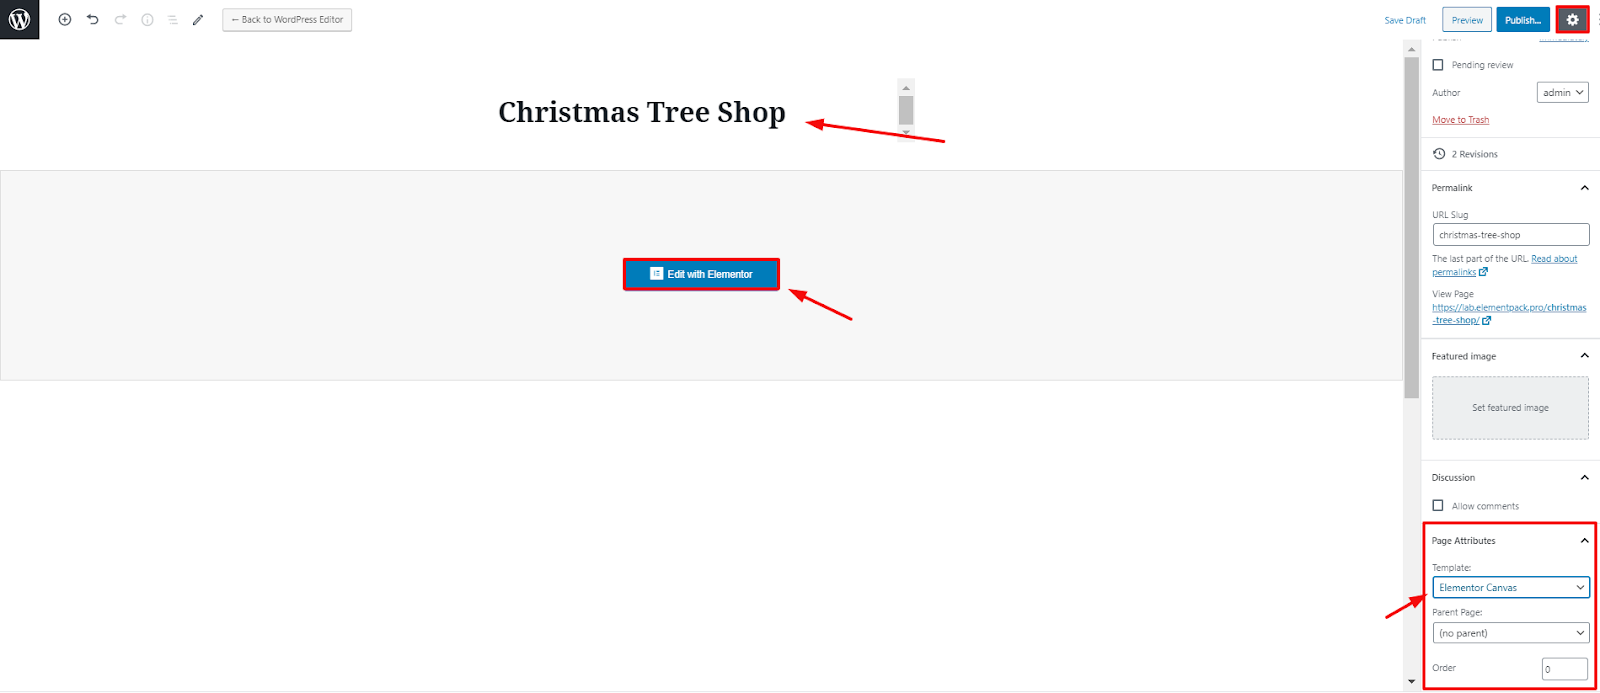
After Clicking ‘Añadir nuevo’ you will get a page like this. The bolded text on the top is the title of your shop. Click on the little square on the top right corner and you will get page settings. Change the template of your shop to Elementor Canvas. This way, it’s easy to customize from the very beginning.
Now Click on the ‘Edit with Elementor’ button and move on to the next part.
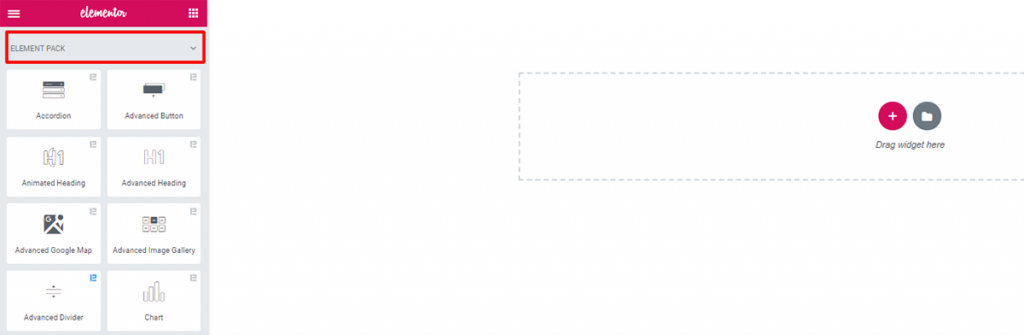
In this blank canvas, I am going to use Element Pack widgets to make the landing page. A landing page is something known as a “static page”, or a “destination page”. It’s a single page that contains all the information that the owner wants to display.
Now, before moving to the next part, here are the things you need to know about a page. These items are the core things that make your shop appearance stunning to others.
The most important part of the landing page is the hero section. It’s the first thing you will see after you go to a website. Hence, you must place the most important things like title, subscription form here.
In this part, you need to describe your main business. You can put the main features or services and their details here.
You can show examples of your work to the visitors in this part of the landing page. It’s important that you drag the interest of others to your shop with quality examples.
This part holds good reviews of your satisfied clients.
This is the last section of your landing page. As your visitor has already reached here, you need to make another offer to them. Engage their needs by directing them what to do next.
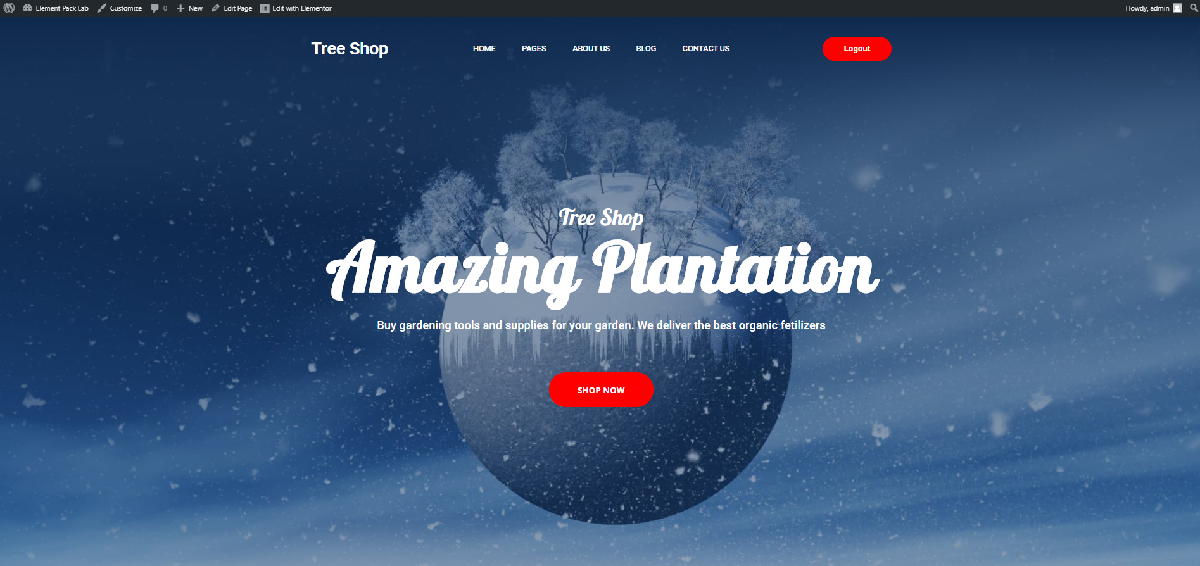
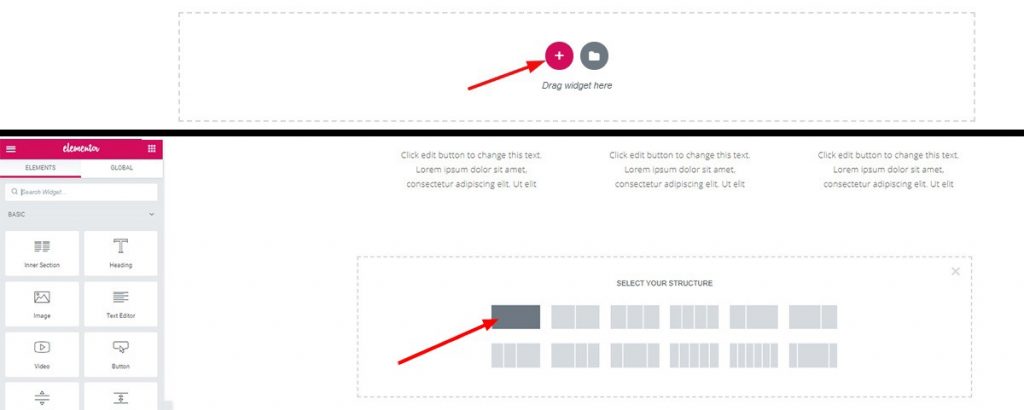
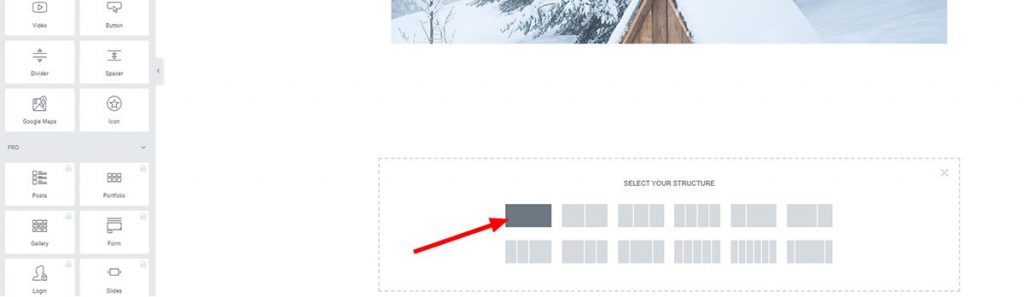
This Landing page is created with the widgets made by Element Pack. Making this type of Amazing landing page is not so easy. So, what you need now is to sit tight and watch the steps carefully. Let’s start by selecting the basic structure of the landing page.


Click on the red button and select 1 column structure.
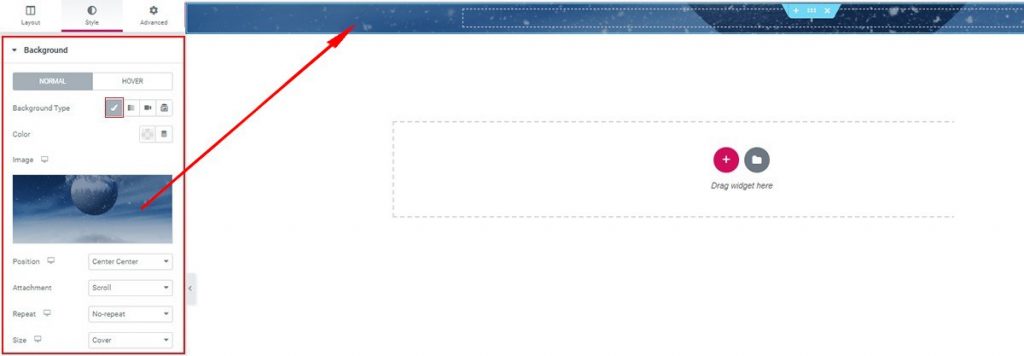
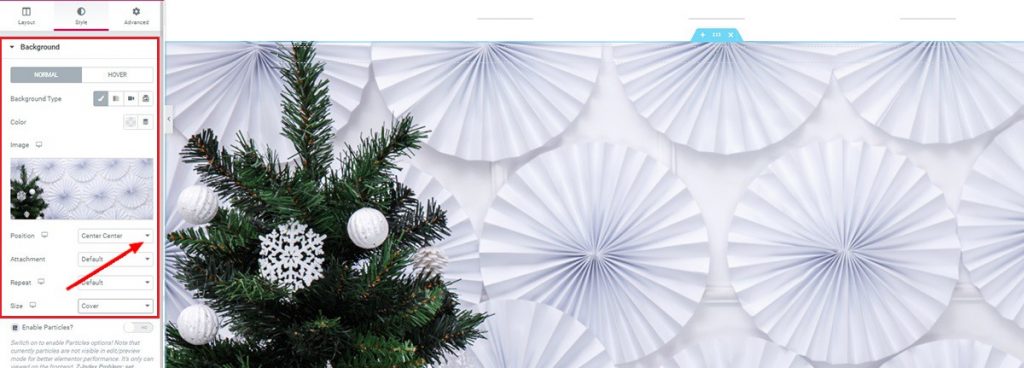
After that, go to the Style tab and put the background image on the landing page. Now, remember you need to choose the right image that goes well with your Christmas Tree Shop theme.
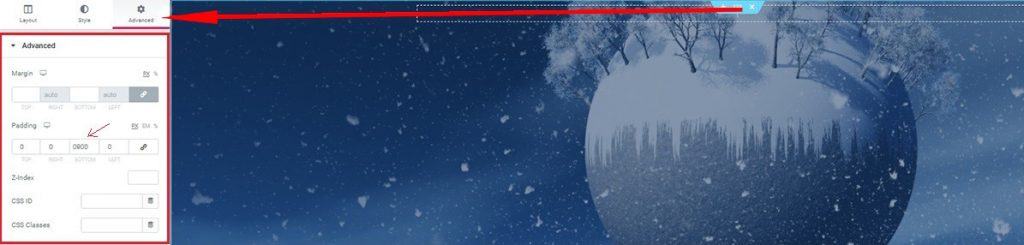
Now, go to its’ Advanced tab and edit the padding. Put 900 as the bottom padding value. This will make the section length big without affecting the Widget input area. By doing so, you can make your image appear without inconvenience.

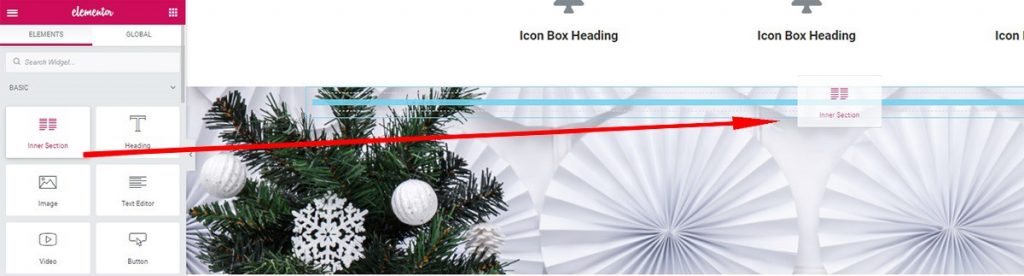
Now, add Inner Section widget from the basic Elementor toolbox. This widget makes a separate section inside the previous section. Once done, we move to the next part.
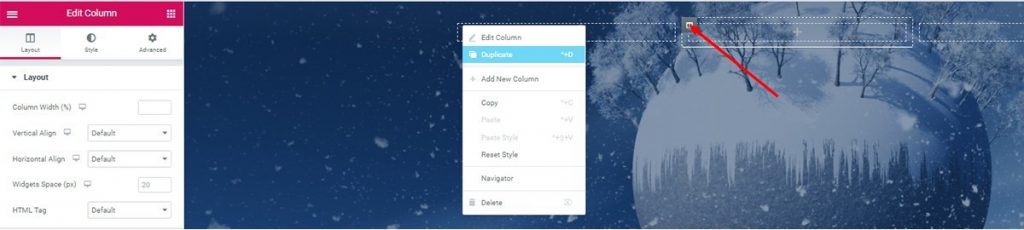
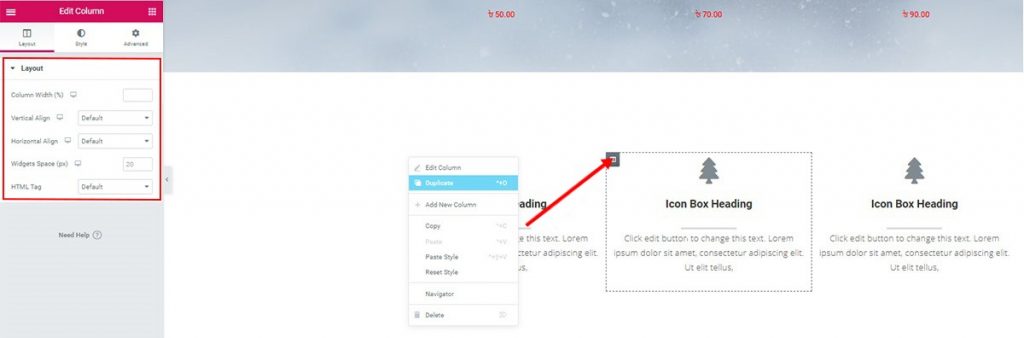
Click on the marked Columna icon and select Duplicate to make a 3 column Section.

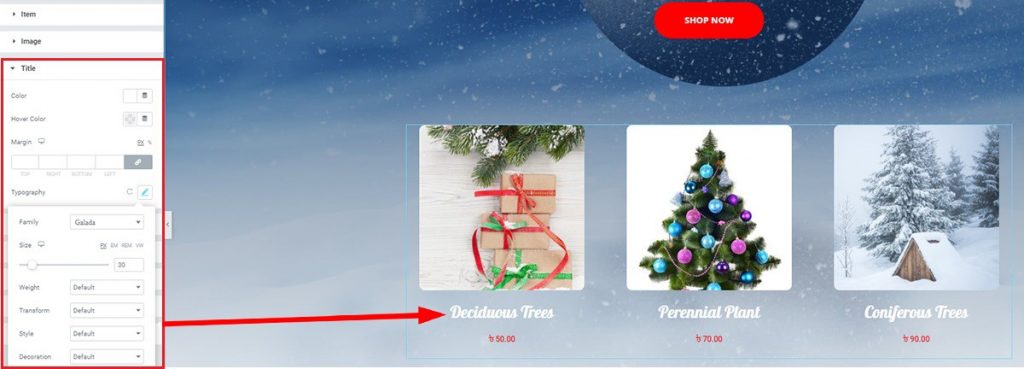
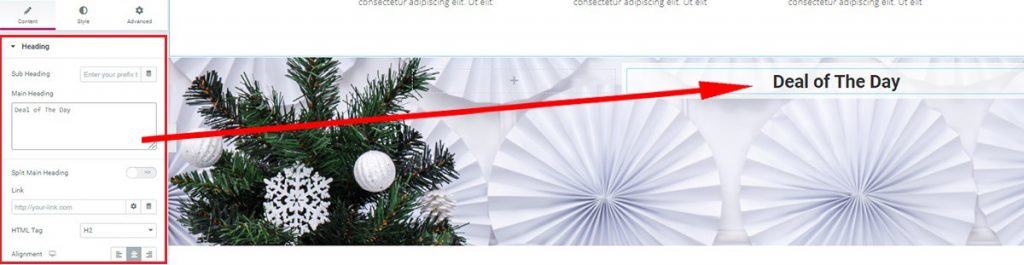
Drag and Drop ‘Advanced Heading’ widget by Element Pack on the first column. You can turn it into a cool heading for your shop.
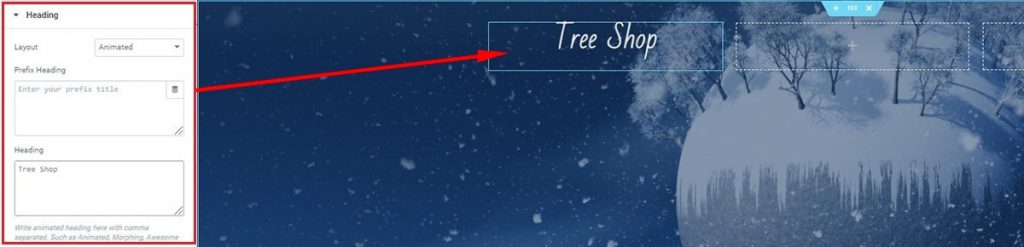
After dragging and dropping the widget, you will get to its Contenido tab. The Heading section is under the Contenido tab. Type your heading there.
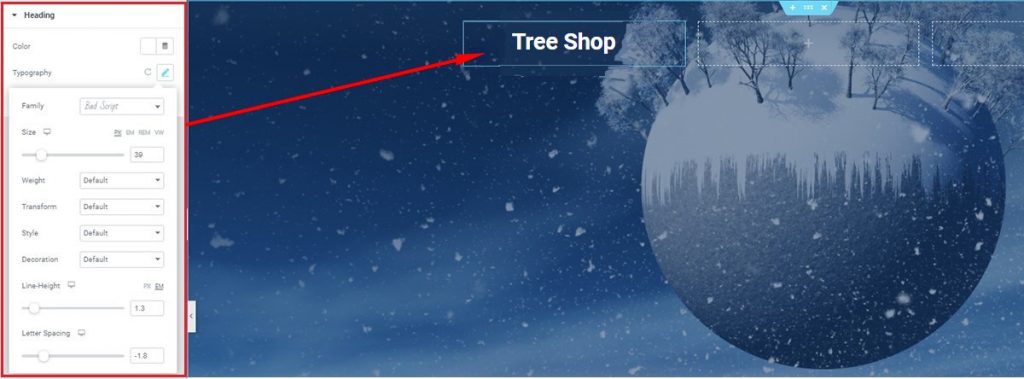
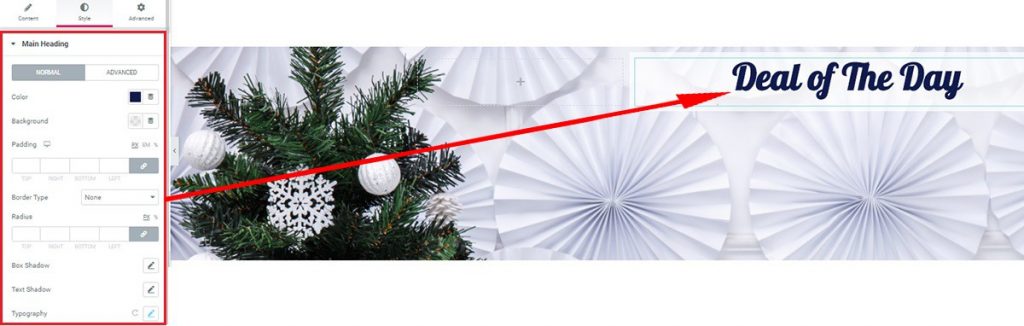
A continuación, vaya a Estilo tab> Heading> Tipografía and change the look of the title in the top section. You can find additional settings there. Try each of them and give a unique look to your title.

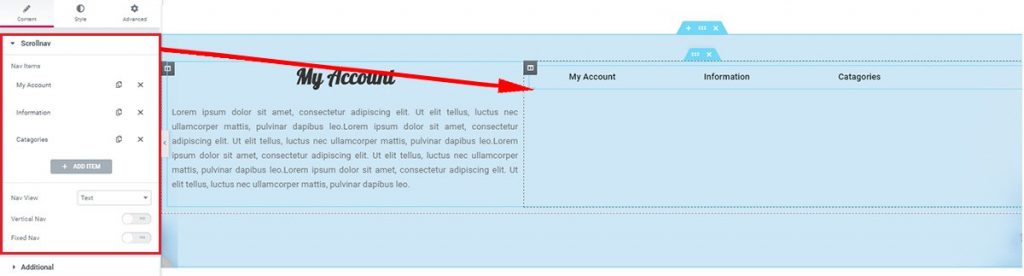
Up next, drag and drop Scroll Navigation widget on to the 2nd Column and start editing it right away. Note that, this widget, made by Element Pack, shows a menu bar for your Christmas Tree Shop.
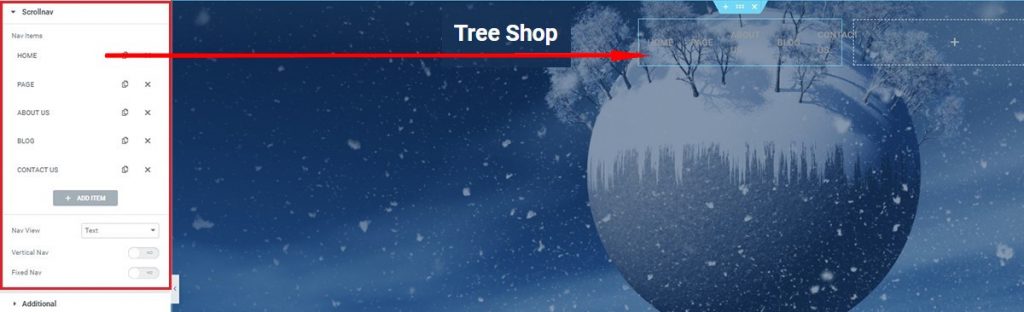
En el Contenido tab, under the Scrollnav section, you can see a bunch of repeaters that you can increase or decrease in number. Take a handful of repeaters and make your own menubar.
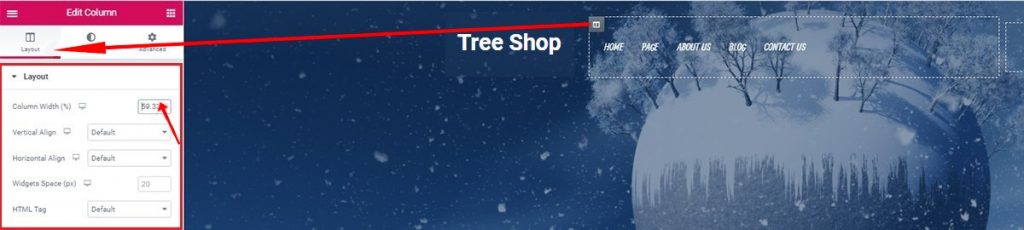
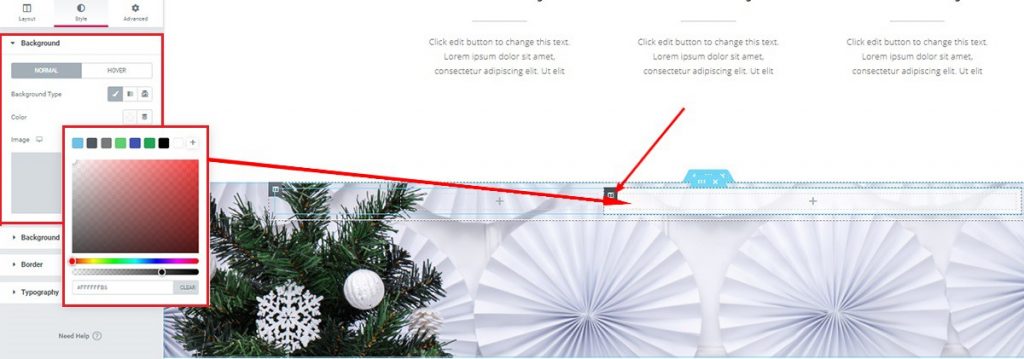
Again, click on the 2nd column icon and increase the column width close to 60. The change will give more space to arrange your Menu buttons.
Haga clic en Columna icon> Diseño> Column width.
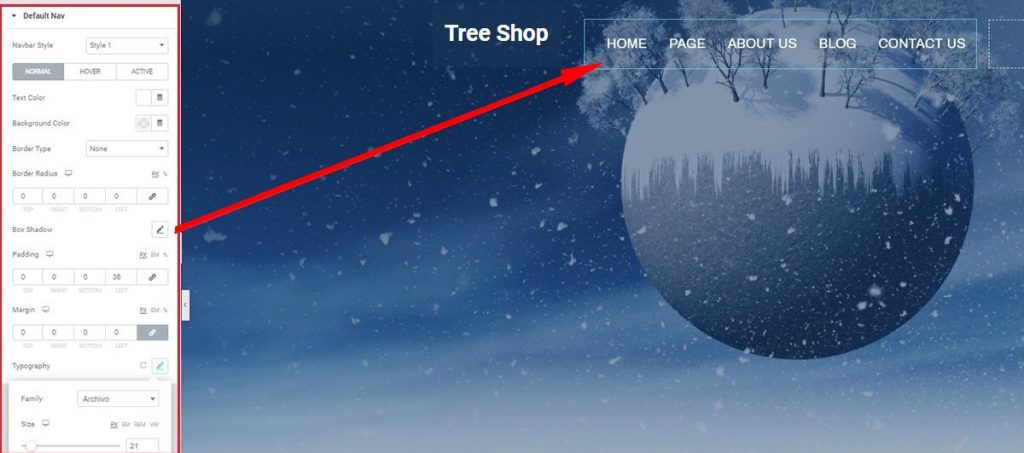
En el Estilo tab, you may change the background color, add some padding, edit the typography, and more. Bring up your own design and see the differences.
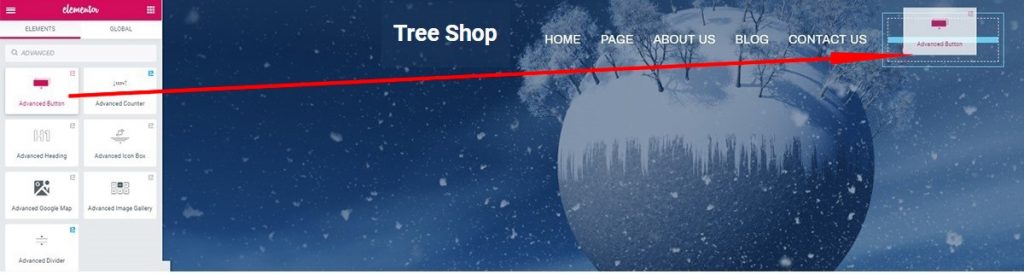
This widget is giving you a clickable button that you can link to your subscription page. It’s easy to use. Also, gives a satisfying look on your shop.
However, you can put any text to show on the button. For that,
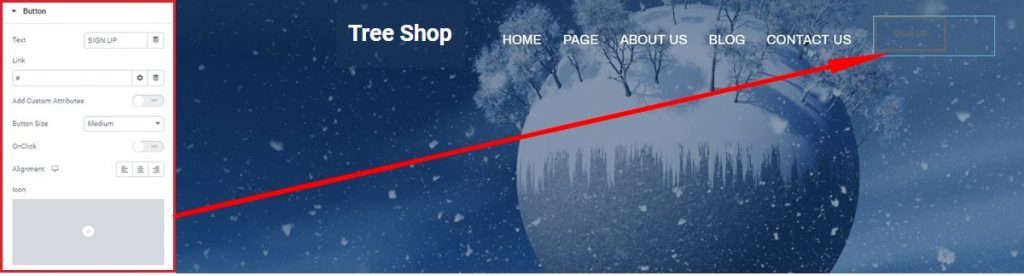
Ir a Contenido tab> Botón and see the options.
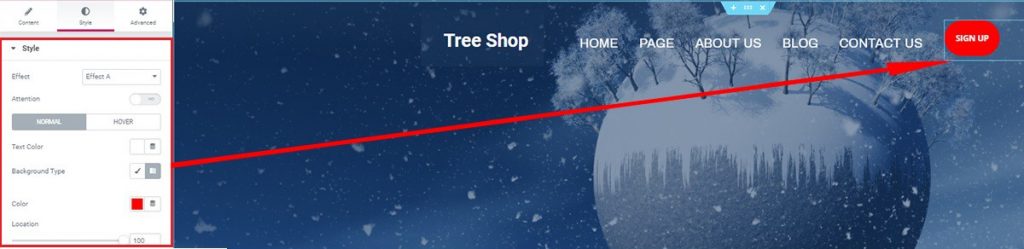
Moreover, you can also give it different looks as you like from the Estilo tab. Note that, a button that has an appealing color is very likely to be clicked by everyone.
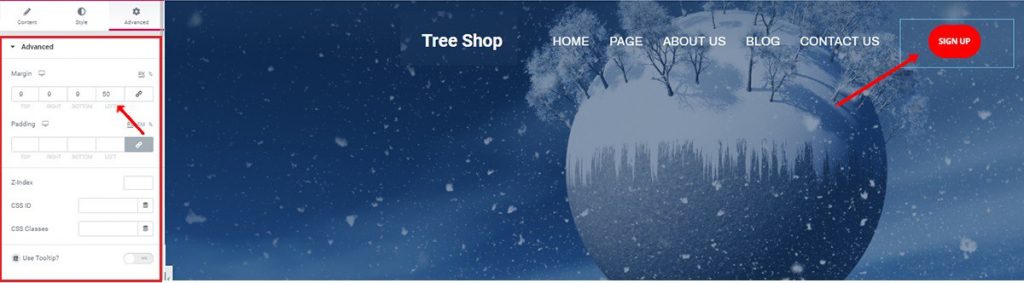
And lastly, add some margin values to position the button wherever it suits best.
Ir a Avanzado tab> Avanzado section> Margen.
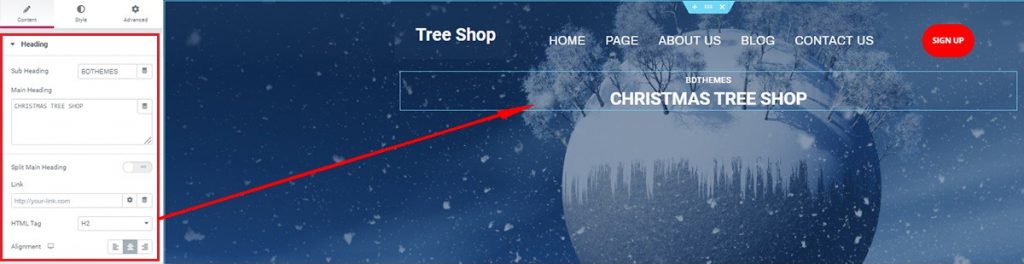
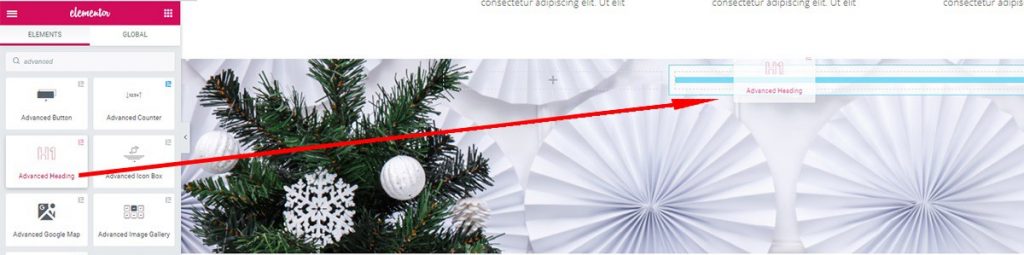
Let’s move on to the Rúbrica avanzada widget. It’s a pretty handy widget compare to the free one Elementor provides. After dragging and dropping it under the previous section, you will see its Contenido tab. Here, you may name boldly of your Christmas tree shop with a sub-heading and main heading.
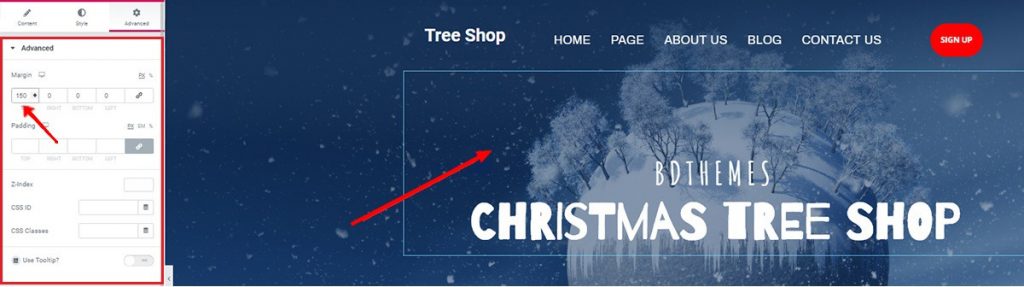
Desde el Avanzado tab, you may add some values to the margin to reposition the heading as fitting. You may notice that the Estilo tab is missing from the explanation. Well, let’s leave that to your taste.
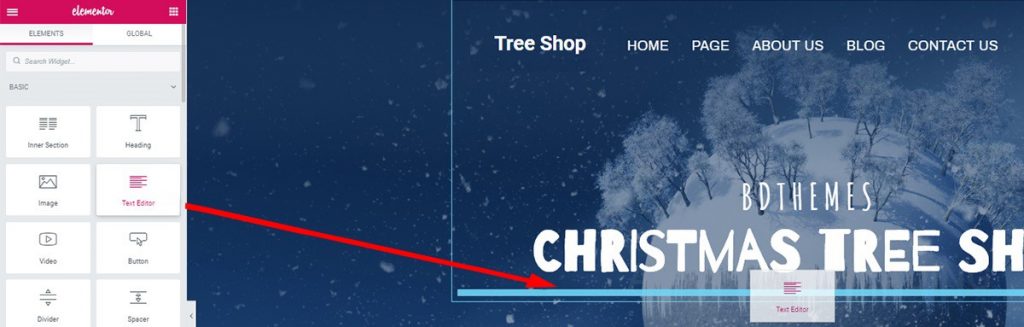
Well, you may add a line or two under the heading. This adds more weight to the hero section as it makes it more eyecatching.
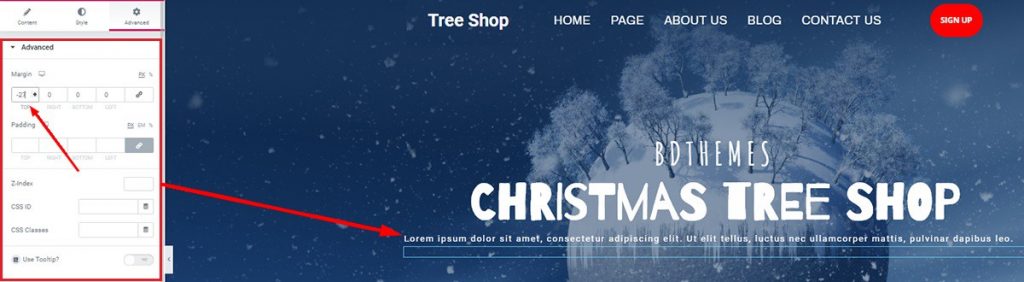
You can try adding top margin value in the negative to close it up under the heading area.
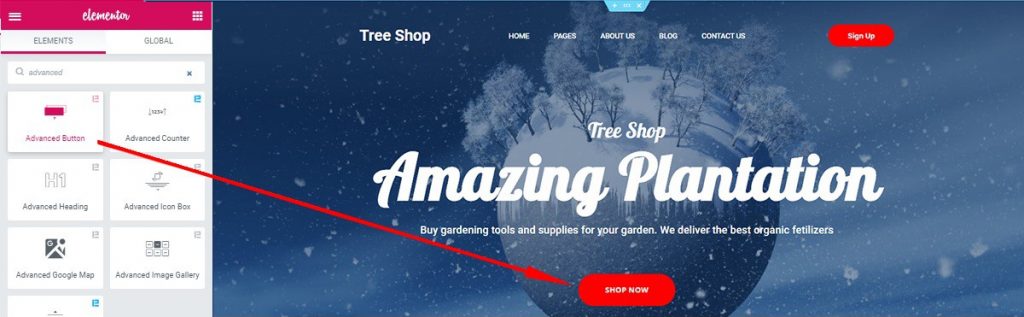
Just add another Botón avanzado widget (made by Element Pack) at the end and see the full hero section. Amazing right? You may have noticed that the heading has a different look. Well, you can change it anyway.
Ir a Rúbrica avanzada> Estilo tab> Tipografía and change it away.
These selected widgets made by Element Pack were used to make this stunning hero section.
Time to show your goods to your visitors. Let me show you how you can do this step by step.
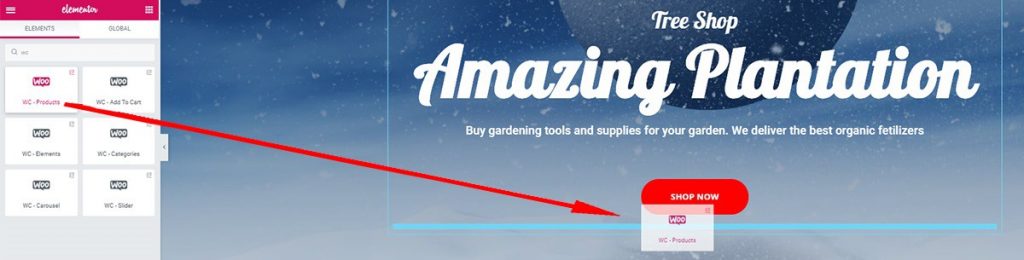
For the next step, drag and drop WooCommerce Product widget de Element Pack. It’s a 3rd party widget that is to be configured with the WooCommerce plugin on the dashboard.
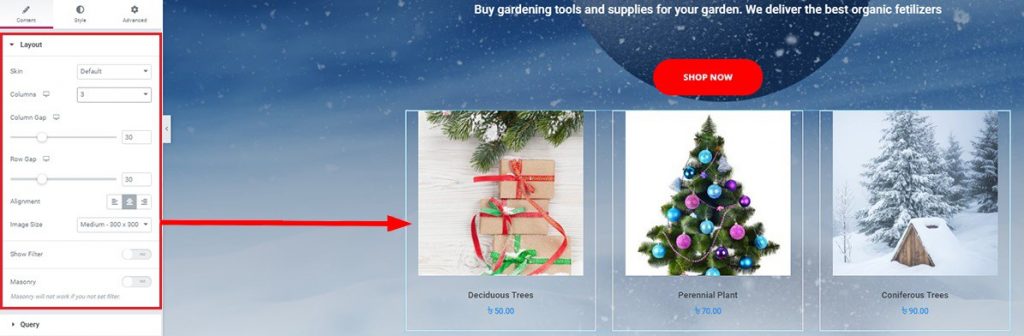
After listing your products, you can show your clients what goods you are offering. The best way to reach the customers is to showcase your product in your shop.

You can make the product images round and display at your Christmas tree shop. Convenient and looks great!
Ir a Estilo tab> Imagen> Radio del borde and change the settings.
If you want to add a twist to the product titles, just change the typography of the title from the Estilo tab. Look for the perfect font that matches the background.
In this section, you are about to show your visitors why they should buy from you. Throw in some of the features that define your shop and it will Boom the market. Let me show you how you can edit this section.

After you make another section, don’t forget to edit the padding of the section. When you finished, add the Cuadro de iconos avanzado widget. This fine widget will definitely give your shop a premium look.
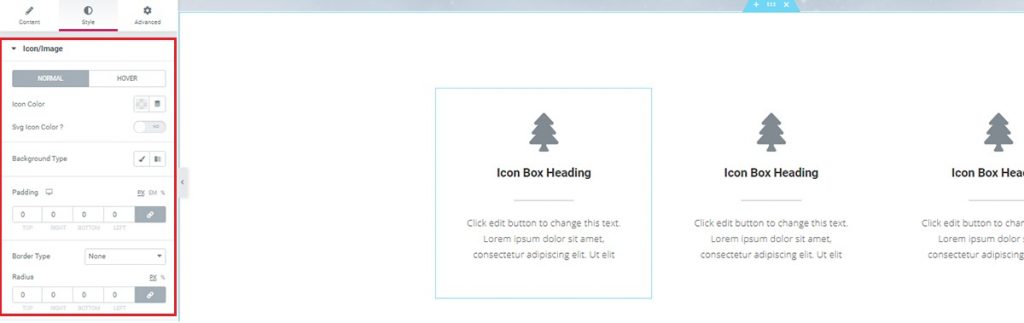
You can add any colors, edit the border, and also add paddings to adjust the height of your icon box.
Of course, you can duplicate them easily to reduce extra work. Just edit the duplicates to separate one another.
With this widget, you can give out a lot of information in a tiny package. Thanks to Element Pack for making such convenient widgets for us. Learn more about them at Demostración Element Pack.
Make your visitor stuck with ‘Cuenta atrás widget’ to the shop by throwing your best discount product on the full-scale page. As a fact, your Christmas tree shop visitors can’t resist your offer. Also, another Woocommerce Products widget to display the offer products. Let’s get into it!
Click on the red plus and make another 1 column section.

Click to edit the section and from the Avanzado tab, set the bottom padding to 250.
Set a good looking background for this section. Make sure the color-contrast is matching sequentially with the whole page.
Now drop an Inner Section widget from the drag and drop menu.
Set the 2nd column color as white from the Estilo ficha.
Now drop an Rúbrica avanzada widget on the 2nd column.
Edit your choice of heading from the Contenido tab and Estilo ficha.
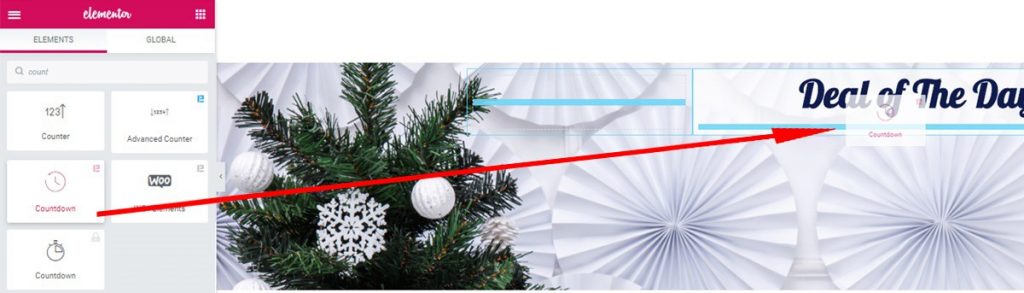
Arrastre y suelte el Cuenta atrás widget, made by Element Pack.
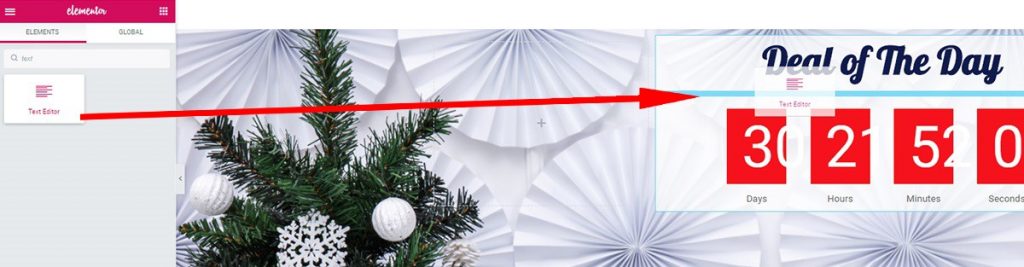
At this point, you can insert a Editor de texto widget between the heading and countdown widgets. This will give out a premium look at this section.
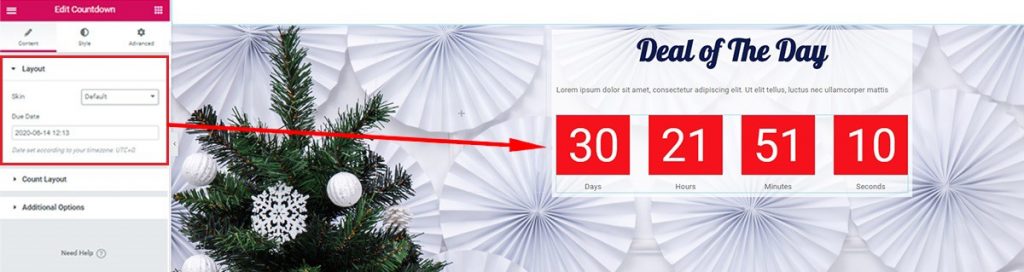

The layout under the Contenido tab shows the basic settings for the Cuenta atrás widget. You can change the background color and font of the countdown timer from the Style tab.
Ir a Estilo tab> Tipografía> and see other options.
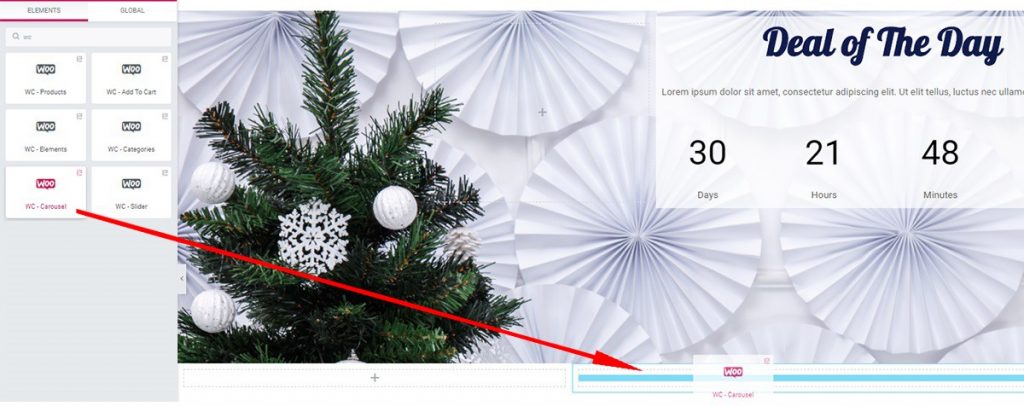
Now make another section at the bottom and drop a Carrusel WooCommerce widget into there.
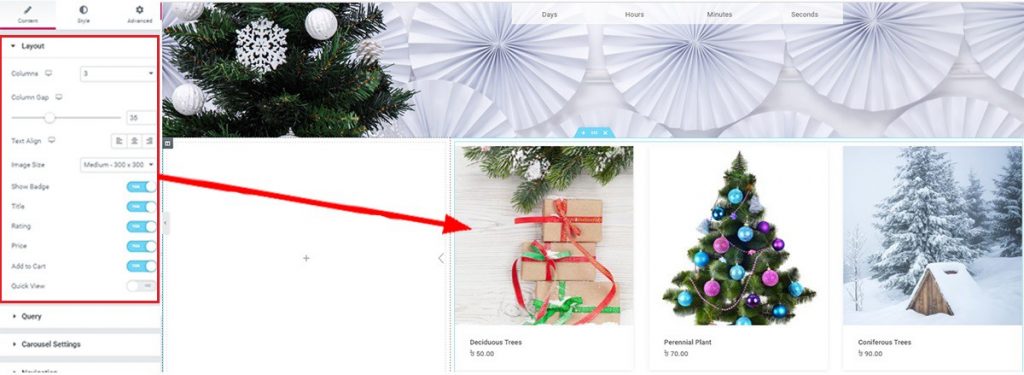
You can edit the Diseño section or Querry Section under the Contenido tab. By editing these, you can choose what products should display in this Carousel.
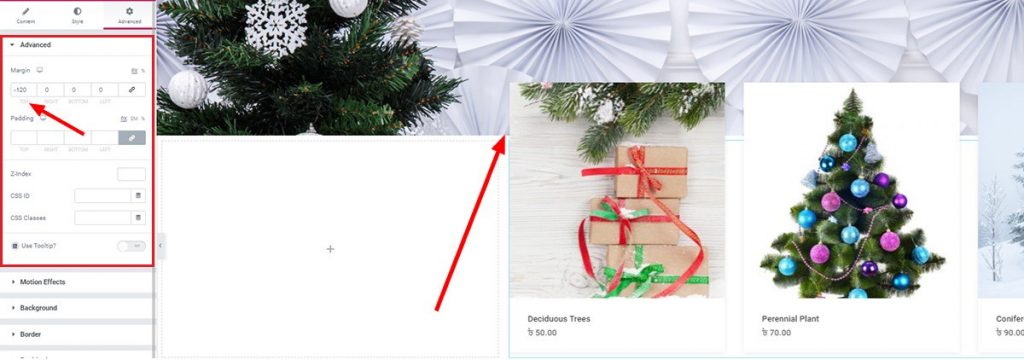
Twist things into a bit more gorgeous looking by putting negative value in the top margin. This action will toss a part of the carousel widget into the upper section. While keeping its shape over the background, it looks like a stunning finish, doesn’t it?
Alright, at this point, you have completed half of your page. Though a little bit lengthy, trust me, you will thank me after finishing this article. Take some rest and continue to the next section.
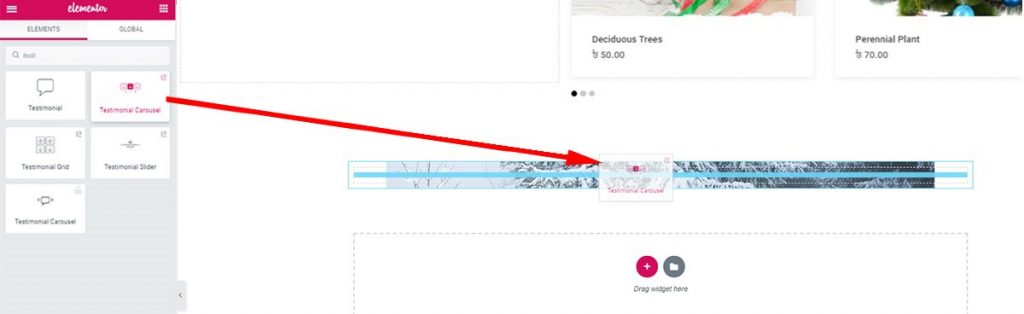
Showcase the reactions of your clients, 5-star comments, or shoutouts in this part. Make your visitor understand what you have achieved so far with your Christmas tree shop. Of course, Element Pack has an amazing widget ‘Testimonial Carousel’ to cover this up.
Making this section is easy. Just follow the steps.
At the end of the special promotion section, add a new section, and set its background with a deep color image.
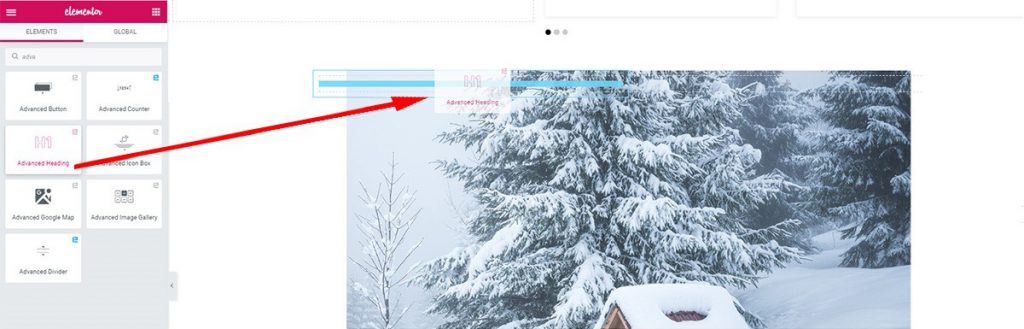
After adding some bottom padding on the section, add Inner Section widget. In the first column, add Rúbrica avanzada.
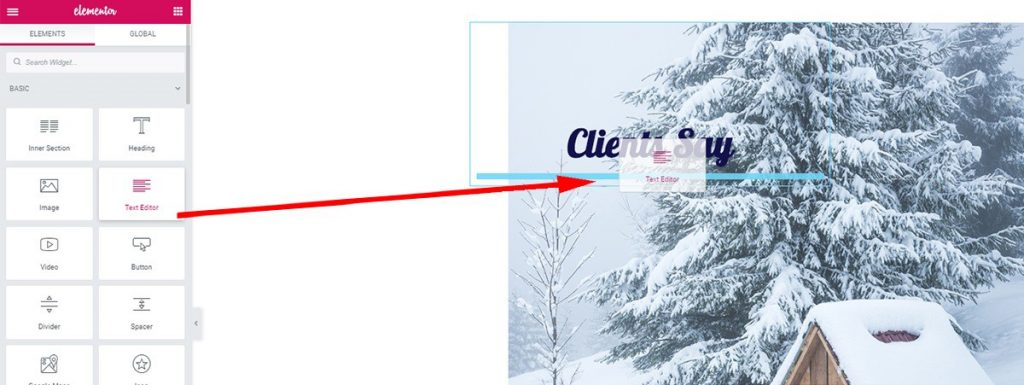
Add margin on the header column and drag-drop a Text Editor widget underneath.
Ir a Advanced Header> Avanzado> Margen> and add 150 to the top.
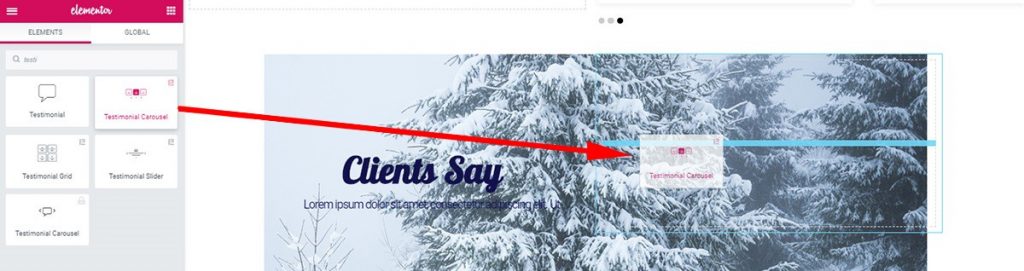
After giving the first column the look you want, move onto the next part. Drag and drop the Carrusel de testimonios widget on the 2nd column. Note that, this widget is listed as a 3rd party on the Element Pack plugin.
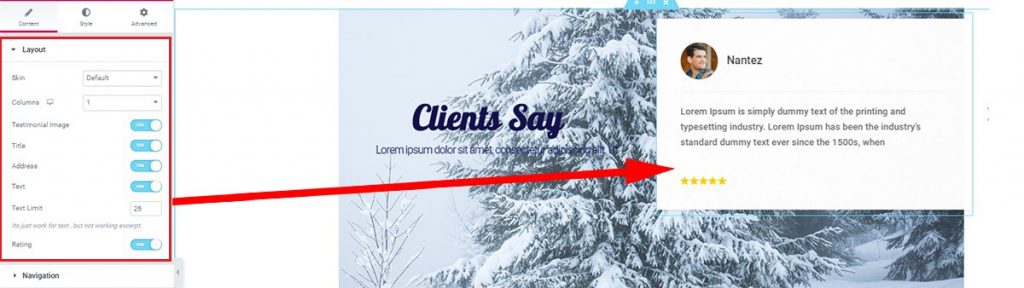
The testimonial widget will show the data presented on your website automatically. Or you can input manually from the dashboard. There’s a bunch of options in the Layout section under the Contenido tab. Make sure to check those out.
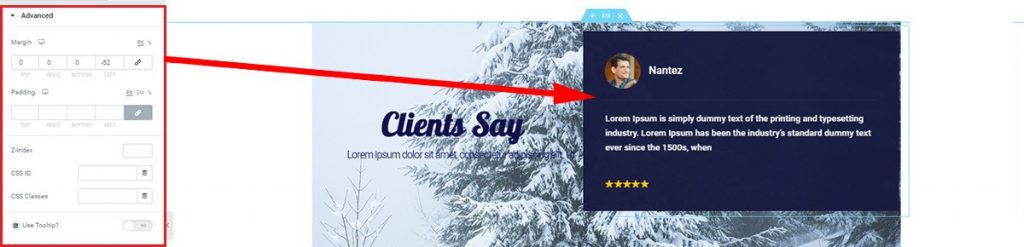
Lastly, check out the Estilo tab to give this client review box a unique look. No need to worry that much. Just match the color of your Christmas tree shop theme to this section.
Ensure your customers’ privacy and call them to action by adding this section into your Christmas tree shop. Mailchimp widget de Element Pack is used in this case. This lets your customers drop in for information and get hook up with your business. See how it’s done-
Add a new section underneath the Client Review section.
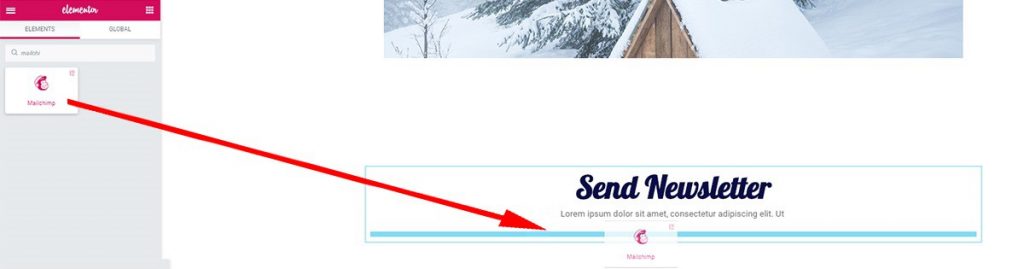
Then, add Advanced Header widget and Text Editor under it. And, lastly, add Mailchimp widget from the drag-drop menu.
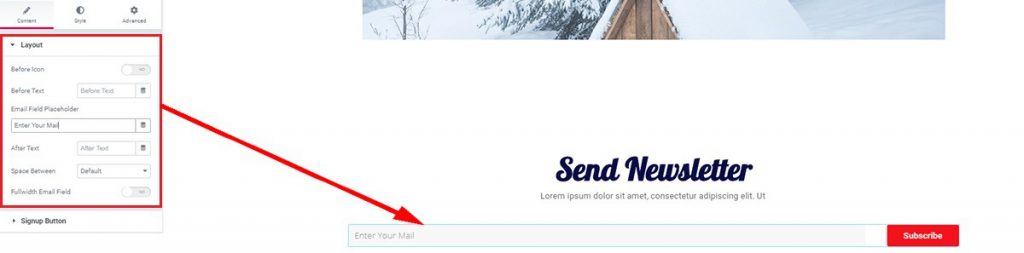
You can edit the layout inside the Contenido tab. Change the email field specifier or button text from here.
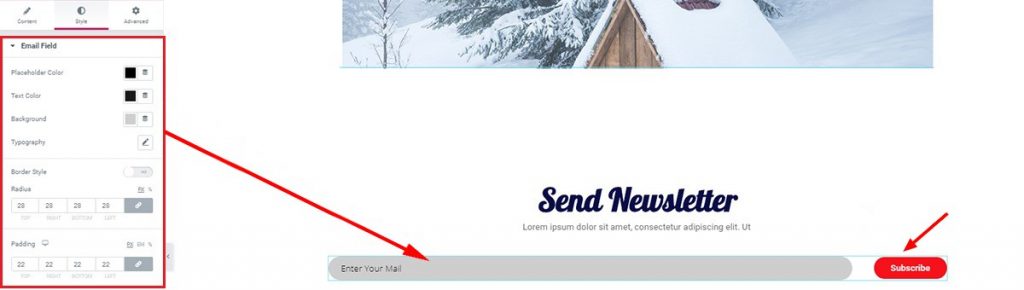
You will get more options to further customize the looks of the Mailchimp widget from the Estilo tab. Create a stylish Newsletter to attract people towards your Christmas tree shop more.
Lastly, make another call for action to your shop website visitors. Make him his own account option to lure his interest in. Also, make an additional product list, or encouraging FAQ to let them know that they desire your goods. This part is important because it creates more attraction in the end. Using widgets made by Element Pack you can achieve this easily.
Now that we have many ready templates to use as footer, I will just show you an easy way of making one. Let’s get going-

Create a new section and select a colorful background for it. Then drop an Inner Section widget from the menu. Now, insert the Scroll Navigation widget into the 2nd column. As you already know how the widgets work, I won’t be explaining this time. Take another look at the Hero Section.

Now insert Rúbrica avanzada and Text Editor widgets simultaneously on the 1st column.
And after a bit of editing, your footer should look like this.
Woah! You have made it to the very bottom of this article. Congratulations! Now that you have read the whole process, I guaranty that you can make one right now. All of your hardworking and this huge amount of focus will pay off. You can make your dream Christmas tree shop on your own now.
The Christmas Tree Shop webpage is now available as a Template on Element Pack. Grab your free template now!
Thanks for keeping patience. Enjoy a good day!
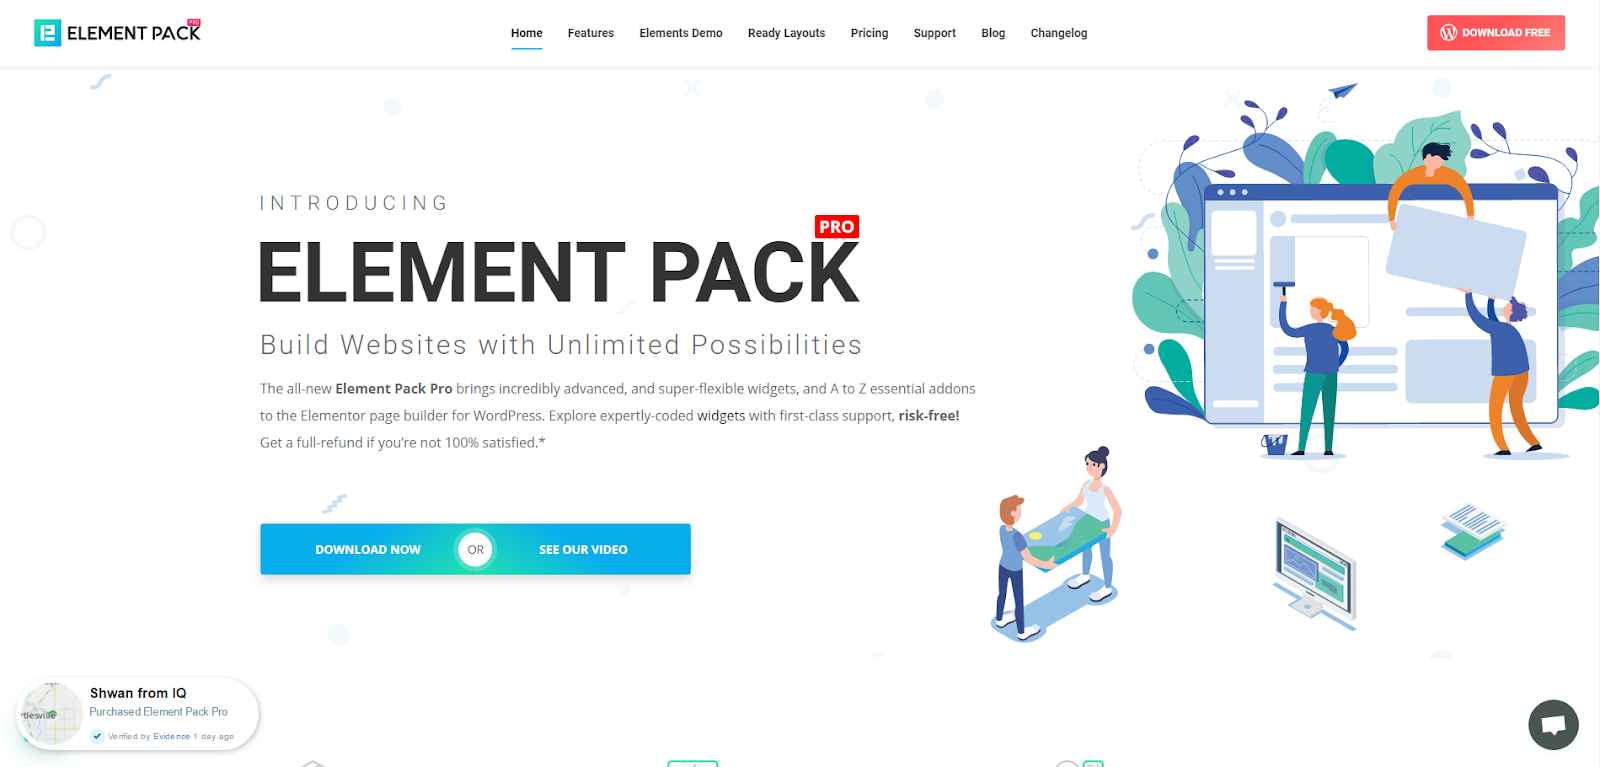
El mayor paquete de plantillas Elementor con la interfaz de usuario más fácil de usar y 300+ widgets útiles de Elementor. Cree sitios web de cero a 100% perfección en poco tiempo.
Este sitio web funciona con Element Pack Pro y Tema Rooten.
Copyright © 2026 BdThemes. Todos los derechos reservados.