Navegación sin esfuerzo con opciones de menú enriquecidas
Las opciones visuales de productos aceleran las ventas
Los contenidos personalizados se adaptan en tiempo real
Desplazamiento fluido para mejorar la experiencia del usuario
La duplicación instantánea de contenidos ahorra tiempo
Acceso rápido a potentes elementos de diseño
Las plantillas listas para usar agilizan el diseño
Campos personalizados avanzados para datos flexibles
Clonar sitios fácilmente sin complicaciones
Gráficos nítidos y escalables para todas las pantallas
Cambie el nombre de las herramientas para darles un aspecto profesional
Mostrar u ocultar contenidos con precisión
Captar la profundidad con un movimiento suave
Añade notas y anotaciones claras fácilmente
Los consejos útiles mejoran la interacción con el usuario
Anime elementos con estilo
Mantenga siempre visibles las secciones importantes
Control total con ajustes de código personalizados
Optimizar archivos para aumentar la velocidad del sitio
Plantillas de página elaboradas para ayudarle a empezar con su página de aterrizaje con sólo soltar un diseño inicial
Ready Blocks incluye una gran variedad de diseños y elementos de diseño, como encabezados, pies de página, widgets, etc.
Encabezados prediseñados con estilos lucrativos que se adaptan a varios nichos de sitios web y gustos de diseño.
Una útil colección de diseños de pie de página que te ayudarán a crear un pie de página atractivo al instante en tu página de aterrizaje.
Encuéntrenos 24 horas al día, 7 días a la semana, a su servicio. Estaremos encantados de ayudarle.
Guías detalladas disponibles para cada característica en BdThemes
Aprenda algo nuevo, manténgase informado sobre WordPress, diseño web y mucho más
He aquí algunos de los hitos clave de mi desarrollo:
Aprenda a utilizar los productos, consejos y trucos de WordPress con nuestros vídeos
Gana sustanciosas comisiones uniéndote a nosotros en la promoción
Widget Idea Share es una gran manera de encontrar widgets similares que puedes mejorar.
Por supuesto. Si necesita ponerse en contacto con nosotros, no dude en hacerlo.
Cree cualquier formulario de WordPress en cuestión de minutos con Sigma Forms.
Plugin constructor de páginas Coming Soon & Maintenance Mode
Facilite el acceso a los sitios web con One Accessibility
Muestre testimonios de clientes para aumentar la confianza y la credibilidad.
Zoloblocks ayuda a crear impresionantes sitios web basados en Gutenberg.
Slider más superior en la Era del Slider Elementor
Los únicos widgets compatibles en Elementor para cualquier blog
Crear un sitio web WordPress de comercio electrónico de última generación para empresas
Organiza tus fotos en un ángel diferente cada vez con Elementor
Impulse el compromiso y aumente las ventas con Spin Wheel.
Potente plugin AI Image Generator para WordPress por ChatGPT
¡Consigue hoy la Realidad Aumentada 360° para WooCommerce!
¡Copia y pega cualquier diseño web que te guste con sólo 2 clics!
Un tema totalmente funcional para elementor con opciones ilimitadas
Tema de bloques inteligente, limpio y flexible para Gutenberg
El plugin Dark Reader garantiza una lectura de la web respetuosa con los ojos.
Pago en una página de WooCommerce para aumentar las conversiones.
Find Nearby Stores Instantly with Sigma Store Locator
The Ultimate WordPress Media Library Organizer
Acceda a más de 100 plugins premium para WordPress con actualizaciones de por vida y soporte dedicado.
We know you’re looking to inaugurate a WooCommerce Website and start trading products over the Internet, aren’t you? It is a little bit a daunting task but not impossible. In this post, we’re going to show you actual steps to help you to build WooCommerce Website using Elementor and Element Pack.
This kind of website is a combination of some tools such as Elementor, WooCommerce, and a suited theme (recommended Tema Rooten). If these tools are new, you might look them up.
Let’s move on and see.
We’re going to show you step by step how to create WooCommerce Website using Elementor and Element Pack.
Step-1: To begin with, you’ve to make sure that you have an installed WordPress CMS (Content Management System).
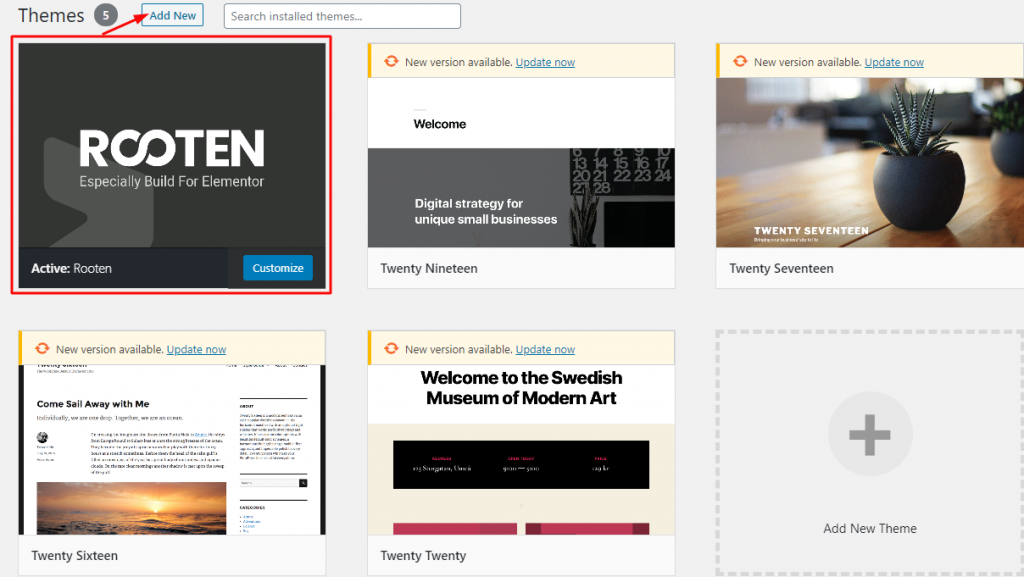
Most importantly here, you will have to install a theme first and then activate. And to do that go to Panel de WordPress > Apariencia > Tema > Añadir nuevo.
Step-2: In this step, you must install and activate the Elementor a page builder Plugin.

Simply go to WordPress Cuadro de mandos a Plugins > Añadir nuevo > search Elementor in the search box > then hit Instale y activar.
If done, you’ll find the plugin exactly left side in the panel of the dashboard.
Step-3: This step will let you install and activate the WooCommerce plugin. Remember, this plugin will be one of your main tools.
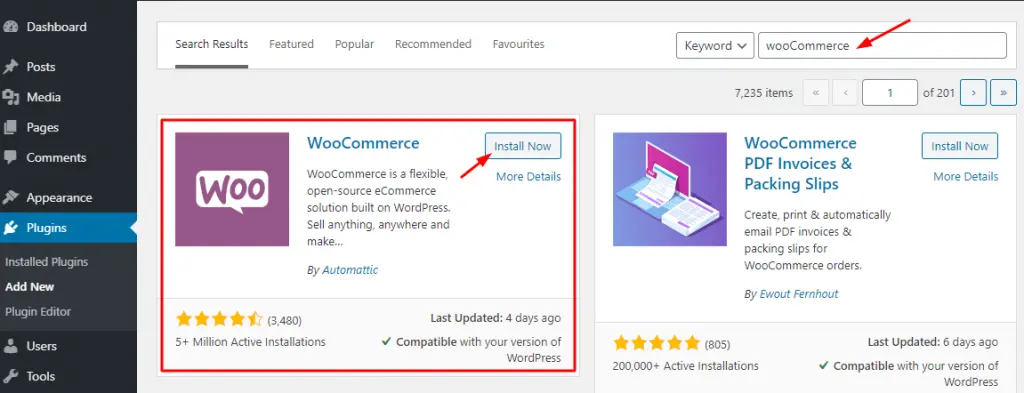
Just go to WordPress Cuadro de mandos a Plugins > Añadir nuevo > search WooCommerce in the search box > then hit Instale y activar.
Furthermore, you have to go through a few more options namely:
i. Providing Basic Information
ii. Setting up Payment Gateways
iii. Shipping Configuration
iv. Connecting WooCommerce with Jetpack
v. Finalize the setup of WC
To do all these things, visit elementor.com
Is this enough? Quite enough but we’ve to go a little forward.
Adding Products With WooCommerce
Products menu will allow you to add the products you want to populate and sell.
Step-1: Here you can add your product items with Categorías, Tagsy Attributes. Just go to Productos > Añadir nuevo. Every time you have to add products in this way.
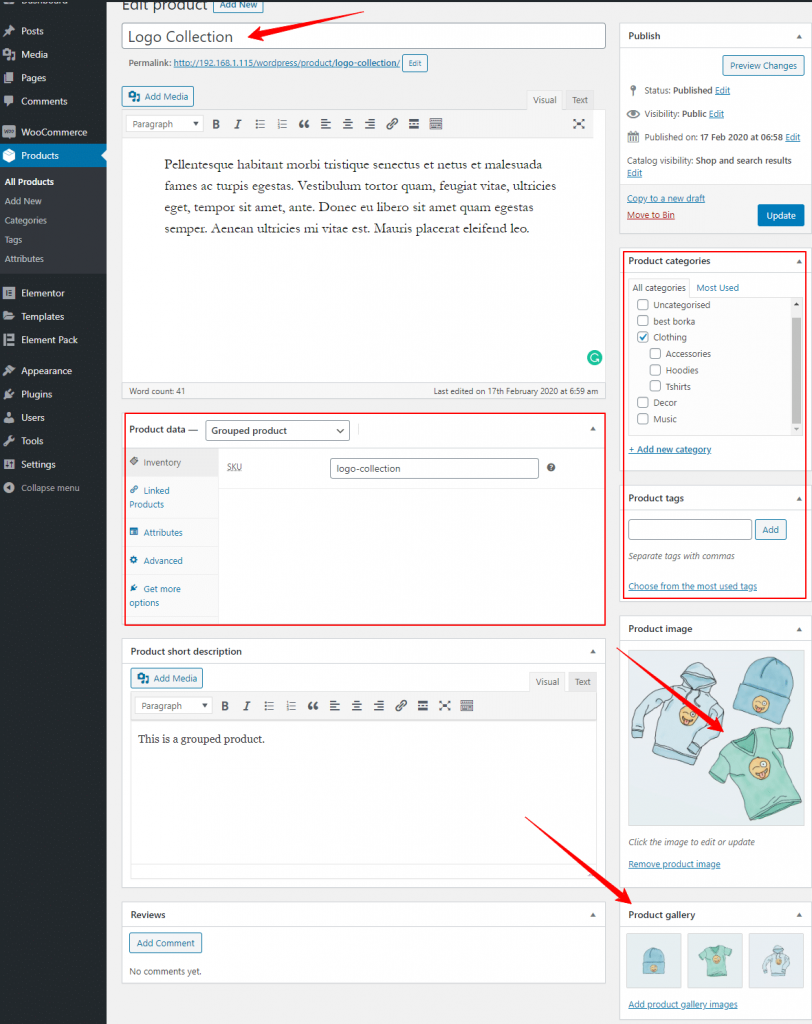
One more thing is to do that you can set Product data, short description. Look at the screenshot above carefully.
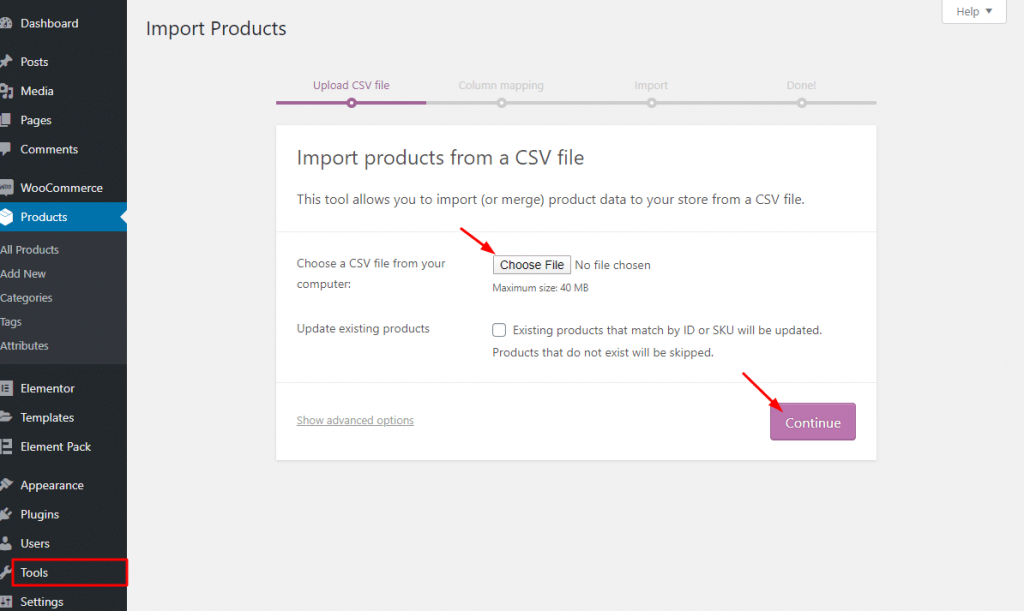
step-2: If you want you can show sample_products data in CSV/XML file provided by WooCommerce. Simply go to Herramientas > Importar > Productos WooCommerce(CSV)> then hit on the Ejecutar importador. You can do this only for demo purposes.
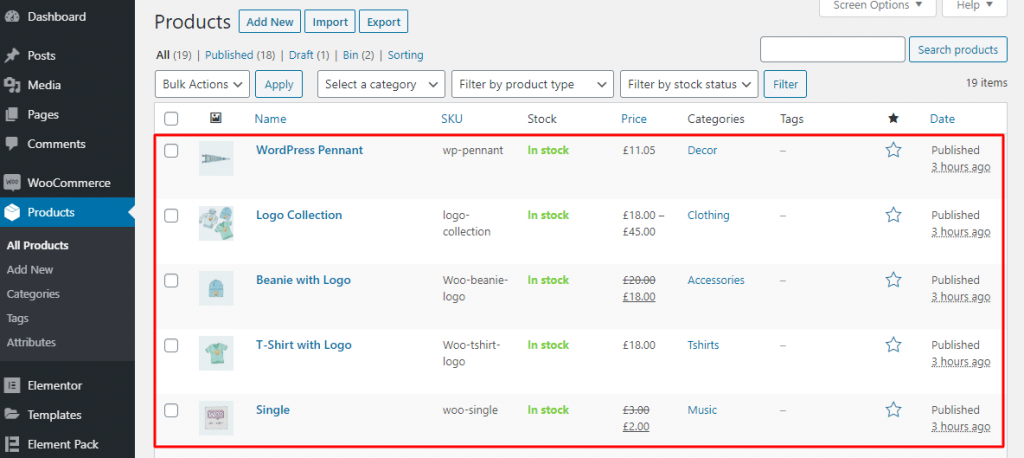
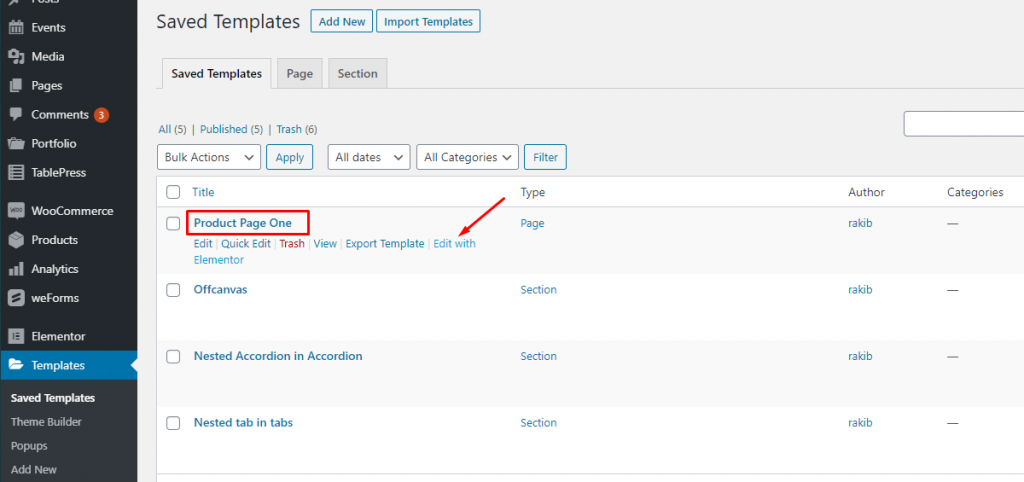
Step-3: After adding products, from the Productos > Añadir nuevo and saving, you can find your products in the list under as you can see.
It is very certain that you can also customize the look and feel of your products with Elementor. There is a little trick I wanna suggest you allow a plugin Element Pack to get a better look and feel of products. Yeah, these two plugins integrate with WooCommerce.
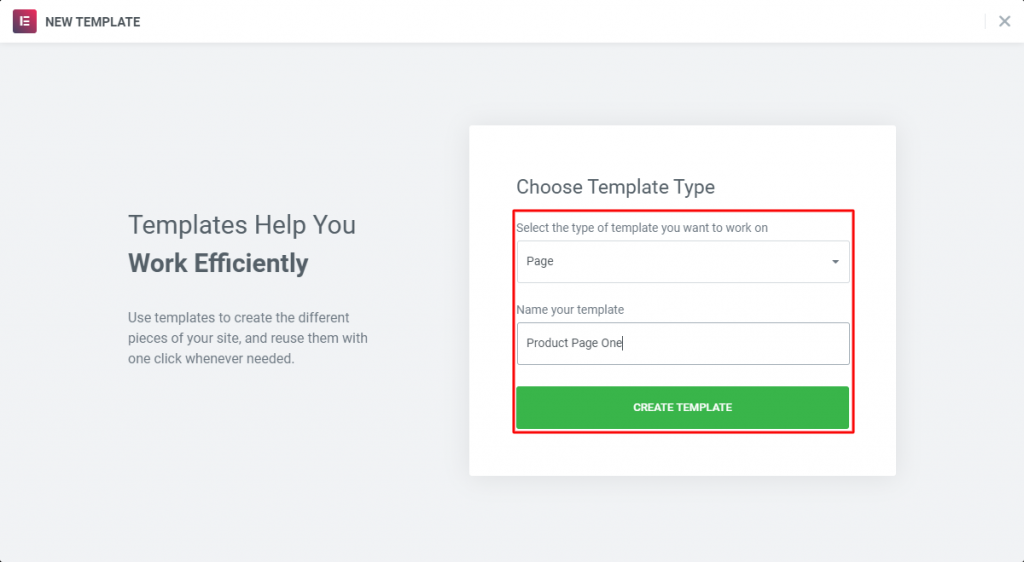
Step-1: To create a new product template, simply go to Plantillas > Añadir nuevo.
After creating a template and publishing, you’ve to open it in Elementor. After that, you’ll find a variety of widgets for WooCommerce.
With the default Widgets of Elementor (Free/ Premium), if you install Element Pack, you’ll find more widgets to create your products page. See the photo below.
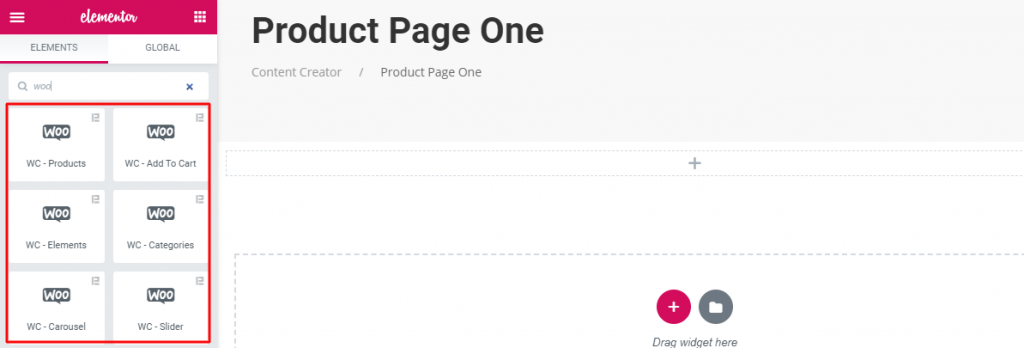
This plugin has some very strong widgets including WC-Products, WC-Add To Cart, WC-Categories, WC-Slider, WC-Elements, WC-Carousely WC-Mini Cart that will give you supports in the terms of showing products and services for WooCommerce.
Step-2: In this step, I’ll show you how to use Widgets of Element Pack for WooCommerce.
First, drag and drop any widget (mentioned above).
Disposición:
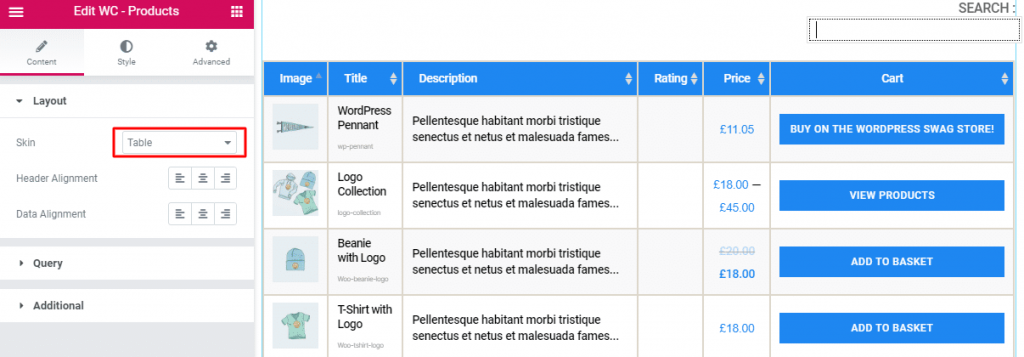
This widget in the Layout section will allow you to show your products grid-wise and table-wise by the Skin controls.
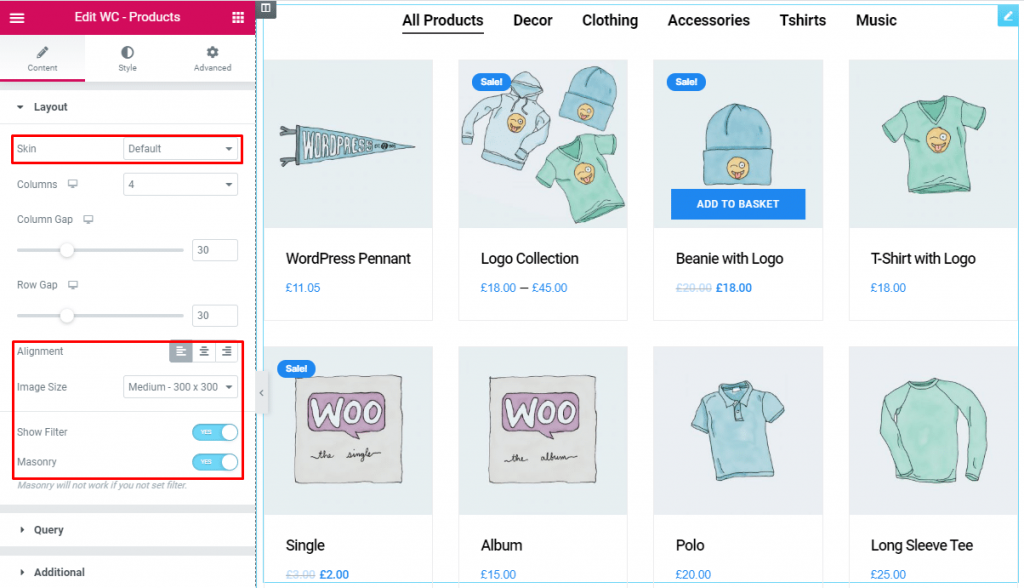
Moreover, in this section, you can set the product image size and product filtering with masonry.
Simply, go to Diseño > Piel(default/table) > Alineación> Tamaño de la imagen > Show Filter > Albañilería.
This section works for setting the source location of data that you need to display by the reference like Author, Categorías, Tagsy Formats. The references can be different in accordance with the source location. Seguir leyendo
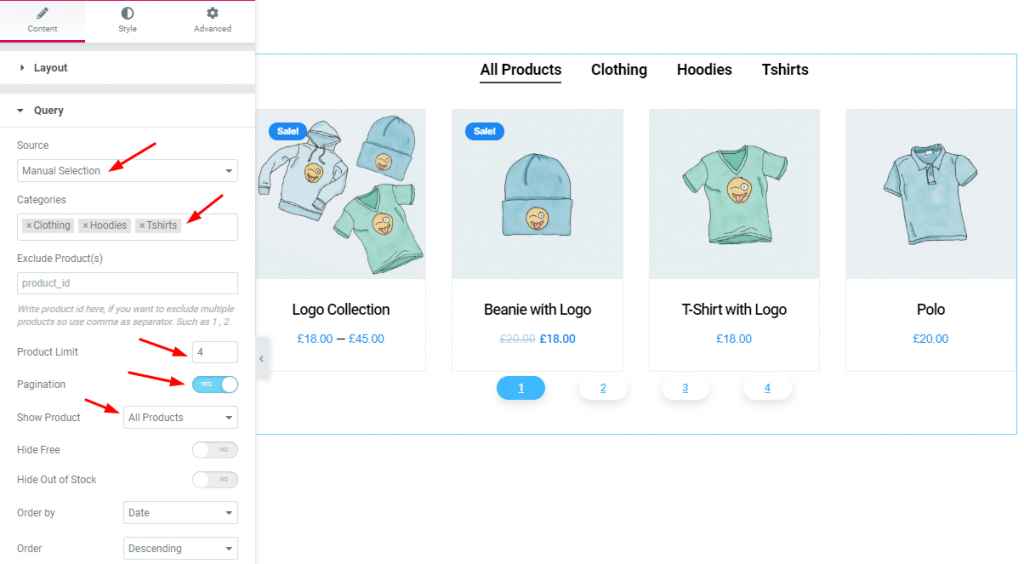
Ir a Consulta > Fuente (Show All / Manual Selection) > Show Product (All products/ On Sale/ Featured).
Most importantly, you can set Pagination y Product Limit and you can show product id-wise de Exclude Product(s).
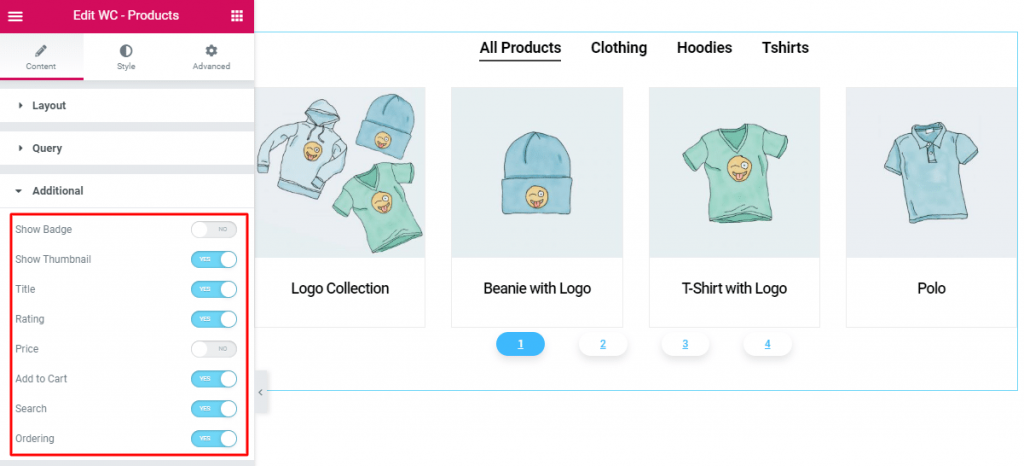
From this section, you have a chance to manipulate the Badge, Thumbnail, Título, Rating, Precio, Add to Cart, Buscar en, Ordering of the products. Just work with Yes/NO switcher button.
Estamos llevando a cabo un programa de regalos para nuestros queridos consumidores y suscriptores que están conectados a nuestro sitio web oficial BDthemes.com
Visite Element Pack o Prime Slider y comparte con nosotros tus opiniones. Los afortunados ganadores recibirán una licencia vitalicia por valor de $100. Participar sólo te llevará un minuto.
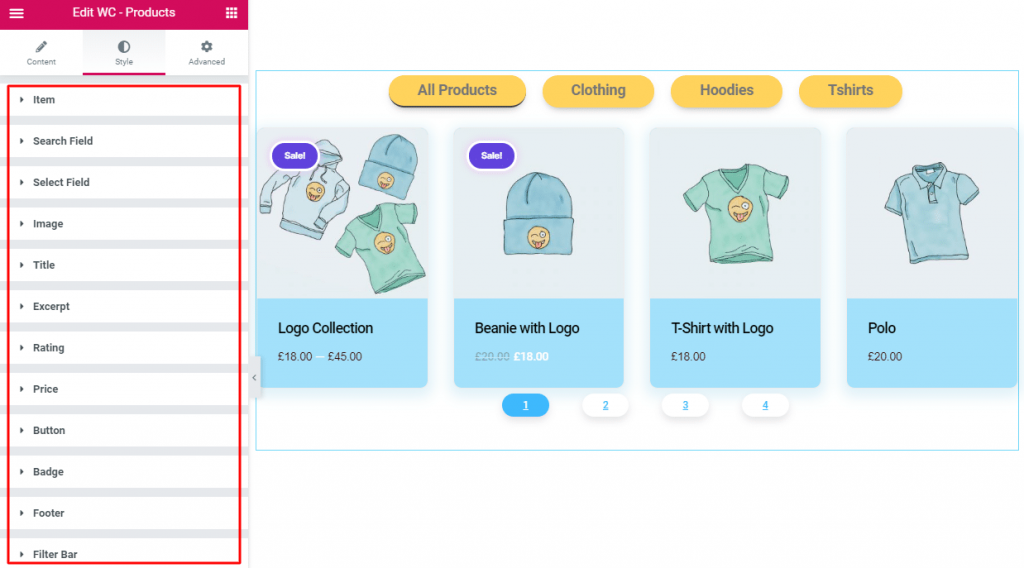
For styling, you will have to Style Tab and give style as you can see the below screenshot. Here, you’ll be able to style the content section by section such as Item, Search Field, Select Field, Imagen, Título, Excerpt, Rating, Precio, Botón, Badge, Pie de página, Filter Bar.
Along with WC-Products widget, you will find 6 more widgets in the Element Pack plugin as I’ve mentioned above. Using the widgets, you will be able to display your products for sale.
Here, I’ll explain each and every menu item one by one so you know exactly what’s going on there.
This one will show the current status of orders at your shop. You will see here are the numbers and type of items sold, and to whom.
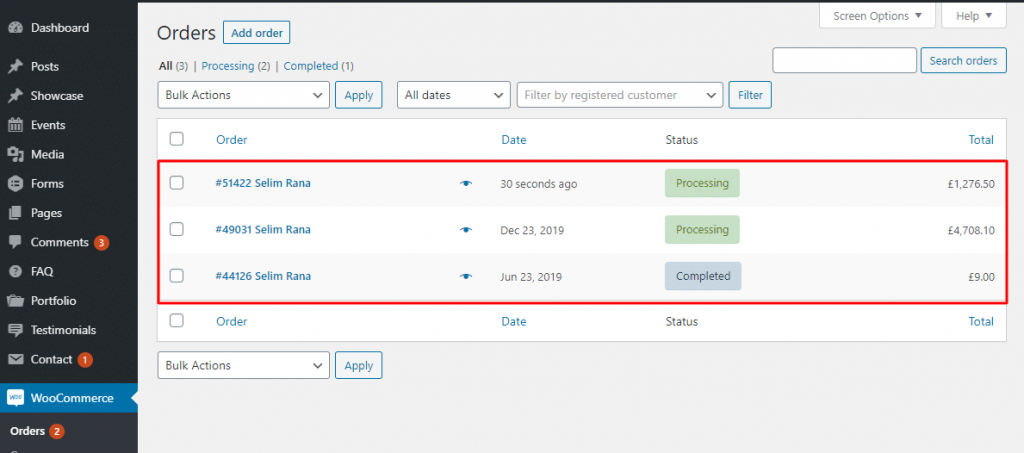
In addition, you will experience many different statuses (pending payment, on hold, refunded, failed canceled, etc.). You can click on each order to modify billing or shipping addresses, add notes, refund order, change the contents of the order, and more.
We think it is a very familiar concept to you. Here, you can create and manage discount codes.
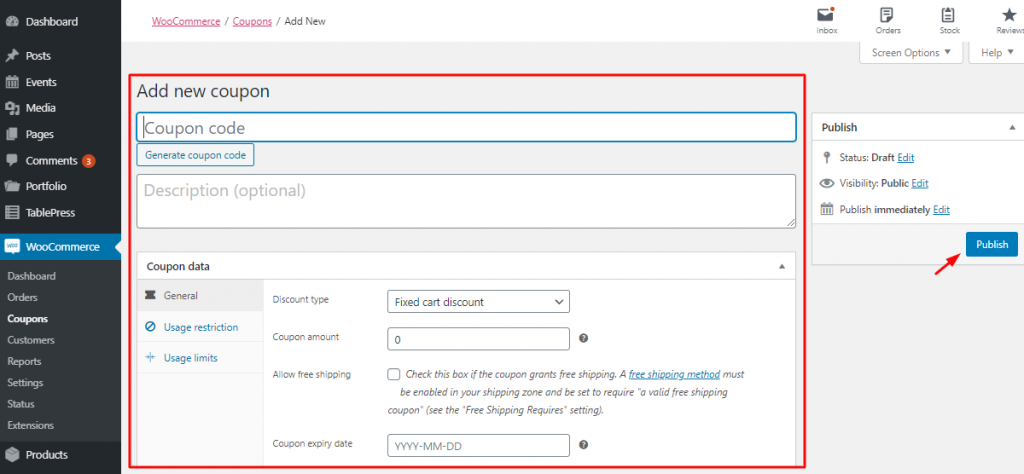
Especially, you can handle coupons expiry date and usage restrictions and limits on how many coupons are available to be used overall or per customer.
This section will inform you of the detailed summaries of every aspect of your shop.
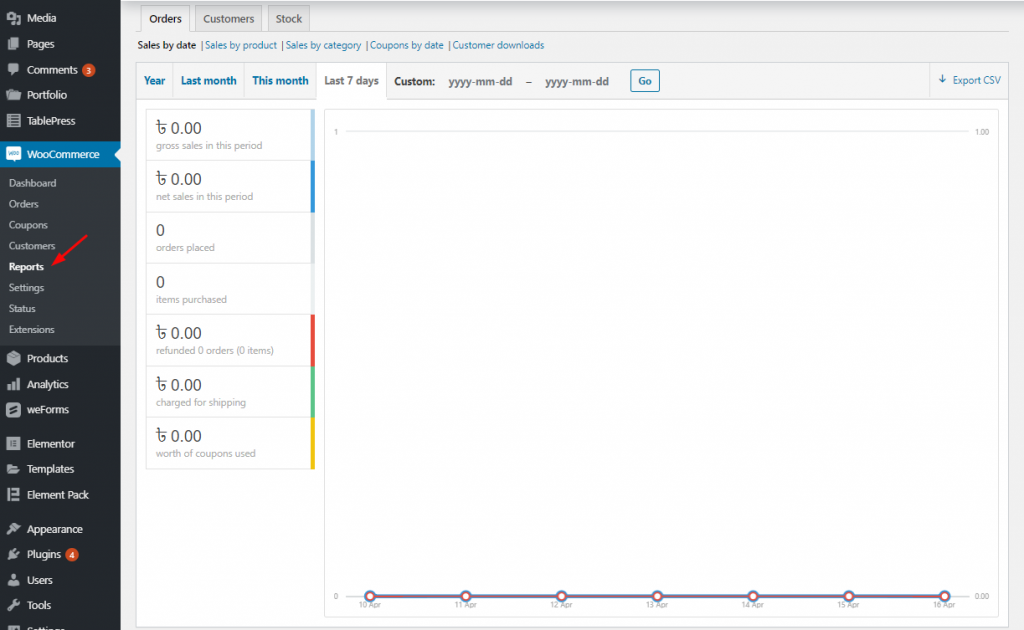
This includes orders placed, items purchased, refunds, issued, shipping costs collected and coupons used and it also holds gross and net sales of the last 7 days, months, year or custom time frame.
Moreover, along with sales by product, categories, coupons used or customer downloads, you may find detailed information on customers, taxes, and stock.
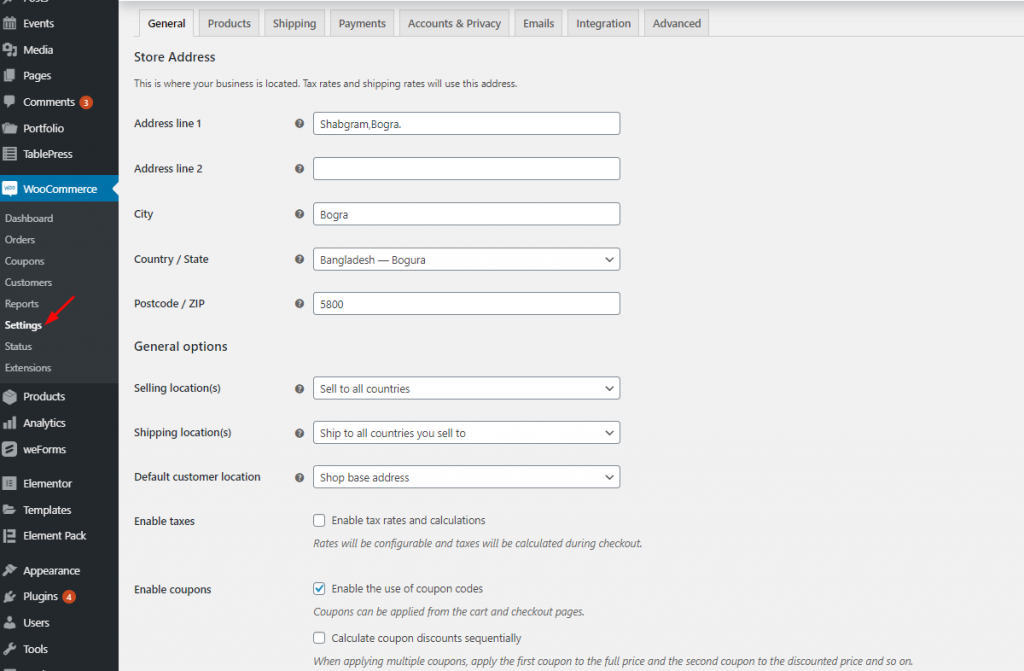
If you gotta control everything in your online e-shop. It has a lot of configuration options to help you.
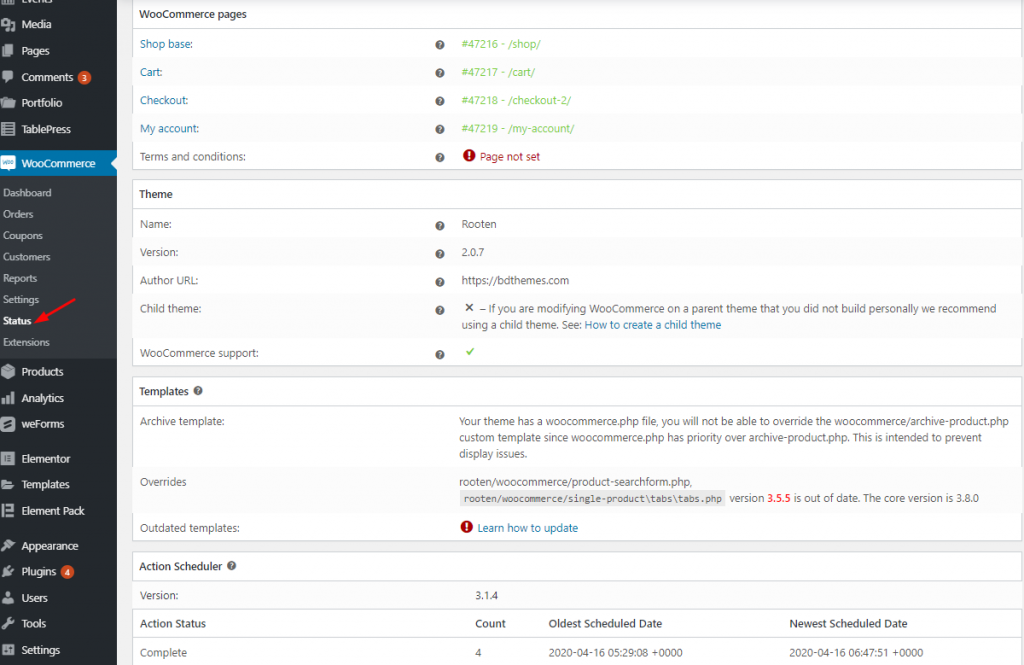
This menu offers you an overview of the health and performance of your online shop.
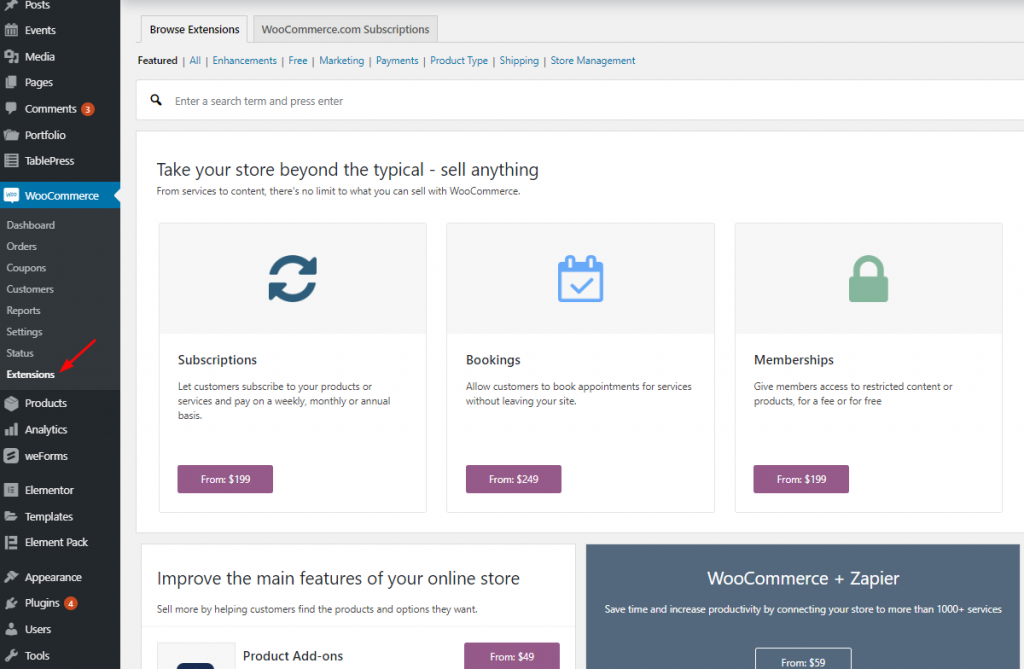
From this menu section, if you interested to enable any extensions suitable, you can easily do that.
Finally, at the very beginning of this article, I quoted about WordPress theme (Hello, OceanWP, GeneratePress, Astra, and more ) is required to build WooCommerce Website. Here, considering the hard task of choosing theme, I’m going to recommend you Tema Rooten (Multi purpose theme) one of the best WordPress Themes.
We’ve gone through a few easy processes that will surely take you on the right track of Building WooCommerce Website.
You can feel the confidence to get two cool and mature plugins – WooCommerce and Elementor that give you the necessary tools for an online store. Now, you know how to create and set up your online shop.
However, The free version of both of the plugins is enough to get you up and running. Our store is ready. We wish you all the best, man.
At last, if you find any issue further and struggle, please comment us.
El mayor paquete de plantillas Elementor con la interfaz de usuario más fácil de usar y 300+ widgets útiles de Elementor. Cree sitios web de cero a 100% perfección en poco tiempo.
Este sitio web funciona con Element Pack Pro y Tema Rooten.
Copyright © 2026 BdThemes. Todos los derechos reservados.