Mühelose Navigation mit umfangreichen Menüoptionen
Visuelle Produktauswahl steigert schnell den Umsatz
Personalisierte Inhalte passen sich in Echtzeit an
Nahtloser Bildlauf für besseren UX-Flow
Sofortige Vervielfältigung von Inhalten spart Zeit
Schneller Zugriff auf leistungsstarke Designelemente
Vorgefertigte Vorlagen beschleunigen die Gestaltung
Erweiterte benutzerdefinierte Felder für flexible Daten
Websites einfach und problemlos klonen
Gestochen scharfe, skalierbare Grafiken für alle Bildschirme
Rebranding von Werkzeugen für ein professionelles Aussehen
Inhalte präzise ein- und ausblenden
Fesselnde Tiefe mit sanfter Bewegung
Einfaches Hinzufügen von Notizen und Kommentaren
Hilfreiche Hinweise verbessern die Benutzerinteraktion
Elemente mit stilvollem Flair animieren
Wichtige Abschnitte immer sichtbar halten
Vollständige Kontrolle mit benutzerdefinierten Code-Optimierungen
Optimieren Sie Dateien, um die Geschwindigkeit der Website zu erhöhen
Ausgearbeitete Seitenvorlagen, die Ihnen den Einstieg in Ihre Landing Page erleichtern, indem Sie einfach ein Einstiegsdesign einfügen
Ready Blocks enthält eine Vielzahl von Layouts und Designelementen, wie Kopf- und Fußzeilen, Widgets usw.
Vorgefertigte Kopfzeilen mit lukrativen Stilen, die für verschiedene Nischenwebsites und Designvorlieben geeignet sind
Eine hilfreiche Sammlung von Fußzeilendesigns, mit denen Sie sofort eine attraktive Fußzeile für Ihre Landing Page erstellen können
Wir sind 24/7 für Sie da. Wir helfen Ihnen gerne.
Detaillierte Anleitungen für jede Funktion bei BdThemes verfügbar
Lernen Sie etwas Neues, bleiben Sie informiert über WordPress, Webdesign und mehr
Hier sind einige der wichtigsten Meilensteine in meiner Entwicklung:
Lernen Sie in unseren Videos die Verwendung von Produkten sowie Tipps und Tricks zu WordPress
Verdienen Sie saftige Provisionen, indem Sie sich an der Aktion beteiligen
Widget Idea Share ist eine gute Möglichkeit, ähnliche Widgets zu finden, die Sie verbessern können.
Gewiss! Wenn Sie sich mit uns in Verbindung setzen möchten, können Sie sich gerne an uns wenden
Erstellen Sie jedes WordPress-Formular in wenigen Minuten mit Sigma Forms.
Coming Soon & Wartungsmodus Page Builder Plugin
Websites mit One Accessibility leicht zugänglich machen
Zeigen Sie Erfahrungsberichte von Kunden an, um das Vertrauen und die Glaubwürdigkeit zu erhöhen.
Zoloblocks hilft bei der Erstellung beeindruckender Gutenberg-basierter Websites.
Der beste Slider in der Ära der Elementor Slider
Die einzigen kompatiblen Blogging-Widgets in Elementor für jeden Blog
Erstellen Sie eine WordPress-eCommerce-Website der nächsten Generation für Unternehmen
Organisieren Sie Ihre Fotos jedes Mal in einem anderen Engel mit Elementor
Steigern Sie das Engagement und den Umsatz mit Spin Wheel.
Leistungsstarkes AI Image Generator Plugin für WordPress von ChatGPT
Holen Sie sich 360° Augmented Reality für WooCommerce noch heute!
Kopieren und Einfügen eines beliebigen Webdesigns mit nur 2 Klicks!
Ein voll funktionsfähiges Theme für elementor mit unbegrenzten Optionen
Intelligentes, sauberes und flexibles Block-Theme für Gutenberg
Das Dark Reader Plugin sorgt für augenfreundliches Lesen im Internet.
WooCommerce einseitige Kasse zur Steigerung der Konversionen.
Find Nearby Stores Instantly with Sigma Store Locator
The Ultimate WordPress Media Library Organizer

Zugang zu über 100 Premium-WordPress-Plugins mit lebenslangen Updates und speziellem Support.
Mühelose Navigation mit umfangreichen Menüoptionen
Visuelle Produktauswahl steigert schnell den Umsatz
Personalisierte Inhalte passen sich in Echtzeit an
Nahtloser Bildlauf für besseren UX-Flow
Sofortige Vervielfältigung von Inhalten spart Zeit
Schneller Zugriff auf leistungsstarke Designelemente
Vorgefertigte Vorlagen beschleunigen die Gestaltung
Erweiterte benutzerdefinierte Felder für flexible Daten
Websites einfach und problemlos klonen
Gestochen scharfe, skalierbare Grafiken für alle Bildschirme
Rebranding von Werkzeugen für ein professionelles Aussehen
Inhalte präzise ein- und ausblenden
Fesselnde Tiefe mit sanfter Bewegung
Einfaches Hinzufügen von Notizen und Kommentaren
Hilfreiche Hinweise verbessern die Benutzerinteraktion
Elemente mit stilvollem Flair animieren
Wichtige Abschnitte immer sichtbar halten
Vollständige Kontrolle mit benutzerdefinierten Code-Optimierungen
Optimieren Sie Dateien, um die Geschwindigkeit der Website zu erhöhen
Ausgearbeitete Seitenvorlagen, die Ihnen den Einstieg in Ihre Landing Page erleichtern, indem Sie einfach ein Einstiegsdesign einfügen
Ready Blocks enthält eine Vielzahl von Layouts und Designelementen, wie Kopf- und Fußzeilen, Widgets usw.
Vorgefertigte Kopfzeilen mit lukrativen Stilen, die für verschiedene Nischenwebsites und Designvorlieben geeignet sind
Eine hilfreiche Sammlung von Fußzeilendesigns, mit denen Sie sofort eine attraktive Fußzeile für Ihre Landing Page erstellen können
Wir sind 24/7 für Sie da. Wir helfen Ihnen gerne.
Detaillierte Anleitungen für jede Funktion bei BdThemes verfügbar
Lernen Sie etwas Neues, bleiben Sie informiert über WordPress, Webdesign und mehr
Hier sind einige der wichtigsten Meilensteine in meiner Entwicklung:
Lernen Sie in unseren Videos die Verwendung von Produkten sowie Tipps und Tricks zu WordPress
Verdienen Sie saftige Provisionen, indem Sie sich an der Aktion beteiligen
Widget Idea Share ist eine gute Möglichkeit, ähnliche Widgets zu finden, die Sie verbessern können.
Gewiss! Wenn Sie sich mit uns in Verbindung setzen möchten, können Sie sich gerne an uns wenden
Erstellen Sie jedes WordPress-Formular in wenigen Minuten mit Sigma Forms.
Coming Soon & Wartungsmodus Page Builder Plugin
Websites mit One Accessibility leicht zugänglich machen
Zeigen Sie Erfahrungsberichte von Kunden an, um das Vertrauen und die Glaubwürdigkeit zu erhöhen.
Zoloblocks hilft bei der Erstellung beeindruckender Gutenberg-basierter Websites.
Der beste Slider in der Ära der Elementor Slider
Die einzigen kompatiblen Blogging-Widgets in Elementor für jeden Blog
Erstellen Sie eine WordPress-eCommerce-Website der nächsten Generation für Unternehmen
Organisieren Sie Ihre Fotos jedes Mal in einem anderen Engel mit Elementor
Steigern Sie das Engagement und den Umsatz mit Spin Wheel.
Leistungsstarkes AI Image Generator Plugin für WordPress von ChatGPT
Holen Sie sich 360° Augmented Reality für WooCommerce noch heute!
Kopieren und Einfügen eines beliebigen Webdesigns mit nur 2 Klicks!
Ein voll funktionsfähiges Theme für elementor mit unbegrenzten Optionen
Intelligentes, sauberes und flexibles Block-Theme für Gutenberg
Das Dark Reader Plugin sorgt für augenfreundliches Lesen im Internet.
WooCommerce einseitige Kasse zur Steigerung der Konversionen.
Find Nearby Stores Instantly with Sigma Store Locator
The Ultimate WordPress Media Library Organizer
Zugang zu über 100 Premium-WordPress-Plugins mit lebenslangen Updates und speziellem Support.
Price Box is a very useful tool if you are running a website to sell any products. Normally, most eCommerce websites use it to sell packages, products, courses, daily necessaries, etc. People often address it as Preis-Tabelle in the tech industry. Furthermore, well-structured price tables make price comparison easier for the users and make it easy to decide what to purchase.
In fact, if you can present offers and prices to your customers with a decent price box design, they most likely are willing to pay. With Elementor, you can in fact create neat and stunning pricing tables. As for the widget Preis-Tabelle, Element Pack has developed it. This widget has awesome features that you can use to create an effective price box easily.
In this blog, we will show you a step-by-step process of creating a price box using Elementor und Element Pack Addon’s Preis-Tabelle Widget.
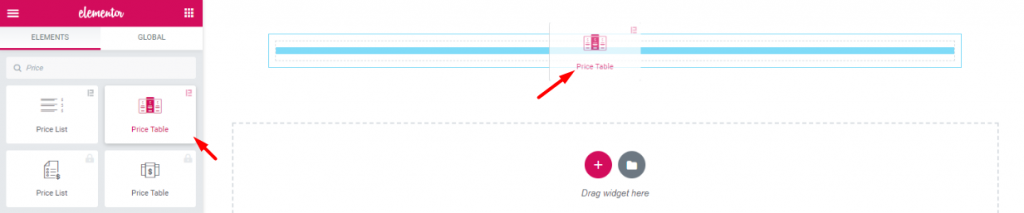
First thing’s first. Though, it’s not worth mentioning, for beginners it may be helpful. Drag and drop the Preis-Tabelle widget (Element Pack logo attached) into your webpage.
If you don’t have the Element Pack plugin installed, no problem. In that case, you can use Elementors’ price table widget instead. Note that, both of them are available on pro versions.
We must mention one thing, the company Element Pack always puts tonnes of customizing options in each of their widgets. As a result, you have a big menu bar for customizing your price box. The Preis-Tabelle widget will help you to create unique and stylish designs easily.
Let’s move into the main course!
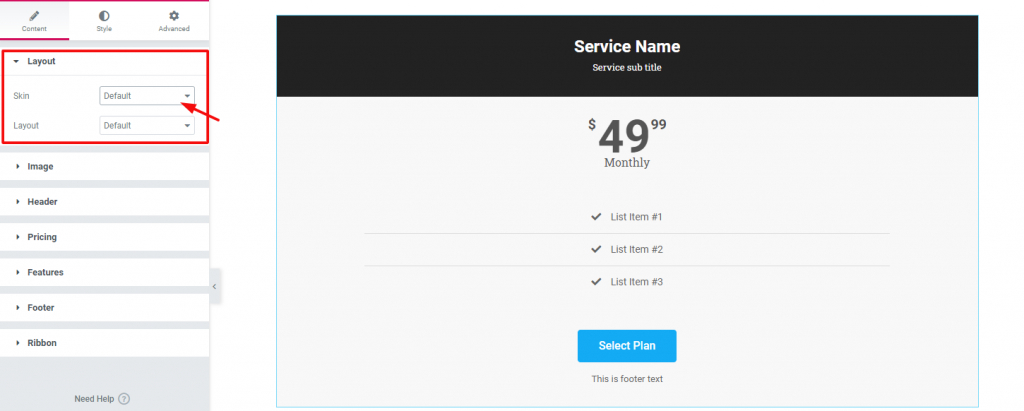
Once you drop the widget, it will pop up Content Tab. This tab holds the base settings for customizing the contents of the box. As you can see, the first section of Layout has two options; Skin & Layout. Both are set to Default. Keep an eye on the section list of this tab.
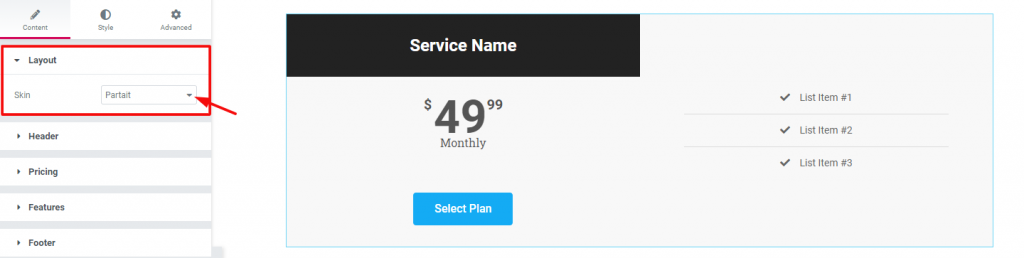
In case you choose a different Haut (Partait), the appearance of your price box will also change. Now notice that there is a section ‘Bild‘ is missing on the section list. Also, you can see no Layout option under Skin. However, the reason is, when you change the Haut option, it will automatically show/hide options related to that layout.
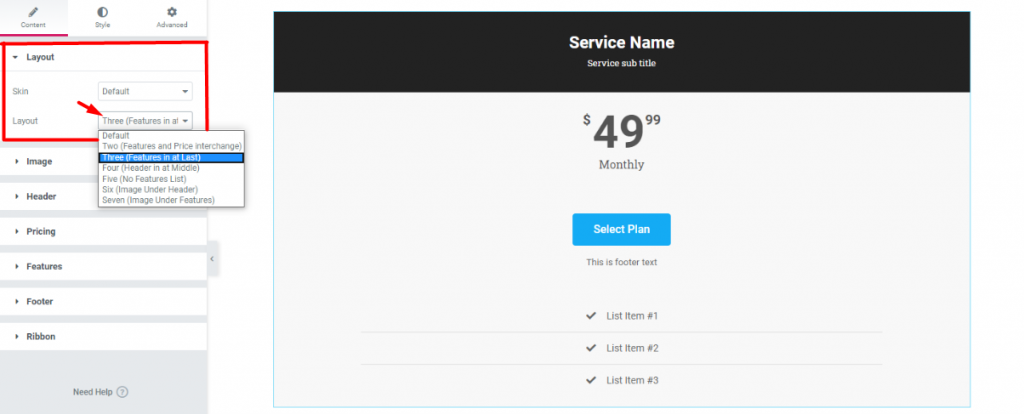
Once again, back to the default settings. The Layout option under Haut also has its uses. After all, you can choose from a number of layout styles from here. Each layout style is different and has different sets of options.
After choosing a layout, what we need to do now is add our details. In fact, you can add any image to your price box if you want. Adding service/product-related images will bring more attention to it. In fact, adding images increase the charm of that product.
But, if the landing page already shows all the information about that service, you may not need any image. However, I will show you how to add images anyway.
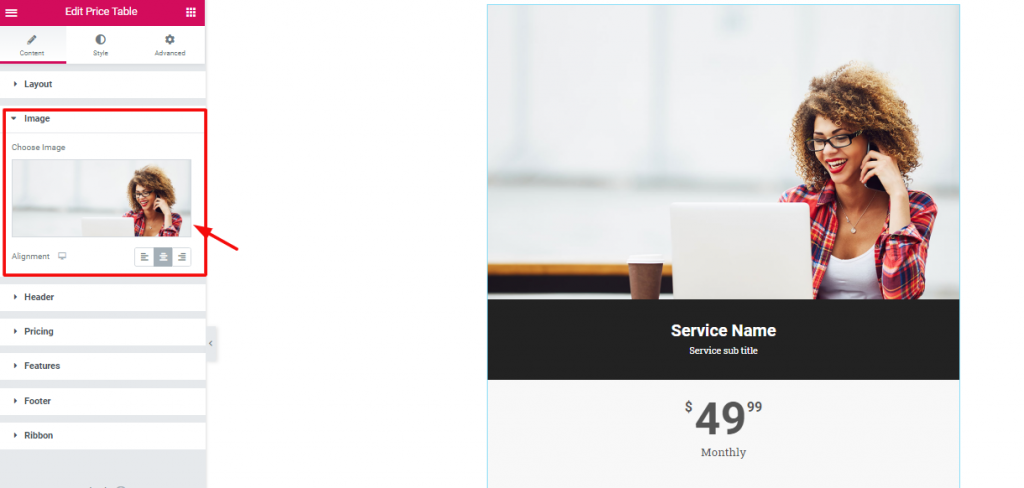
Gehe zu Content Tab> Image section
Let’s be precise. To add an image to your price box is not a difficult matter. But what’s difficult, is choosing the right image. Just go to the Bild section from the widget customizing panel and choose your image.
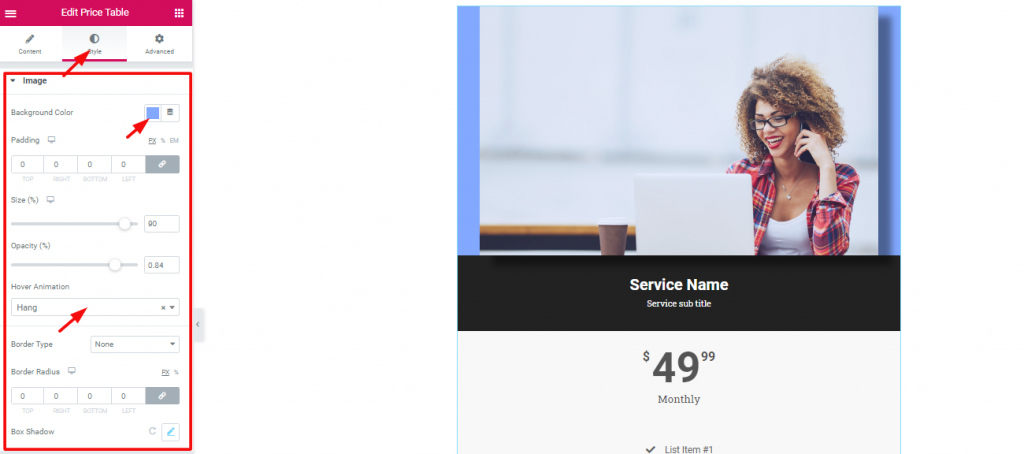
After choosing an image, you can also customize a few things about it. From the Registerkarte "Stil, gehen Sie zu Bild. Here, you can find some options like Background color, Größe, Opacity, Hover Animation, usw.
For the most part, the image size, background color, and opacity options are enough. But, as you can see, Element Pack given out more options like Border, Border Radius, and Box shadow along with other options. However, try for yourself! I guaranty that you will make a great design.
Now, let’s move on to the details.

A title holds great importance for your content. Therefore, you must put something that grabs the attention of the visitors. For a price box, you need to put direct titles such as product names or service plans’ names. As for its customization, go to Style Tab> Header. There, you can change the color and typography of the title and sub-heading.
Next, let’s talk about the price tag. The Preis-Tabelle widget has an interesting setting for this part.
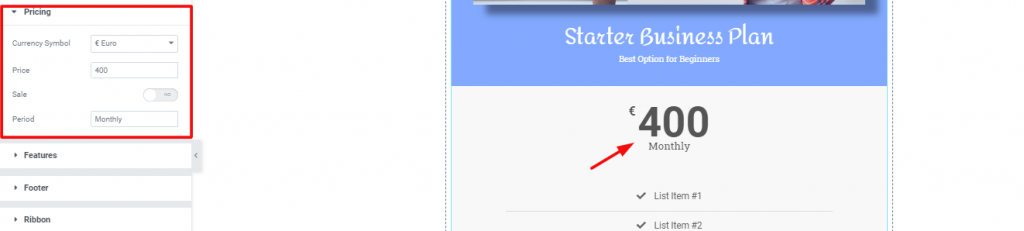
Like all the price labels on the market, you can change the pricing from the Preisgestaltung section. The fun part is, you can choose any currency label from the Currency Symbol Option.

Again, if you click on the Switcher Sale, it will bring up another price field Original Price. Here, you can put the original price of your product with a crossed-out style. Generally speaking, you can use this to show discounted products or offers.

And Lastly, you can customize your price tag from the Style tab> Pricing. As shown above, try to leave the background color separate from the rest. Doing this will highlight the price tag to the viewers.
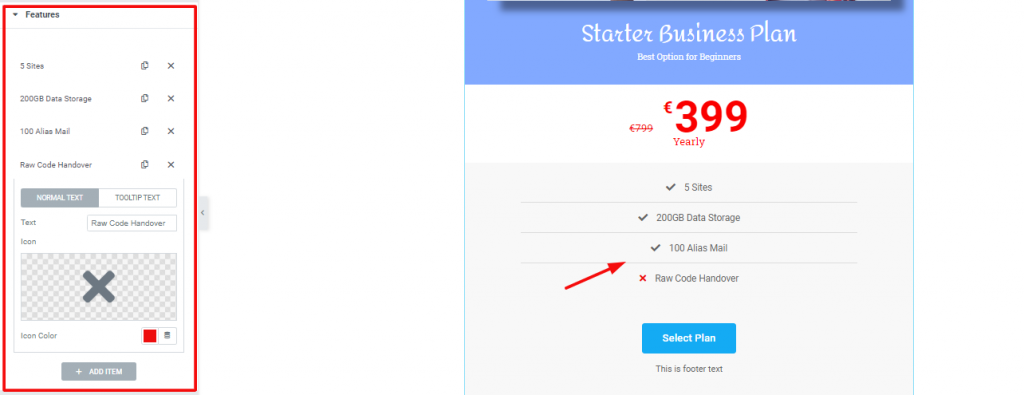
Gehe zu Content Tab> Features
For starters, the features section holds the key to understand what things your offer includes. Though it’s not a briefly detailed part, it gives a quick view of the contents. Hence, for this part, use direct words and be specific.
Let’s talk about customization. As you can see, this section has a bunch of repeaters. You can add more or remove them also. Each repeater has two option sets, one as Normal Text, the other as Tooltip Text. For the normal text, you have options to choose a logo, logo color, and title. In most cases, you can ignore the tooltip option.
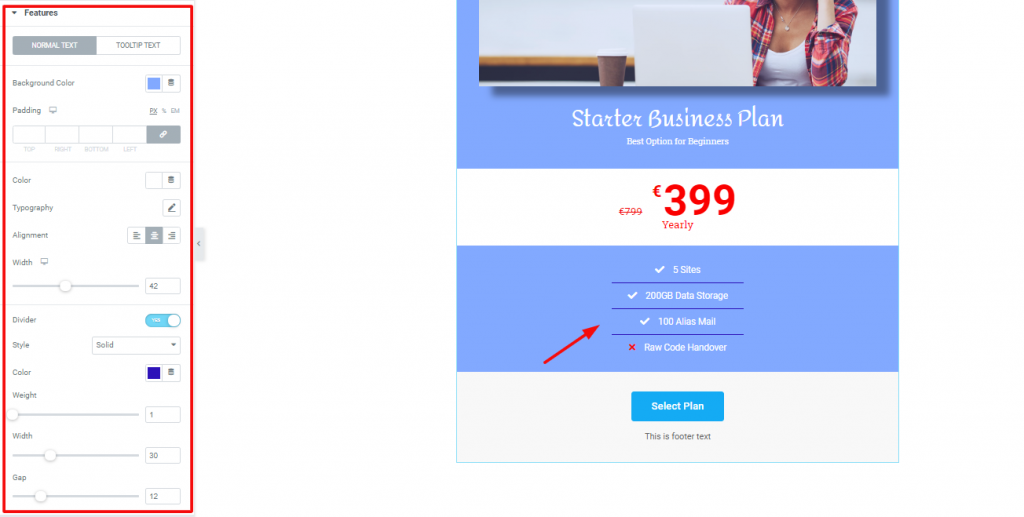
Now, let’s change the outlook of this part. In this case, go to Style Tab> Features. There, you will find the options shown above. We are, in fact, maintaining a single color for the whole price box. Again, the price tag is the only part highlighted.
However, you can change the color, typography, borderline width und weightund gap from this part. Moreover, there is an option to change the alignment of the texts. But, you may want to keep it in the middle of this style.
We are very close to the finishing part. Regardless of what type your price box is, you need to add the footer. Let’s see how to make one.
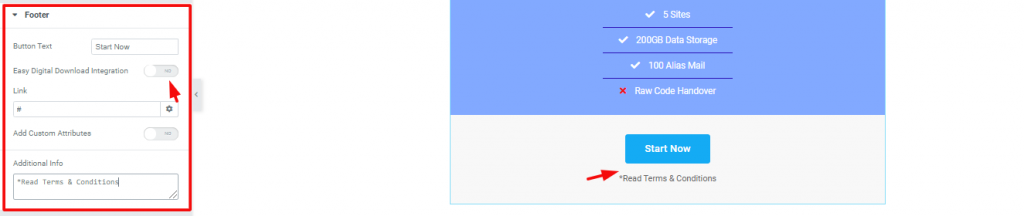
Die Content Tab of the Price Table widget has a section named Fußzeile. Basically, the footer area has a call-out button and an additional text box. From the settings, you can see two switchers named Einfache Integration digitaler Downloads und Add Custom Attributes. You can use the first one to link EDD to your button. As for the second one, you can learn about it hier.
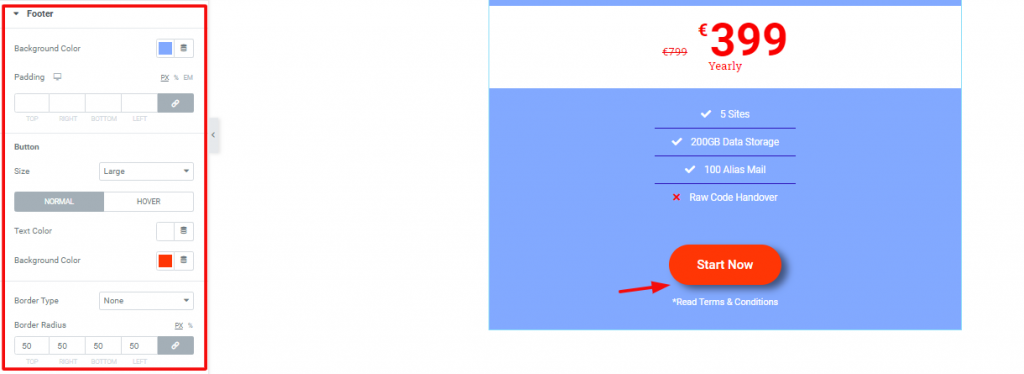
However, you can change the look of the footer from the Fußzeile Abschnitt in der Registerkarte "Stil. In fact, you can make the button round using the Radius der Grenze option. You can change the background and foreground color of the footer here. Also, you can add a hover effect and a box shadow to the button.
People often use Ribbon on their price box to show features or new offers. It is nothing but a mark that highlights a specific product. Let us show you how you can use it.
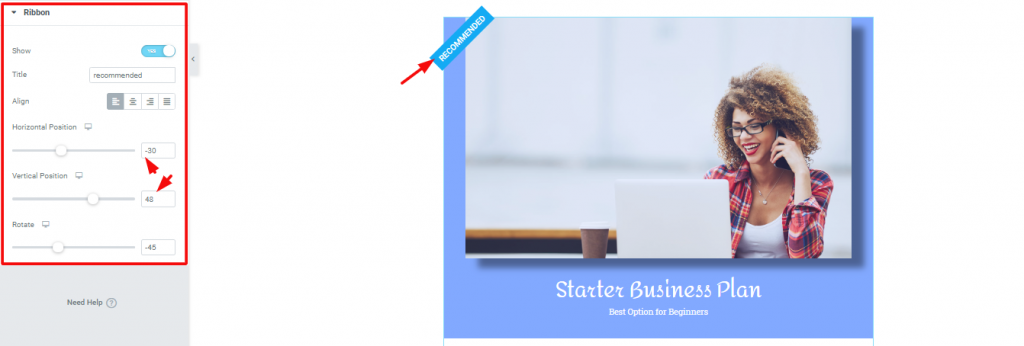
Auf der Content Tab, the last section is Ribbon. There is a switcher at the top of the section. You need to turn it on to make the ribbon appear. However, you can edit the title, change the position of it from Alignment & Horizontal/Verticle Position. Also, you can rotate the ribbon as you like.
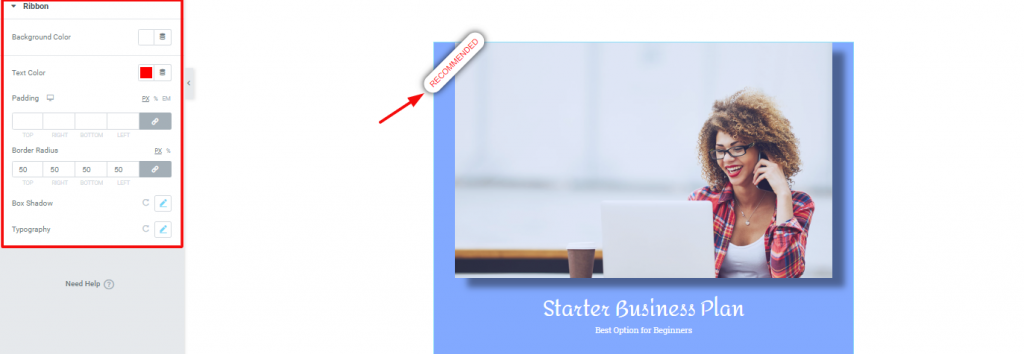
Now, to change the outlook of the ribbon, go to Style Tab> Ribbon. Surely as the image above, you can easily design this by changing its color, border-radius, typography, and box shadow.
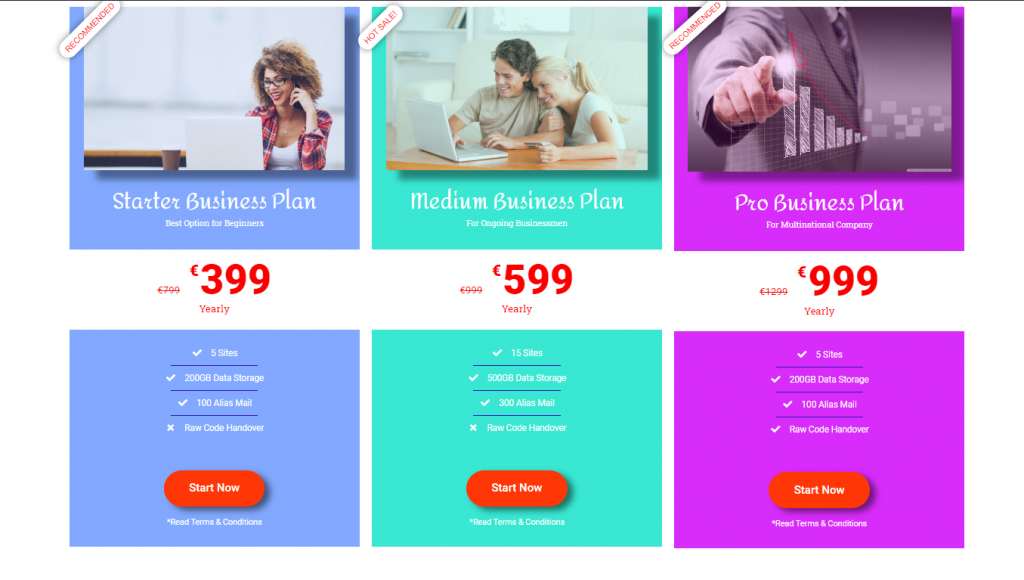
Congratulations and thanks for keeping patients up to this moment. Look at the stunning price boxes you made with us. With the example above, you can easily create such boxes for your eCommerce websites.
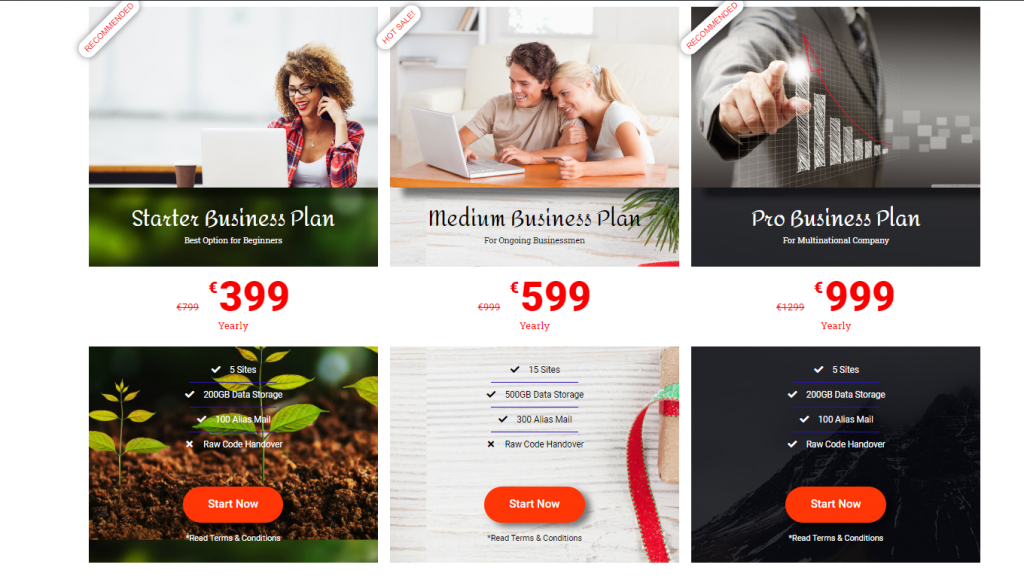
One more thing, you can also add your custom backgrounds to these price boxes. It’s easy to create. It’s attractive. Also, it’s fun. Thanks for reading this blog. Have a great day!
Größtes Elementor-Vorlagenpaket mit der benutzerfreundlichsten UI und 300+ nützliche Elementor-Widgets. Erstellen Sie Websites von Null auf 100% Perfektion im Handumdrehen.
Diese Website wird betrieben von Element Pack Pro und Rooten Thema.
Copyright © 2026 BdThemes. Alle Rechte vorbehalten.