Mühelose Navigation mit umfangreichen Menüoptionen
Visuelle Produktauswahl steigert schnell den Umsatz
Personalisierte Inhalte passen sich in Echtzeit an
Nahtloser Bildlauf für besseren UX-Flow
Sofortige Vervielfältigung von Inhalten spart Zeit
Schneller Zugriff auf leistungsstarke Designelemente
Vorgefertigte Vorlagen beschleunigen die Gestaltung
Erweiterte benutzerdefinierte Felder für flexible Daten
Websites einfach und problemlos klonen
Gestochen scharfe, skalierbare Grafiken für alle Bildschirme
Rebranding von Werkzeugen für ein professionelles Aussehen
Inhalte präzise ein- und ausblenden
Fesselnde Tiefe mit sanfter Bewegung
Einfaches Hinzufügen von Notizen und Kommentaren
Hilfreiche Hinweise verbessern die Benutzerinteraktion
Elemente mit stilvollem Flair animieren
Wichtige Abschnitte immer sichtbar halten
Vollständige Kontrolle mit benutzerdefinierten Code-Optimierungen
Optimieren Sie Dateien, um die Geschwindigkeit der Website zu erhöhen
Ausgearbeitete Seitenvorlagen, die Ihnen den Einstieg in Ihre Landing Page erleichtern, indem Sie einfach ein Einstiegsdesign einfügen
Ready Blocks enthält eine Vielzahl von Layouts und Designelementen, wie Kopf- und Fußzeilen, Widgets usw.
Vorgefertigte Kopfzeilen mit lukrativen Stilen, die für verschiedene Nischenwebsites und Designvorlieben geeignet sind
Eine hilfreiche Sammlung von Fußzeilendesigns, mit denen Sie sofort eine attraktive Fußzeile für Ihre Landing Page erstellen können
Wir sind 24/7 für Sie da. Wir helfen Ihnen gerne.
Detaillierte Anleitungen für jede Funktion bei BdThemes verfügbar
Lernen Sie etwas Neues, bleiben Sie informiert über WordPress, Webdesign und mehr
Hier sind einige der wichtigsten Meilensteine in meiner Entwicklung:
Lernen Sie in unseren Videos die Verwendung von Produkten sowie Tipps und Tricks zu WordPress
Verdienen Sie saftige Provisionen, indem Sie sich an der Aktion beteiligen
Widget Idea Share ist eine gute Möglichkeit, ähnliche Widgets zu finden, die Sie verbessern können.
Gewiss! Wenn Sie sich mit uns in Verbindung setzen möchten, können Sie sich gerne an uns wenden
Erstellen Sie jedes WordPress-Formular in wenigen Minuten mit Sigma Forms.
Coming Soon & Wartungsmodus Page Builder Plugin
Websites mit One Accessibility leicht zugänglich machen
Zeigen Sie Erfahrungsberichte von Kunden an, um das Vertrauen und die Glaubwürdigkeit zu erhöhen.
Zoloblocks hilft bei der Erstellung beeindruckender Gutenberg-basierter Websites.
Der beste Slider in der Ära der Elementor Slider
Die einzigen kompatiblen Blogging-Widgets in Elementor für jeden Blog
Erstellen Sie eine WordPress-eCommerce-Website der nächsten Generation für Unternehmen
Organisieren Sie Ihre Fotos jedes Mal in einem anderen Engel mit Elementor
Steigern Sie das Engagement und den Umsatz mit Spin Wheel.
Leistungsstarkes AI Image Generator Plugin für WordPress von ChatGPT
Holen Sie sich 360° Augmented Reality für WooCommerce noch heute!
Kopieren und Einfügen eines beliebigen Webdesigns mit nur 2 Klicks!
Ein voll funktionsfähiges Theme für elementor mit unbegrenzten Optionen
Intelligentes, sauberes und flexibles Block-Theme für Gutenberg
Das Dark Reader Plugin sorgt für augenfreundliches Lesen im Internet.
WooCommerce einseitige Kasse zur Steigerung der Konversionen.
Find Nearby Stores Instantly with Sigma Store Locator
The Ultimate WordPress Media Library Organizer
Zugang zu über 100 Premium-WordPress-Plugins mit lebenslangen Updates und speziellem Support.
Contact Form 7 is one of the most widely used form widgets in WordPress. Almost every website needs a configured contact form tool and the majority of them use this widget.
Unlike any other widget, Contact Form 7 is not a plug & play tool. In order to use it, you need to configure it first. Maybe it seemed to you that configuring a tool is rather a task for developers. But, most certainly, that is not the case for this tool.
Let me guide you, in this blog, how to properly configure, and the ways to use Contact Form 7 for the WordPress website.
Note that, this article includes easy-to-deploy content. There is no hardcore developer stuff included.
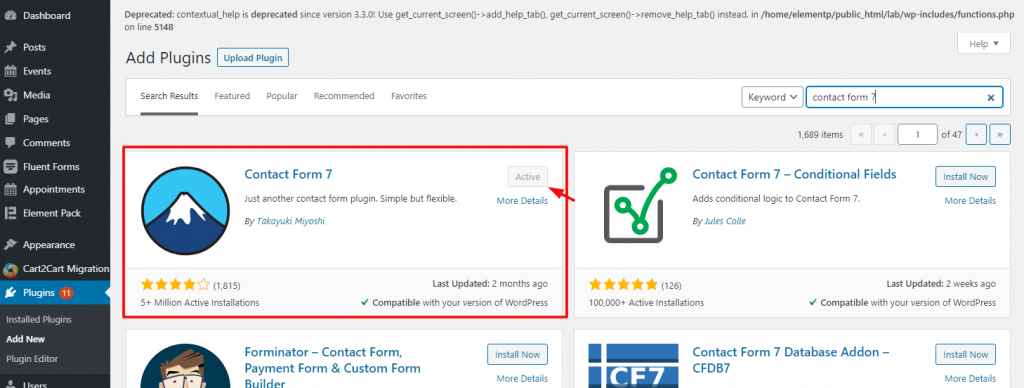
First of all, you have to install it within your dashboard.
Gehe zu Plugins> Neu hinzufügen> and search by typing the name.
Install it and activate it. If you are using Element Pack plugin, you can skip this step because it is pre-loaded inside the package.
Learn about Element Pack hier.
As I have said before, Contact Form 7 is not a plug&play widget. You have to configure it to work. So,

Look for the tab Kontakt from your dashboard, navigate it, and click on Neu hinzufügen. In this step, we are going to develop the form.
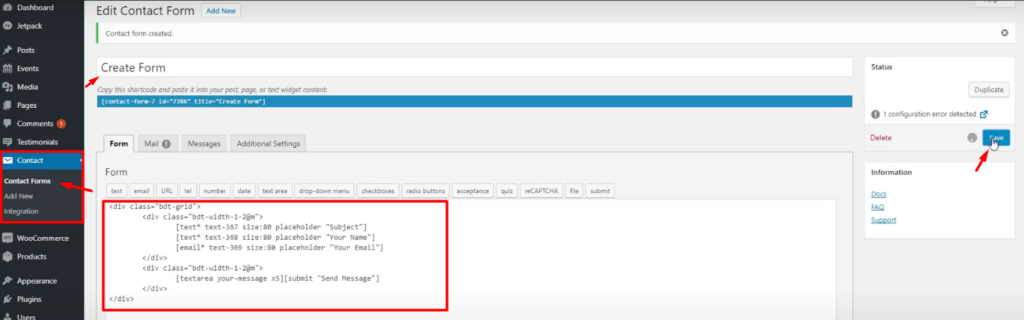
Now, focus. You have to look carefully from here. Creating a new form will give you a couple of options. You have to put any text as the title above and insert the form format in the Form tab.
As a default, the form will show a few lines of text codes on the marked red box. I changed it according to my choice. You may do so as well or even leave it as default. It’s up to you. These texts basically are the form structure codes.
For seasoned developers, it is easy to create new structures for the form. But you can do it too. Though you have to put a little bit of effort behind it, it’s not totally hard. So, configuring Contact Form 7 is easy.
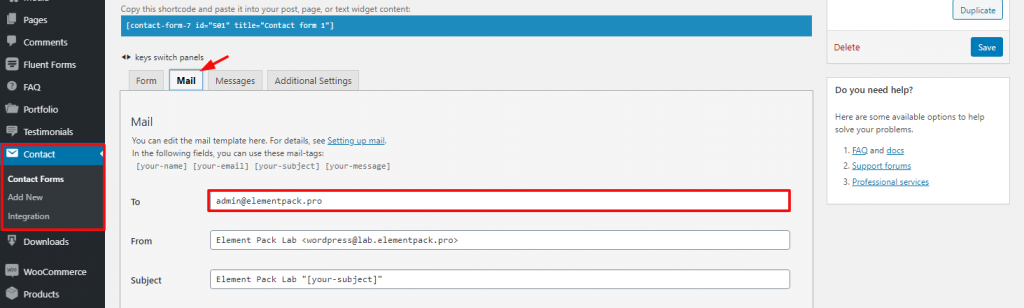
Now, go to the Mail tab beside the Form tab. Here, you have to configure the receiving mail address and the masked texts of the form body.
Just put your work mail in the An field and that basically does all the work. You can change things in every field and see how things go later.
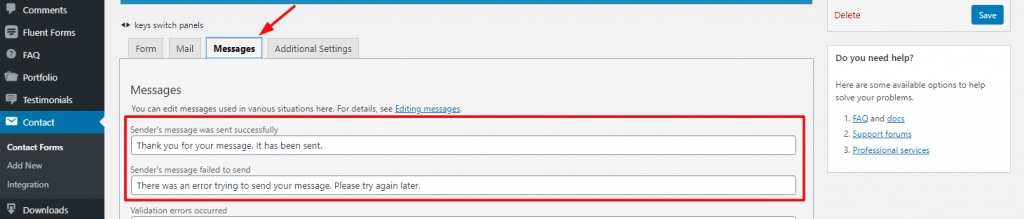
After that, go to the Messages tab and write in the corresponding messages in the text fields. This part is also set as default and you can leave it unchanged if you like to.
Okay, Contact form 7 is configured and is ready-to-deploy. There are actually two ways you can use it.
Let’s see both of them.
Every form created with Kontakt-Formular 7 has a shortcode for quick use. These shortcodes will show the full format of the form to the visitors.
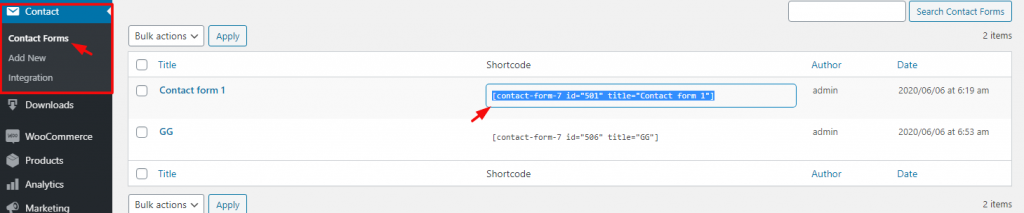
Go to the Contact Forms tab and locate the shortcodes beside the form titles. Select it and copy it.
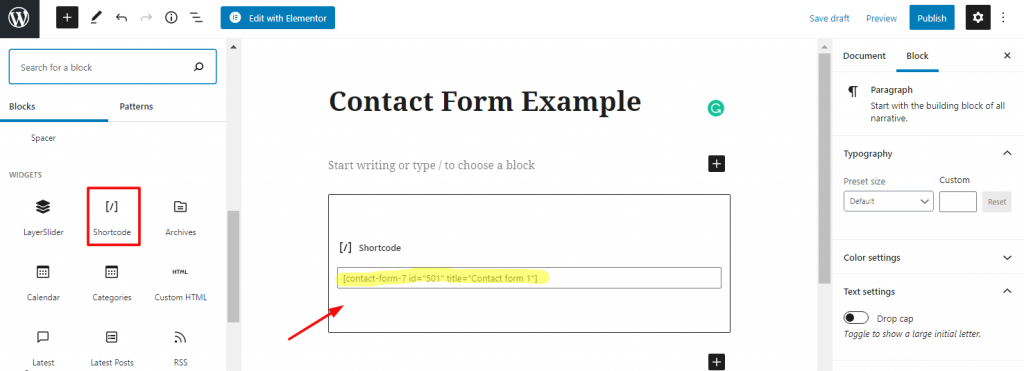
Now, on the page editor, place a Shortcode widget and paste the Form shortcode in it. Now, let’s see in preview mode if it works.
Like this, the contact form is attached and is visible to the visitors. Here, by no means you can change the appearance of the form (changing color, typography, adding a border, etc.)
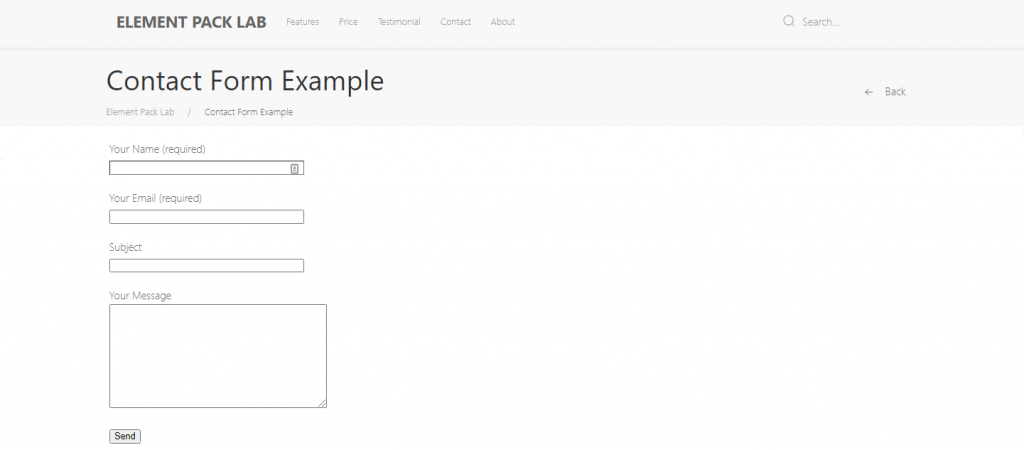
With a widget inside the Elementor page editor, you can place the Contact Form 7 widget as well as edit its appearance as you like.
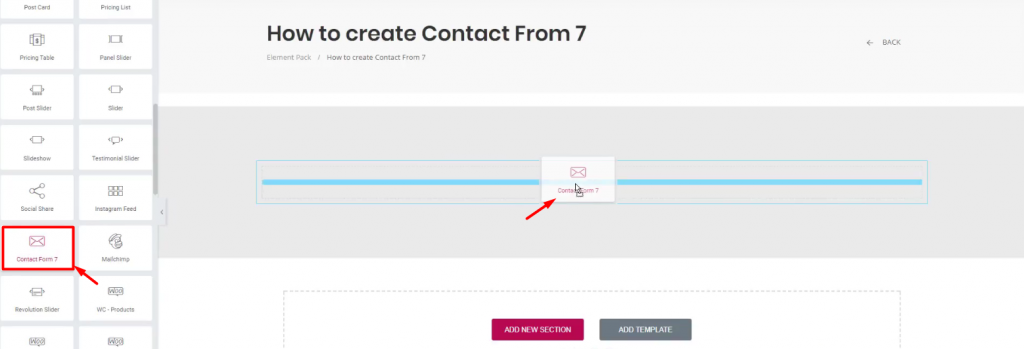
Go to your page editor and select Edit With Elementor. There, from the widget menu, select Kontakt-Formular 7 and place it inside the page.
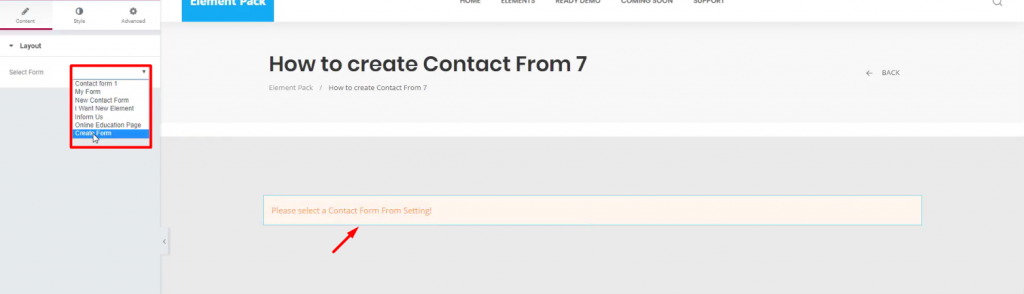
Von der Layout section, select the form that you have made following the instructions above.
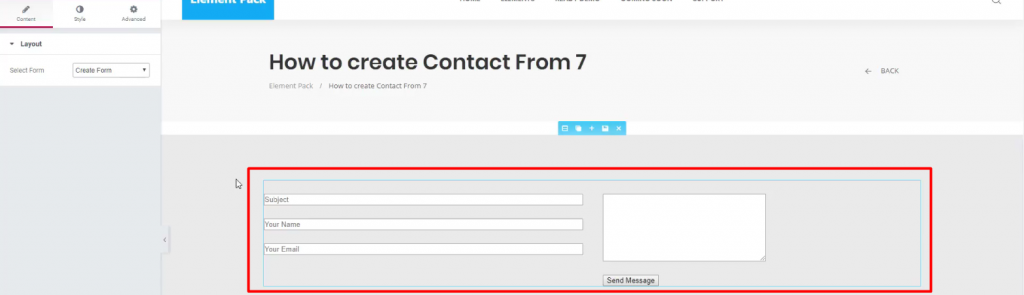
And that’s it! The form will appear on the page. Now, what you see is the default form. You can further customize it according to your needs.

Klicken Sie auf das Stil tab and change the forms’ appearance. See in the preview mode.
Configuring Kontakt-Formular 7 is not so hard. The widget gives you the option to design and develop your form with a custom-code insert option. So, it’s a good thing that you use this widget.
Dieser Blog wird Ihnen präsentiert von Element Pack, the best widget combo for Elementor. Thank you for reading.
Größtes Elementor-Vorlagenpaket mit der benutzerfreundlichsten UI und 300+ nützliche Elementor-Widgets. Erstellen Sie Websites von Null auf 100% Perfektion im Handumdrehen.
Diese Website wird betrieben von Element Pack Pro und Rooten Thema.
Copyright © 2026 BdThemes. Alle Rechte vorbehalten.