Navegação sem esforço com opções de menu avançadas
Opções visuais de produtos aumentam as vendas rapidamente
O conteúdo personalizado se adapta em tempo real
Rolagem contínua para um melhor fluxo de experiência do usuário
A duplicação instantânea de conteúdo economiza tempo
Acesso rápido a elementos de design avançados
Modelos prontos agilizam o design
Campos personalizados avançados para dados flexíveis
Clone sites facilmente, sem complicações
Gráficos nítidos e dimensionáveis para todas as telas
Renove a marca das ferramentas para obter uma aparência profissional
Mostrar ou ocultar conteúdo com precisão
Envolvendo a profundidade com movimentos suaves
Adicione facilmente notas e anotações claras
As dicas úteis melhoram a interação com o usuário
Animar elementos com um toque de estilo
Mantenha as seções importantes sempre visíveis
Controle total com ajustes de código personalizados
Otimize os arquivos para aumentar a velocidade do site
Modelos de página elaborados para ajudá-lo a começar a criar sua página de destino apenas com um design inicial
O Ready Blocks vem com uma variedade de layouts e elementos de design, como cabeçalhos, rodapés, widgets etc.
Cabeçalhos pré-projetados com estilos lucrativos que são adequados para vários sites de nicho e gostos de design
Uma coleção útil de designs de rodapé para ajudá-lo a criar um rodapé instantaneamente atraente em sua página de destino
Encontre-nos 24 horas por dia, 7 dias por semana, à sua disposição. Teremos prazer em ajudar.
Diretrizes detalhadas disponíveis para cada recurso na BdThemes
Aprenda algo novo, mantenha-se informado sobre WordPress, Web Design e muito mais
Aqui estão alguns dos principais marcos em meu desenvolvimento:
Aprenda a usar o produto, dicas e truques do WordPress com nossos vídeos
Ganhe comissões pesadas ao se juntar a nós na promoção
O Widget Idea Share é uma ótima maneira de encontrar widgets semelhantes que você pode melhorar.
Com certeza! Se precisar entrar em contato conosco, sinta-se à vontade para falar conosco
Crie qualquer formulário do WordPress em minutos com o Sigma Forms.
Plug-in do Page Builder para o modo de manutenção e em breve
Torne os sites acessíveis facilmente com o One Accessibility
Exiba depoimentos de clientes para aumentar a confiança e a credibilidade.
O Zoloblocks ajuda a criar sites incríveis baseados em Gutenberg.
O controle deslizante mais avançado na era do controle deslizante Elementor
Os únicos widgets de blog compatíveis com o Elementor para qualquer blog
Crie um site de comércio eletrônico WordPress de última geração para empresas
Organize suas fotos em um anjo diferente a cada vez com o Elementor
Impulsione o engajamento e aumente as vendas usando o Spin Wheel.
Poderoso plug-in de gerador de imagens de IA para WordPress por ChatGPT
Obtenha 360° Augmented Reality para WooCommerce hoje mesmo!
Copie e cole qualquer design da Web de sua preferência com apenas 2 cliques!
Um tema totalmente funcional para o elementor com opções ilimitadas
Tema de bloco inteligente, limpo e flexível para Gutenberg
O plug-in Dark Reader garante uma leitura da Web agradável aos olhos.
Checkout de uma página do WooCommerce para aumentar as conversões.
Find Nearby Stores Instantly with Sigma Store Locator
The Ultimate WordPress Media Library Organizer
Acesse mais de 100 plug-ins premium do WordPress com atualizações vitalícias e suporte dedicado.
If you have an online store and having trouble with customer checkout, we are here to help you create checkout page using Elementor Pro.
As the Ecommerce industry is growing rapidly and searching customer care as well as attention span is also decreasing, Ecommerce website owners are trying to make their websites more user-friendly and appealing. In this blog, I am trying to guide you on how to create checkout page using Elementor Pro on your own website and it’s easy.
As you know, for an Ecommerce store, along with other pages, the checkout page is very important and is a must. If you cannot satisfy your customers with the checkout process, they will make an instant u-turn and discourage others to come to your store site.
That is an alarming signal and the reason to go down your business goodwill at the bottom. Ignoring this part will result in bad things for your site.
To avoid this miserable situation of the website and make it a topper in the market, we are going to show you the way to create checkout page using Elementor Pro. Just keep patience and go through this article to the end to know about this.
A checkout page relates to the payment or shipping details on a WooCommerce site. It lets the customers enter payment details for the products and complete their orders. In short, it collects customers shipping details.
In another sense, a checkout page is a website page that is shown to the customers to conclude a transaction. It is equivalent to arriving at the checkout counter at any physical store, just digitally done. eCommerce websites can have either multiple or a single checkout page (s) depending upon the nature of the transaction and the product or service being offered.
Commonly, you can see the checkout page at the end of the checkout process. It gives the customer a series of payment options that shows them an overview of their shopping cart. You have to be very careful like other eCommerce shop owners and customize the checkout page based on feedback from your customers.
The checkout page also reduces your shopping cart abandonment rate. If your customers regularly abandon their carts, you have to evaluate their journey and find out the fault of your checkout page.
To keep your online store up and running, the checkout page is a must. You cannot avoid this part, because it plays a vital role to drive more visitors to your site, obviously so does the checkout design.
You have done all the settings right from the point of a user entering the checkout funnel to the finishing point. Your marketing has worked, and your website design and navigation drove them to this point, and finally, they are ready to make a transaction.
But, it is unfortunate that if your checkout design is lengthy, all your efforts will go to waste.
We found that nearly 1 out of 5 shoppers abandoned a cart in the last quarter because the checkout process was too long or complicated. So while it happens, you have to take action to avoid it, or you can at least reduce the amount of abandonment during the checkout process.
When you design an excellent and short checkout process, the user experience is as seamless as possible. If your product page helps them to add items to their basket, you have to guide them effortlessly throughout the checkout steps all the way to conversion.
It is essential that you avoid giving the user any reason to leave. So, you have to have:
All you need to optimize here is that you should set the goal to reduce the time and effort your customer takes to complete the checkout process.
Now, let’s proceed to create checkout page using Elementor for your site. To do that, you should follow these steps:
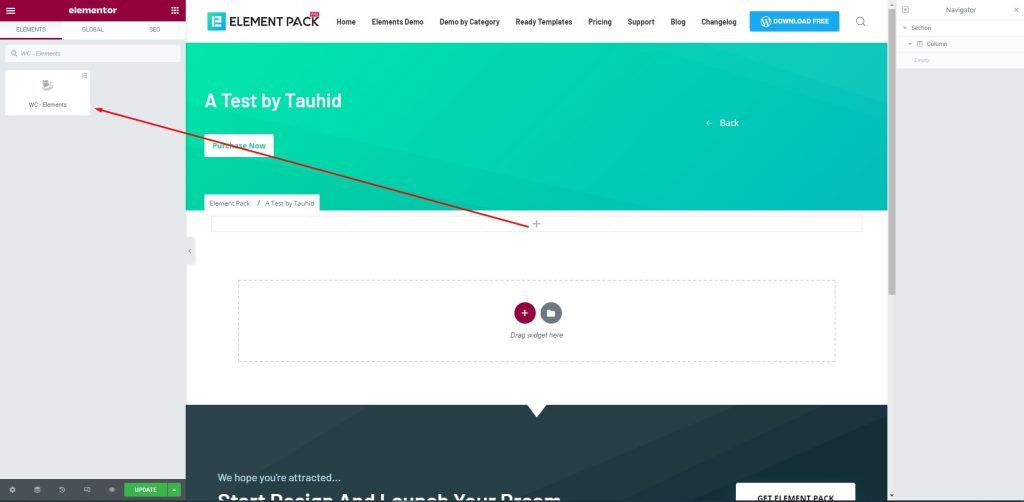
First, drag-drop the element into your page to create the checkout page.
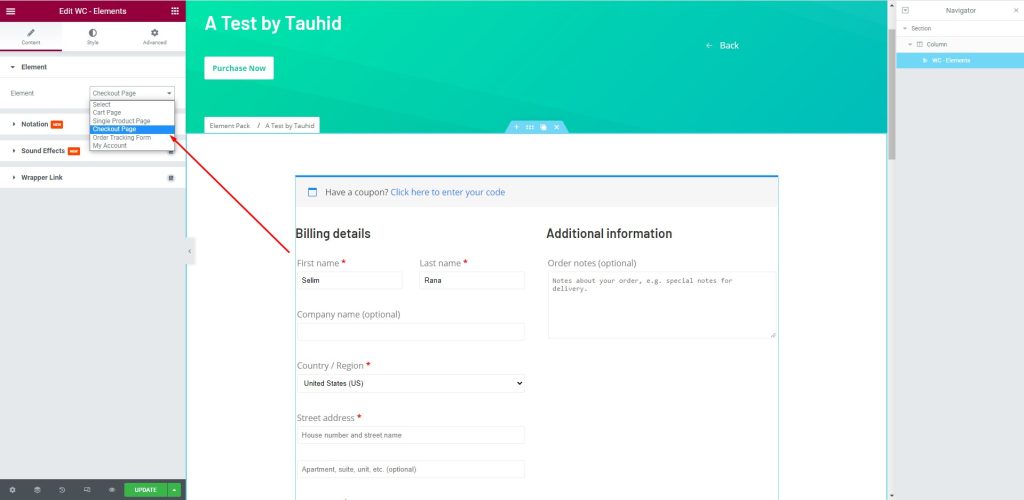
Em seguida, vá para Element > Element > Checkout Page to create a checkout page that will help you manage your customers. There are several fields to fill up with consumer information. You can provide your name and address here.
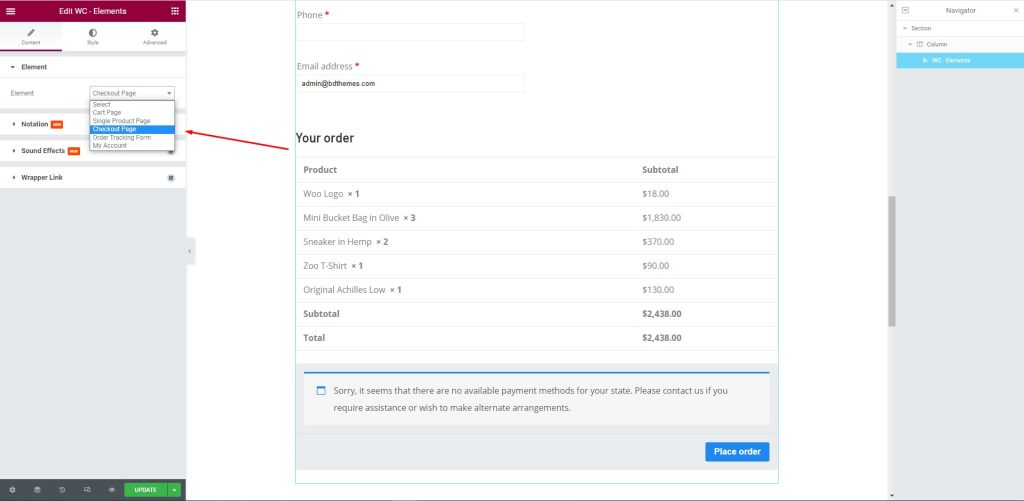
After that, edit the page for your consumers. Let them select their required items and the price against them to complete the checkout process.
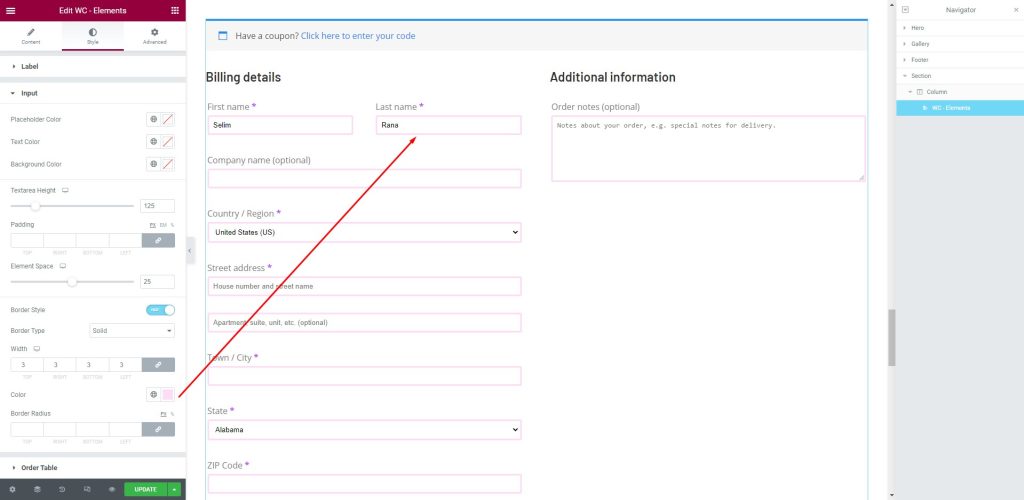
Next, go to the Style tab. Here, shoppers can provide the necessary information in the fields i.e.: First name, Last Name, Company Name, Country/ Region, Street address, Town/ City, and more.
This article is created to show you how to create a checkout page using Elementor pro. We hope that this article helps you create a checkout page. If you have any questions about checkout page or want to share your experience regarding checkout page, please don’t hesitate to leave a comment below.
Obrigado por ler este artigo. Tenha um bom dia.
O maior pacote de modelos Elementor com a interface de usuário mais fácil de usar e 300+ widgets úteis do Elementor. Crie sites de zero a 100% perfeição em pouco tempo.
Este site é alimentado por Element Pack Pro e Tema Rooten.
Copyright © 2026 BdThemes. Todos os direitos reservados.