다양한 메뉴 옵션을 통한 손쉬운 탐색
시각적인 제품 선택으로 빠른 매출 증대
실시간으로 조정되는 개인화된 콘텐츠
원활한 스크롤로 UX 흐름 개선
즉각적인 콘텐츠 복제로 시간 절약
강력한 디자인 요소에 빠르게 액세스
기성 템플릿으로 디자인 속도 향상
유연한 데이터를 위한 고급 사용자 지정 필드
번거로움 없이 간편하게 사이트 복제
모든 화면에 적합한 선명하고 확장 가능한 그래픽
전문적인 룩을 위한 리브랜딩 도구
콘텐츠를 정확하게 표시하거나 숨기기
부드러운 모션으로 깊이 있는 몰입감
선명한 메모와 주석을 쉽게 추가하세요
유용한 힌트로 사용자 상호 작용 개선
세련된 감각으로 요소에 애니메이션 적용
중요한 섹션은 항상 표시되도록 유지
사용자 지정 코드 조정을 통한 완벽한 제어
파일 최적화를 통한 사이트 속도 향상
연중무휴 24시간 언제든지 문의하세요. 기꺼이 도와드리겠습니다.
모든 기능에 대한 자세한 가이드라인은 BdThemes에서 확인할 수 있습니다.
새로운 것을 배우고, 워드프레스, 웹 디자인 등에 대한 최신 정보를 확인하세요.
개발 과정의 주요 이정표는 다음과 같습니다:
동영상에서 제품 사용법, 워드프레스 팁과 요령 알아보기
프로모션에 참여하여 막대한 수수료를 받으세요.
위젯 아이디어 공유는 개선할 수 있는 유사한 위젯을 찾을 수 있는 좋은 방법입니다.
물론입니다! 문의 사항이 있으시면 언제든지 연락주세요.
시그마 폼으로 몇 분 만에 워드프레스 양식을 작성하세요.
곧 출시 예정 & 유지 관리 모드 페이지 빌더 플러그인
접근성 하나로 웹사이트에 쉽게 접근 가능
고객 추천글을 표시하여 신뢰와 공신력을 높이세요.
졸로블록은 구텐베르크 기반의 멋진 웹사이트를 제작하는 데 도움을 줍니다.
Elementor 슬라이더 시대에서 가장 우수한 슬라이더
Elementor에서 유일하게 호환되는 블로그 위젯은 모든 블로그에 사용할 수 있습니다.
비즈니스를 위한 차세대 워드프레스 전자상거래 웹사이트 구축하기
Elementor로 매번 다른 엔젤로 사진 정리하기
스핀 휠을 사용하여 참여도를 높이고 매출을 늘리세요.
ChatGPT의 강력한 워드프레스용 AI 이미지 생성기 플러그인
지금 바로 WooCommerce용 360° 증강 현실을 사용해보세요!
클릭 두 번으로 원하는 웹 디자인을 복사하여 붙여넣기하세요!
무제한 옵션으로 모든 기능을 갖춘 엘리멘터용 테마
구텐베르크를 위한 스마트하고 깔끔하며 유연한 블록 테마
다크 리더 플러그인은 눈에 편안한 웹 읽기를 보장합니다.
전환율을 높이는 WooCommerce 원페이지 결제.
Find Nearby Stores Instantly with Sigma Store Locator
The Ultimate WordPress Media Library Organizer
If you have an online store and having trouble with customer checkout, we are here to help you create checkout page using Elementor Pro.
As the Ecommerce industry is growing rapidly and searching customer care as well as attention span is also decreasing, Ecommerce website owners are trying to make their websites more user-friendly and appealing. In this blog, I am trying to guide you on how to create checkout page using Elementor Pro on your own website and it’s easy.
As you know, for an Ecommerce store, along with other pages, the checkout page is very important and is a must. If you cannot satisfy your customers with the checkout process, they will make an instant u-turn and discourage others to come to your store site.
That is an alarming signal and the reason to go down your business goodwill at the bottom. Ignoring this part will result in bad things for your site.
To avoid this miserable situation of the website and make it a topper in the market, we are going to show you the way to create checkout page using Elementor Pro. Just keep patience and go through this article to the end to know about this.
A checkout page relates to the payment or shipping details on a WooCommerce site. It lets the customers enter payment details for the products and complete their orders. In short, it collects customers shipping details.
In another sense, a checkout page is a website page that is shown to the customers to conclude a transaction. It is equivalent to arriving at the checkout counter at any physical store, just digitally done. eCommerce websites can have either multiple or a single checkout page (s) depending upon the nature of the transaction and the product or service being offered.
Commonly, you can see the checkout page at the end of the checkout process. It gives the customer a series of payment options that shows them an overview of their shopping cart. You have to be very careful like other eCommerce shop owners and customize the checkout page based on feedback from your customers.
The checkout page also reduces your shopping cart abandonment rate. If your customers regularly abandon their carts, you have to evaluate their journey and find out the fault of your checkout page.
To keep your online store up and running, the checkout page is a must. You cannot avoid this part, because it plays a vital role to drive more visitors to your site, obviously so does the checkout design.
You have done all the settings right from the point of a user entering the checkout funnel to the finishing point. Your marketing has worked, and your website design and navigation drove them to this point, and finally, they are ready to make a transaction.
But, it is unfortunate that if your checkout design is lengthy, all your efforts will go to waste.
We found that nearly 1 out of 5 shoppers abandoned a cart in the last quarter because the checkout process was too long or complicated. So while it happens, you have to take action to avoid it, or you can at least reduce the amount of abandonment during the checkout process.
When you design an excellent and short checkout process, the user experience is as seamless as possible. If your product page helps them to add items to their basket, you have to guide them effortlessly throughout the checkout steps all the way to conversion.
It is essential that you avoid giving the user any reason to leave. So, you have to have:
All you need to optimize here is that you should set the goal to reduce the time and effort your customer takes to complete the checkout process.
Now, let’s proceed to create checkout page using Elementor for your site. To do that, you should follow these steps:
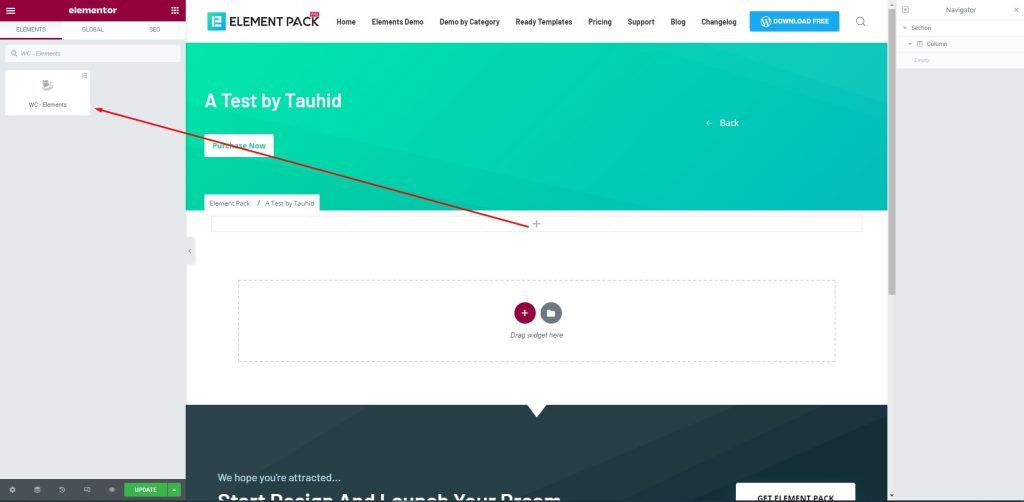
First, drag-drop the element into your page to create the checkout page.
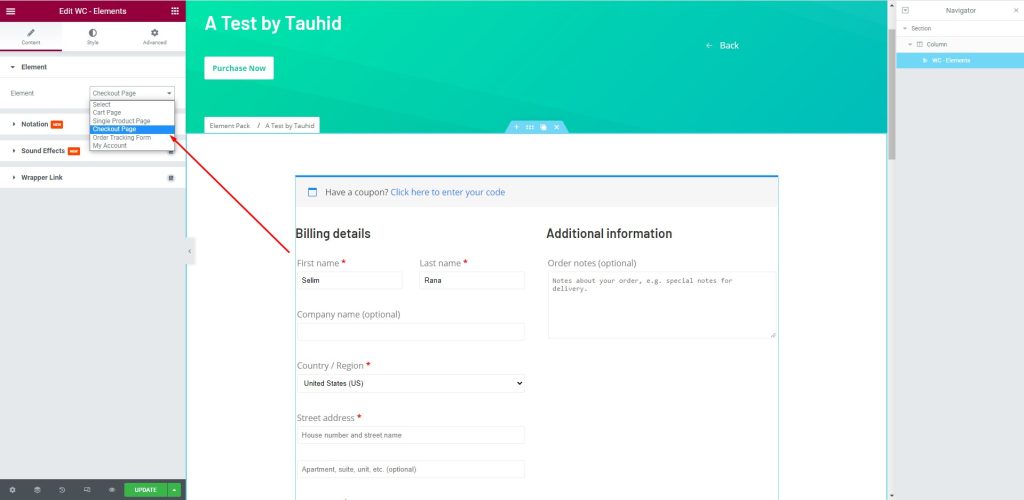
다음으로 다음으로 이동합니다. Element > Element > Checkout Page to create a checkout page that will help you manage your customers. There are several fields to fill up with consumer information. You can provide your name and address here.
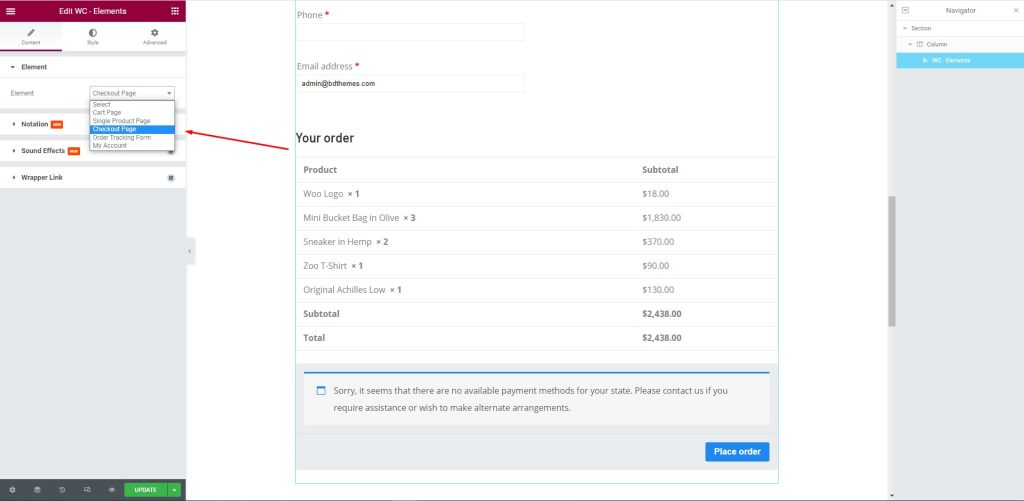
After that, edit the page for your consumers. Let them select their required items and the price against them to complete the checkout process.
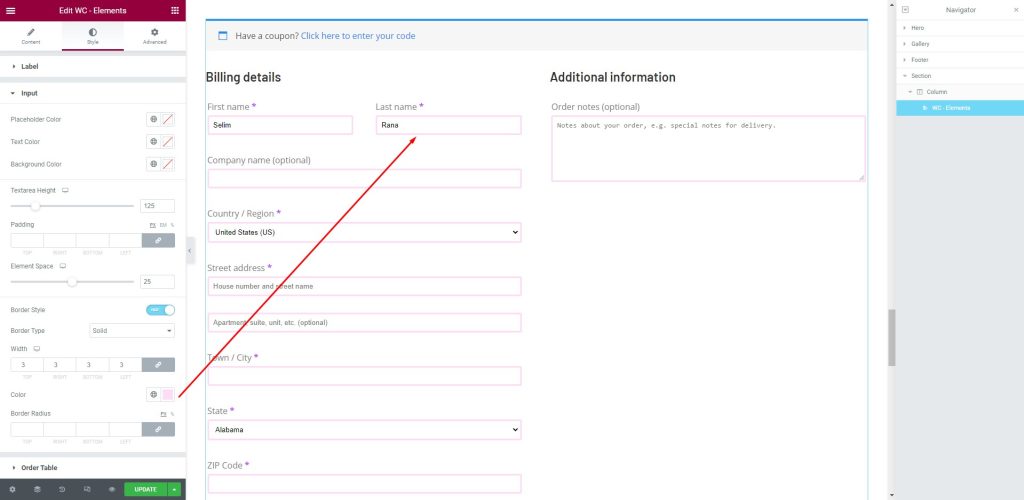
Next, go to the Style tab. Here, shoppers can provide the necessary information in the fields i.e.: First name, Last Name, Company Name, Country/ Region, Street address, Town/ City, and more.
This article is created to show you how to create a checkout page using Elementor pro. We hope that this article helps you create a checkout page. If you have any questions about checkout page or want to share your experience regarding checkout page, please don’t hesitate to leave a comment below.
이 글을 읽어주셔서 감사합니다. 좋은 하루 되세요.
가장 사용자 친화적인 UI를 갖춘 최대 규모의 Elementor 템플릿 팩과 300+ 유용한 Elementor 위젯. 제로에서 시작되는 웹사이트 구축 100% 완벽을 추구합니다.
이 웹사이트는 다음에 의해 구동됩니다. Element Pack Pro 그리고 루텐 테마.
Copyright © 2026 Bd테마. 모든 권리 보유.