豊富なメニューオプションによる容易なナビゲーション
視覚的な商品選択が売上を加速させる
パーソナライズされたコンテンツがリアルタイムで適応
UXフローを改善するシームレススクロール
瞬時にコンテンツを複製し、時間を節約
パワフルなデザイン要素に素早くアクセス
既製のテンプレートがデザインをスピードアップ
柔軟なデータのための高度なカスタムフィールド
手間をかけずに簡単にサイトをクローン
あらゆるスクリーンに対応する、鮮明でスケーラブルなグラフィック
ツールをリブランドしてプロフェッショナルな外観に
正確なコンテンツの表示・非表示
滑らかな動きで奥行きを魅せる
明確なメモや注釈を簡単に追加
役立つヒントがユーザーとのインタラクションを向上
スタイリッシュなアニメーション
重要なセクションは常に見えるようにしておく
カスタム・コードの微調整によるフル・コントロール
ファイルを最適化してサイトのスピードを上げる
年中無休で対応いたします。喜んでお手伝いいたします。
BdThemesで各機能の詳細なガイドラインをご覧いただけます。
ワードプレス、ウェブデザイン、その他について新しいことを学び、情報を得る。
私の成長における重要なマイルストーンをいくつか紹介しよう:
ビデオで製品の使い方、WordPressのヒントとコツを学ぶ
プロモーションに参加することで、高額なコミッションを得ることができます。
Widget Idea Shareは、あなたが改善できる類似ウィジェットを見つける素晴らしい方法です。
確かに!私たちと連絡を取る必要がある場合は、お気軽にご連絡ください。
Sigma Forms を使って WordPress のフォームを数分で作成しましょう。.
ページ・ビルダー・プラグイン
One Accessibilityでウェブサイトを簡単にアクセシブルに
信頼と信用を高めるために、顧客の声を表示する。.
Zoloblocksは、Gutenbergベースの魅力的なウェブサイトを作成するのに役立ちます。.
Elementorスライダー時代の最も優れたスライダー
Elementorで唯一互換性のあるブログ用ウィジェット
ビジネス向け次世代型WordPress eコマースサイトの構築
Elementorで毎回違うエンジェルで写真を整理する
スピンホイールを使ってエンゲージメントを高め、売上を増加させましょう。.
WordPress用AI画像生成プラグイン ChatGPT
WooCommerce用の360°拡張現実を今すぐ入手しましょう!
好きなウェブデザインを2クリックでコピー&ペースト!
無制限のオプションを備えたelementorのための完全に機能するテーマ
スマート、クリーン、フレキシブルなGutenberg用ブロックテーマ
Dark Readerプラグインは、目に優しいウェブ閲覧を保証します。.
コンバージョンを高めるWooCommerceのワンページチェックアウト。
Find Nearby Stores Instantly with Sigma Store Locator
The Ultimate WordPress Media Library Organizer
If you have an online store and having trouble with customer checkout, we are here to help you create checkout page using Elementor Pro.
As the Ecommerce industry is growing rapidly and searching customer care as well as attention span is also decreasing, Ecommerce website owners are trying to make their websites more user-friendly and appealing. In this blog, I am trying to guide you on how to create checkout page using Elementor Pro on your own website and it’s easy.
As you know, for an Ecommerce store, along with other pages, the checkout page is very important and is a must. If you cannot satisfy your customers with the checkout process, they will make an instant u-turn and discourage others to come to your store site.
That is an alarming signal and the reason to go down your business goodwill at the bottom. Ignoring this part will result in bad things for your site.
To avoid this miserable situation of the website and make it a topper in the market, we are going to show you the way to create checkout page using Elementor Pro. Just keep patience and go through this article to the end to know about this.
A checkout page relates to the payment or shipping details on a WooCommerce site. It lets the customers enter payment details for the products and complete their orders. In short, it collects customers shipping details.
In another sense, a checkout page is a website page that is shown to the customers to conclude a transaction. It is equivalent to arriving at the checkout counter at any physical store, just digitally done. eCommerce websites can have either multiple or a single checkout page (s) depending upon the nature of the transaction and the product or service being offered.
Commonly, you can see the checkout page at the end of the checkout process. It gives the customer a series of payment options that shows them an overview of their shopping cart. You have to be very careful like other eCommerce shop owners and customize the checkout page based on feedback from your customers.
The checkout page also reduces your shopping cart abandonment rate. If your customers regularly abandon their carts, you have to evaluate their journey and find out the fault of your checkout page.
To keep your online store up and running, the checkout page is a must. You cannot avoid this part, because it plays a vital role to drive more visitors to your site, obviously so does the checkout design.
You have done all the settings right from the point of a user entering the checkout funnel to the finishing point. Your marketing has worked, and your website design and navigation drove them to this point, and finally, they are ready to make a transaction.
But, it is unfortunate that if your checkout design is lengthy, all your efforts will go to waste.
We found that nearly 1 out of 5 shoppers abandoned a cart in the last quarter because the checkout process was too long or complicated. So while it happens, you have to take action to avoid it, or you can at least reduce the amount of abandonment during the checkout process.
When you design an excellent and short checkout process, the user experience is as seamless as possible. If your product page helps them to add items to their basket, you have to guide them effortlessly throughout the checkout steps all the way to conversion.
It is essential that you avoid giving the user any reason to leave. So, you have to have:
All you need to optimize here is that you should set the goal to reduce the time and effort your customer takes to complete the checkout process.
Now, let’s proceed to create checkout page using Elementor for your site. To do that, you should follow these steps:
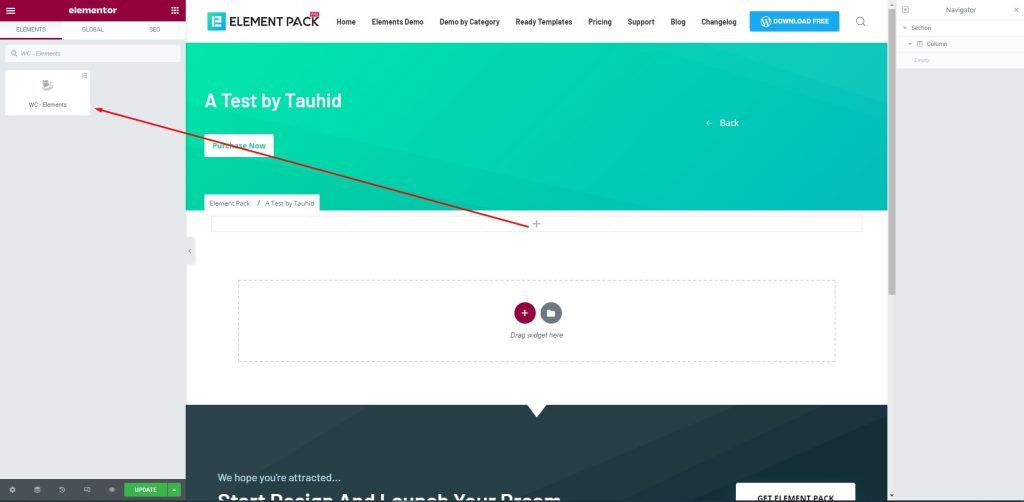
First, drag-drop the element into your page to create the checkout page.
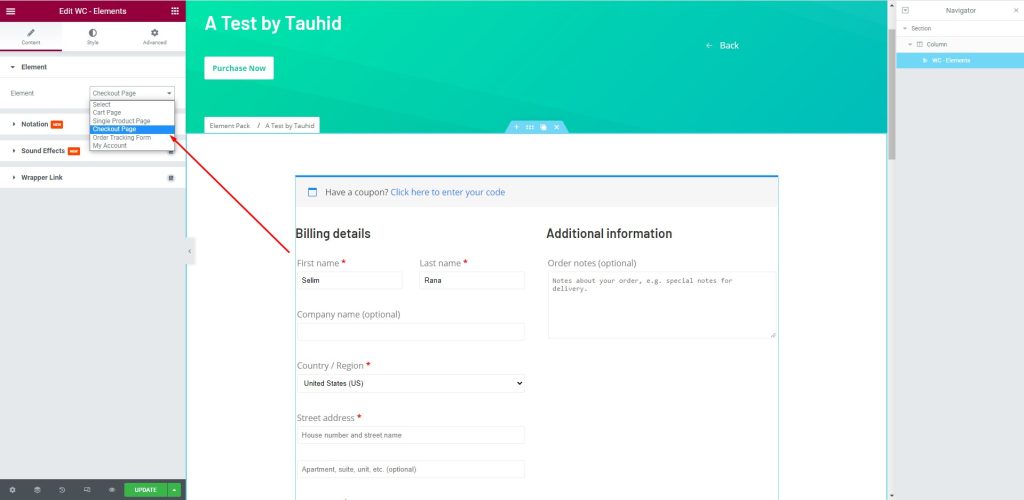
次に Element > Element > Checkout Page to create a checkout page that will help you manage your customers. There are several fields to fill up with consumer information. You can provide your name and address here.
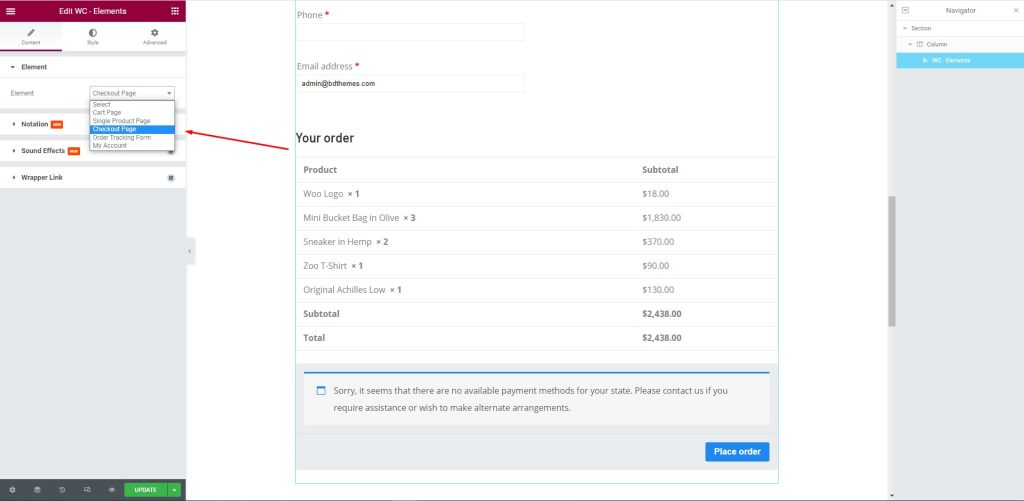
After that, edit the page for your consumers. Let them select their required items and the price against them to complete the checkout process.
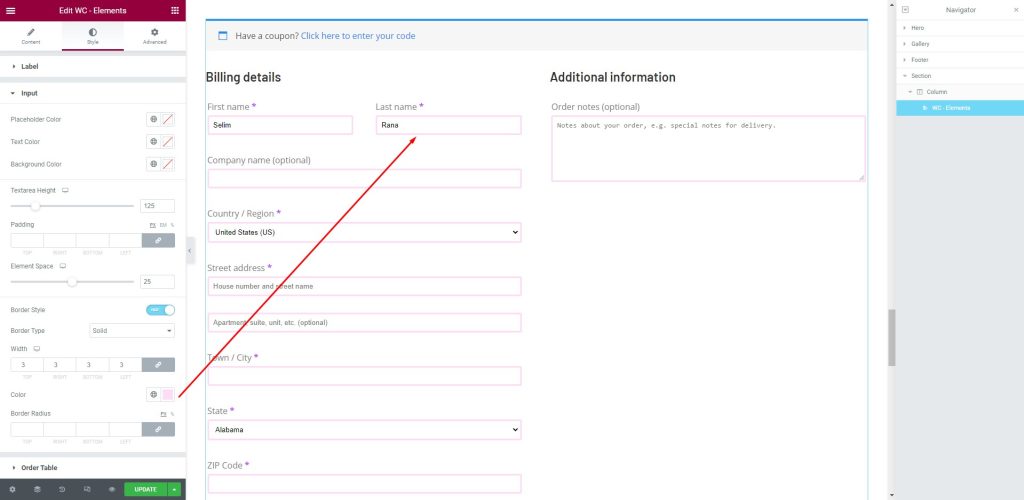
Next, go to the Style tab. Here, shoppers can provide the necessary information in the fields i.e.: First name, Last Name, Company Name, Country/ Region, Street address, Town/ City, and more.
This article is created to show you how to create a checkout page using Elementor pro. We hope that this article helps you create a checkout page. If you have any questions about checkout page or want to share your experience regarding checkout page, please don’t hesitate to leave a comment below.
この記事をお読みいただきありがとうございます。良い一日を。
最大のElementorテンプレートパックは、最もユーザーフレンドリーなUIと 300+ 便利なElementorウィジェット。ゼロからウェブサイトを構築 100% あっという間に完璧になる。
このウェブサイトは Element Pack Pro そして ルーテンのテーマ
Copyright © 2026 Bdテーマ. 無断複写・転載を禁じます。