You’ve spent hours setting up your WooCommerce store, carefully selecting products and crafting descriptions, only to discover that your WooCommerce shop page not editable with Elementor.
According to recent WooCommerce statistics, over 28% of all online stores utilize WooCommerce, making it the most widely used e-commerce platform globally. However, many store owners struggle with customization limitations, particularly when trying to customize WooCommerce shop page design elements.
However, you can’t edit the WooCommerce shop page using through Elementor, it’s because WooCommerce itself manages this default page. So, to edit it, you have to use a WooCommerce page builder plugin that is also compatible with Elementor like Ultimate Storekit. Just drag-drop the widgets and edit the entire shop page as you want.
In this comprehensive guide, we’ll walk you through exactly why you can’t edit WooCommerce shop page with Elementor and then , how it makes easy using Kit per il negozio definitivo‘s powerful widgets. You’ll transform your basic shop layout into a professional storefront that not only looks incredible but also drives sales and improves user experience.
Why You Can’t Edit WooCommerce Shop Page With Elementor
Understanding why you’re facing this Elementor shop page editing issue is crucial before we dive into the solution. Here are the technical reasons behind this common frustration:
WooCommerce Shop Page is a Dynamic Archive
Unlike regular WordPress pages, the WooCommerce default shop page is actually a dynamic archive page that displays products from your database.
This fundamental difference means it doesn’t behave like standard pages that Elementor can easily edit.
Elementor Cannot Directly Edit Dynamic Archive Pages
Elementor not working with WooCommerce shop pages is a well-documented limitation, especially in the free version.
Elementor’s page builder is designed primarily for static content, not dynamic product listings that change based on inventory and categories.
Shop Page Content is Controlled via WooCommerce Templates
Il WooCommerce shop page layout issue stems from the fact that content is controlled through PHP template files rather than the WordPress editor.
This means traditional page builders can’t access the content structure directly.
Elementor Loads a Placeholder Instead of Real Product Data
When you try to edit shop page template Elementor, you’ll notice it often shows placeholder content rather than your actual products.
This happens because Elementor can’t properly interface with WooCommerce’s dynamic product queries.
Elementor Pro Requires Complex Theme Builder Setup
Even with Elementor Pro, creating custom shop page layouts requires understanding the Theme Builder functionality and working with complex template conditions – a process that can be overwhelming for many users.
Without Third-Party Support, Customization Options Are Extremely Limited
There’re many Elementor addons for your woocommerce store, but solutions like Ultimate Store Kit mostly recommanded, providing the missing link between Elementor’s design capabilities and WooCommerce’s dynamic content system.
Prerequisites Before You Begin
Before we start customizing your shop page, ensure you have these essential components installed:
Install and Activate WooCommerce
First, you’ll need a fully functional WooCommerce store. According to Automattic, WooCommerce powers over 5 million active installations worldwide, making it the go-to choice for WordPress e-commerce.
Install and Activate Elementor (Free or Pro)
You’ll need either the free version of Elementor (which has over 5 million active installations) or Elementor Pro. Both versions work with our method, though Pro offers additional design flexibility.
Install and Activate Ultimate Store Kit
This is the crucial component that enables shop page editing with Elementor. The Ultimate Store Kit is specifically designed to resolve compatibility issues between WooCommerce and Elementor.
Why Use Ultimate Store Kit?

Kit per il negozio definitivo offers several compelling advantages:
- 60+ Specialized WooCommerce Widgets: Unlike generic page builders, Ultimate Store Kit provides widgets specifically designed for e-commerce functionality
- No Coding Required: Create professional shop layouts without touching a single line of code
- Mobile-Responsive Designs: All widgets are optimized for mobile commerce, crucial since mobile accounts for 54% of e-commerce traffic
- Performance Optimized: Lightweight code ensures fast loading times, essential for conversion rates
- Regular Updates: Constant compatibility updates ensure smooth operation with latest WooCommerce and Elementor versions
Read More: Install and Activate Ultimate Store Kit on your website.
Edit the WooCommerce Shop Page with Elementor Using Ultimate Store Kit
Now let’s dive into the detailed process of transforming your shop page. Follow these exact steps to achieve professional results:
4.1 Enable the Single Product Page Widget
The first step in our Elementor dynamic content customization process is enabling the necessary widget:

- Vai a WordPress > Ultimate Store Kit Plugin dashboard
- Fare clic sul pulsante WC Widgets Tab
- Ricerca di “Single Product Page Widget”
- Enable the Single Product Page Widget by toggling the switch
- Cliccare “Save Settings” to confirm your changes
This widget is the foundation of our customization approach, providing the Elementor WooCommerce integration needed for advanced shop page editing.
4.2 Insert the Single Product Page Widget in Elementor Editor
Now we’ll add the widget to your page:
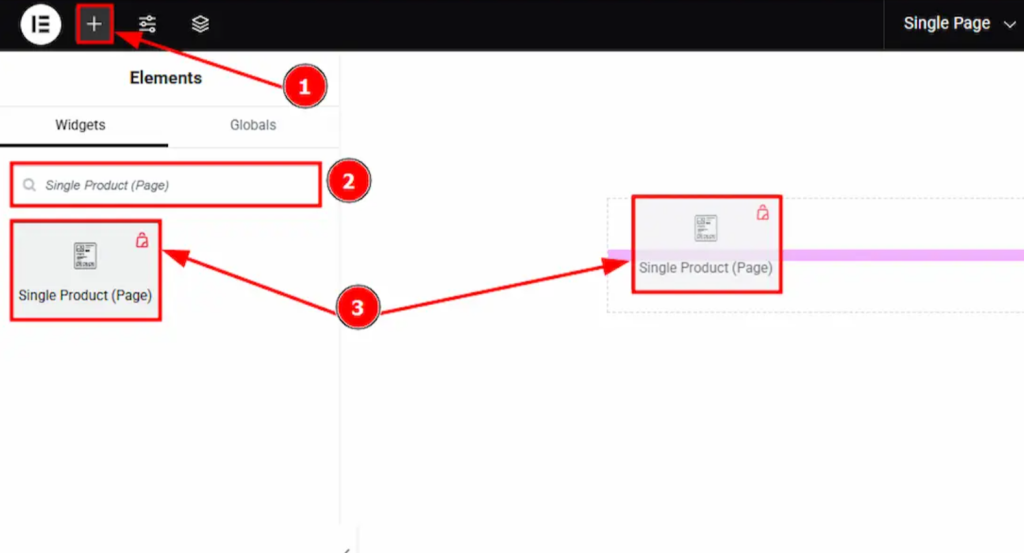
- Open the Elementor Editore for your desired page
- Fare clic sul pulsante “+” (Add Element) icon button
- Ricerca di “Single Product Page” widget
- Drag the widget and drop it onto your editor canvas
The widget will immediately populate with your product data, giving you a live preview of how your customizations will appear.
4.3 Customize the Product Title Section
Product titles are crucial for SEO and user experience. Research shows that compelling product titles can increase click-through rates by up to 36%.
Andare a Style > Product Title and customize:

Colore
- Choose colors that align with your brand palette
- Consider contrast ratios for accessibility (WCAG recommends 4.5:1 minimum)
- Use darker colors for better readability on light backgrounds
Tipografia
Customize your title’s appearance with these options:
- Font Family: Choose from web-safe fonts or Google Fonts
- Font Size: Optimal sizes typically range from 24-32px for desktop
- Font Weight: Bold (700) or semi-bold (600) work well for titles
- Text Transform: Consider uppercase for modern aesthetics
- Line Height: 1.2-1.4 provides good readability
- Letter Spacing: Subtle spacing (0.5-1px) can improve legibility
4.4 Customize the Product Price Section
Pricing is one of the most critical elements affecting conversion rates. Studies show that clear, well-formatted pricing can increase conversions by up to 25%.
Vai a Style > Product Price and adjust:

Colore
- Use contrasting colors to make prices stand out
- Consider red or orange for sale prices to create urgency
- Maintain consistency with your overall color scheme
Tipografia
- Font Size: Price should be prominent (18-24px typical)
- Font Weight: Bold weights draw attention to pricing
- Font Family: Use the same font as titles for consistency
4.5 Customize the Product Description Section
Product descriptions significantly impact purchasing decisions, with detailed descriptions increasing conversion rates by up to 78%.
Andare a Style > Product Description:

Colore
- Use neutral colors that are easy to read
- Ensure sufficient contrast with background
- Consider slightly lighter colors than titles for hierarchy
Tipografia
- Font Size: 14-16px is optimal for readability
- Line Height: 1.5-1.6 improves reading experience
- Font Weight: Regular (400) or medium (500) for body text
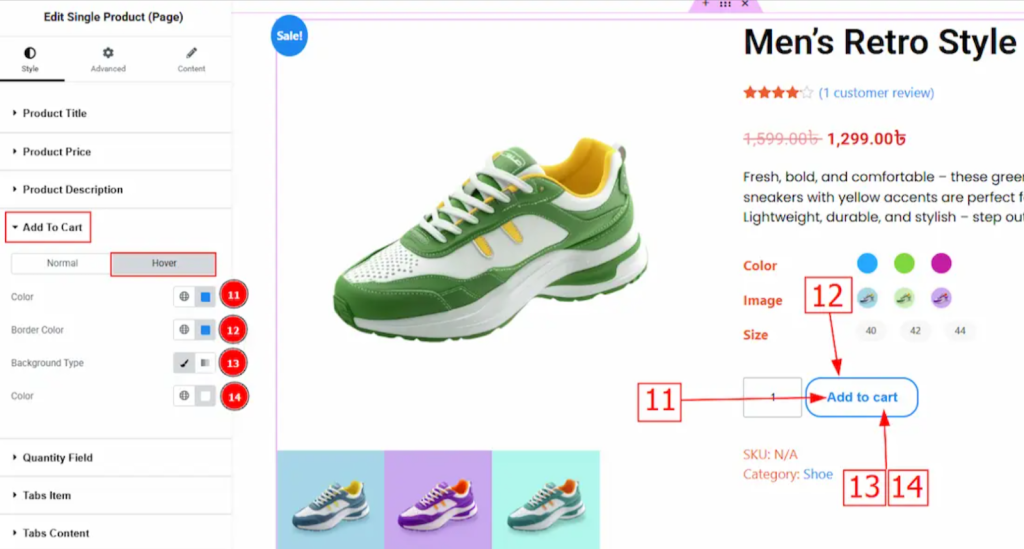
4.6 Customize the Add to Cart Section
The add-to-cart button is your conversion focal point. Optimized buttons can increase conversion rates by up to 35% according to e-commerce studies.
Vai a Style > Add to Cart and work with both tabs:
Normal Tab Customization:

- Text Color: Choose high-contrast colors for visibility
- Background Color: Select between Classic & Gradient options
- Classic: Solid colors work well for professional looks
- Gradient: Modern gradients can create visual appeal
- Border Settings:
- Border Type: Solid borders provide clean definition
- Border Width: 1-2px for subtle definition
- Border Color: Complement your color scheme
- Raggio del bordo: 4-8px for modern rounded corners

- Dimensione: Choose from small, medium, or large based on prominence needs
- Tipografia: Match your site’s typography hierarchy
- Box Shadow: Subtle shadows (2-4px) add depth and clickability cues
Hover Tab Customization:
- Text Hover Color: Create interactive feedback
- Background Type and Hover Color: Darken or lighten for hover states
- Border Hover Color: Subtle color shifts indicate interactivity
4.7 Customize the Quantity Field Section
Quantity selectors should be intuitive and accessible. Navigate to Style > Quantity Field:

- Width: Ensure adequate space for number input (minimum 60px)
- Colore: Use readable text colors
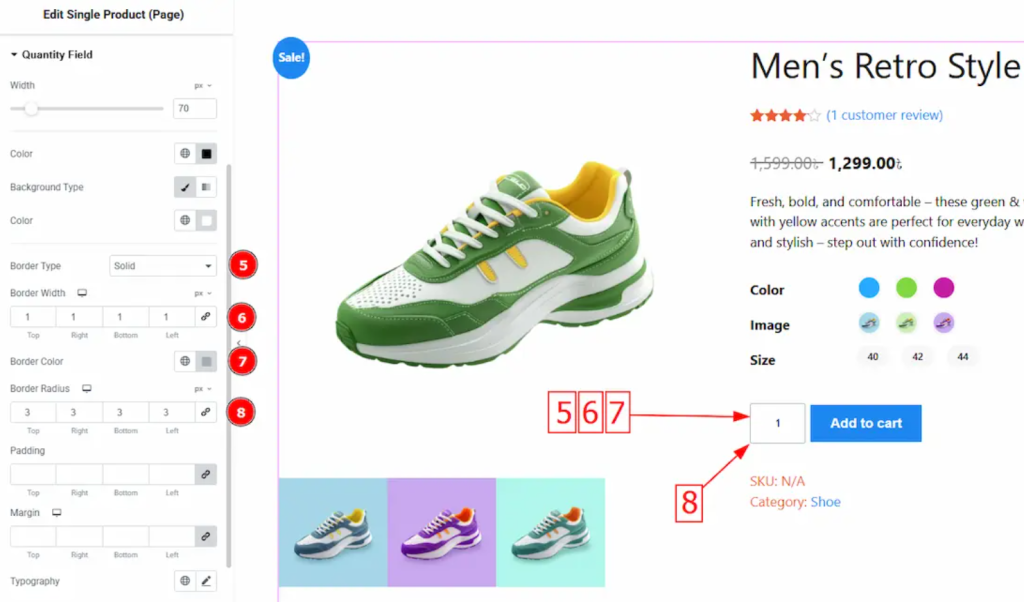
- Background Type: Classic backgrounds work best for form elements
- Border Settings: Clear borders help define input areas

- Imbottitura: 8-12px provides comfortable touch targets
- Margine: Adequate spacing prevents accidental clicks
- Tipografia: Match form typography standards
- Box Shadow: Subtle inset shadows can indicate input fields
4.8 Customize the Tabs Item Section
Product tabs organize information effectively, with well-designed tabs improving user engagement by up to 40%.
Andare a Style > Tabs Item and configure three states:
General Settings:
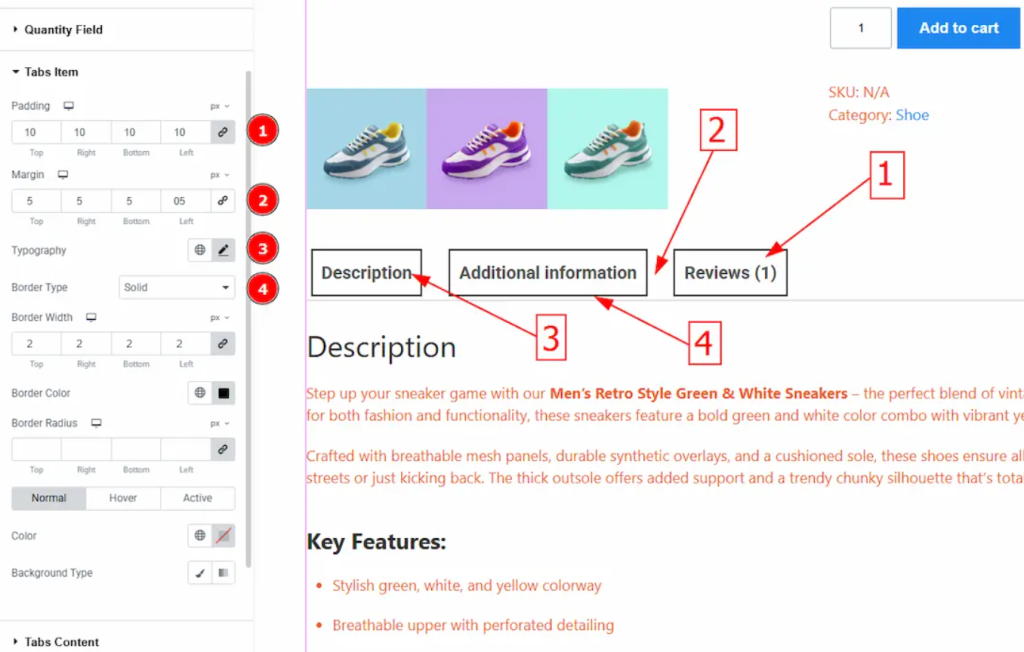
- Imbottitura: 12-16px for comfortable click targets
- Margine: Prevent tabs from touching
- Tipografia: Clear, readable fonts
- Border Settings: Define tab boundaries
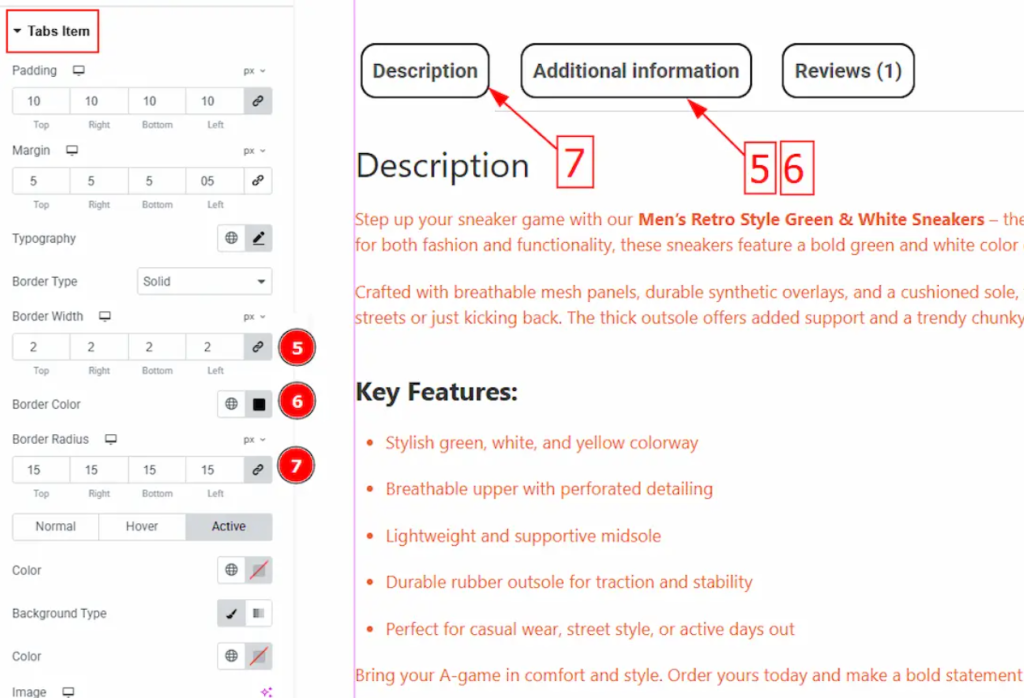
Normal Tab State:

- Text Color: Neutral colors for inactive states
- Background Color: Subtle backgrounds
- Immagine di sfondo: Optional branding elements
Hover Tab State:

- Text Hover Color: Slightly brighter for feedback
- Background Type and Color: Gentle hover transitions
- Border Hover Color: Subtle interactive cues
Active Tab State:
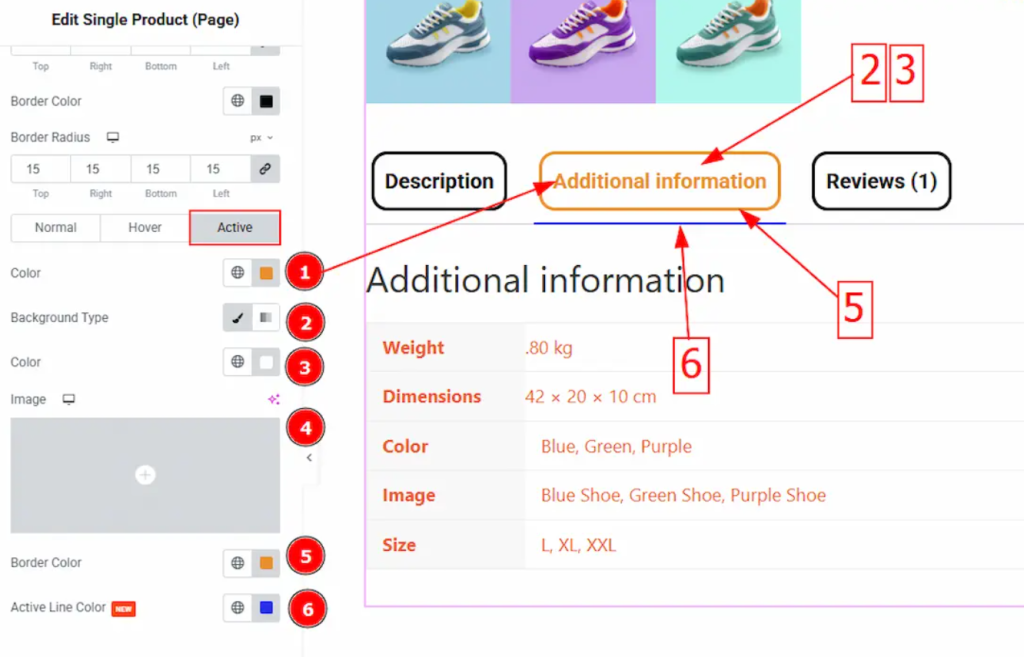
- Text Active Color: High contrast for current selection
- Background Active Color: Clearly distinguish active state
- Border Active Color: Strong visual indicators
- Active Line Color: Underline or accent colors
4.9 Customize the Tabs Content Section
Content areas need to be readable and well-organized:
Andare a Style > Tabs Content:
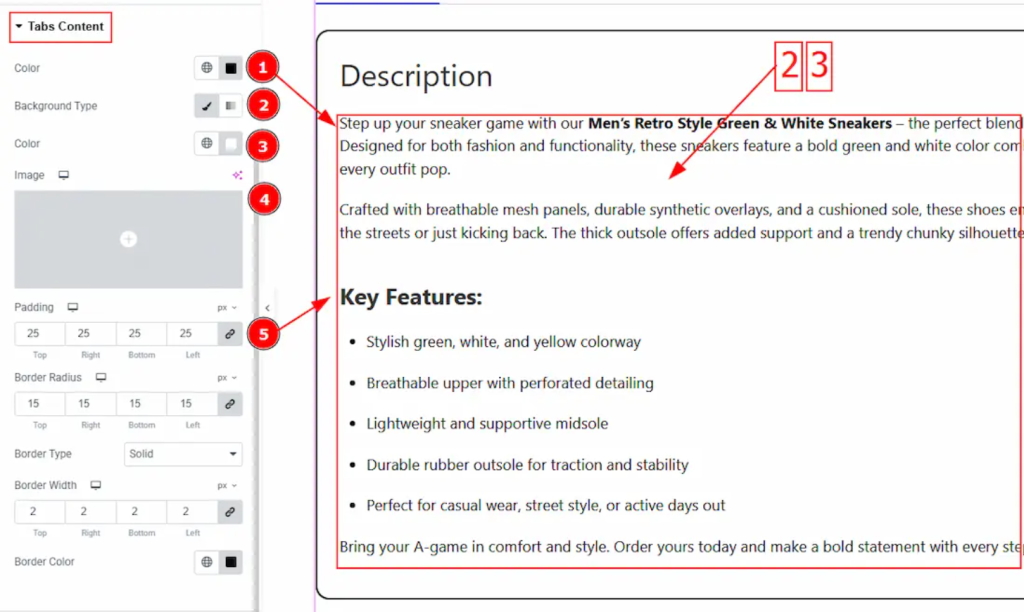
- Text Color: High contrast for readability
- Background Type and Color: Neutral backgrounds work best
- Immagine di sfondo: Use sparingly to avoid distraction
- Imbottitura: 16-20px for comfortable reading

- Raggio del bordo: Match your site’s design language
- Border Settings: Subtle borders can define content areas
4.10 Customize the Related Product Section
Related products can increase average order value by up to 20%. Configure four sub-sections:
Heading Sub Section:

- Colore: Use hierarchy colors (darker than body text)
- Tipografia: Larger, bolder fonts for section headers
- Margine: Adequate spacing above and below
Title Sub Section:
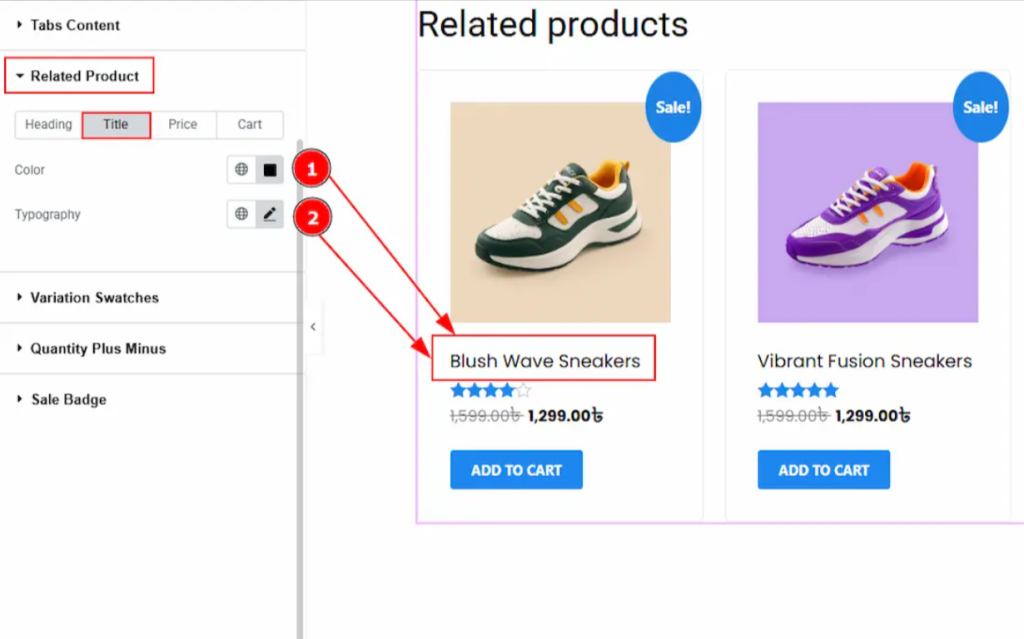
- Colore: Product-specific colors
- Tipografia: Readable sizes (16-18px)
Price Sub Section:
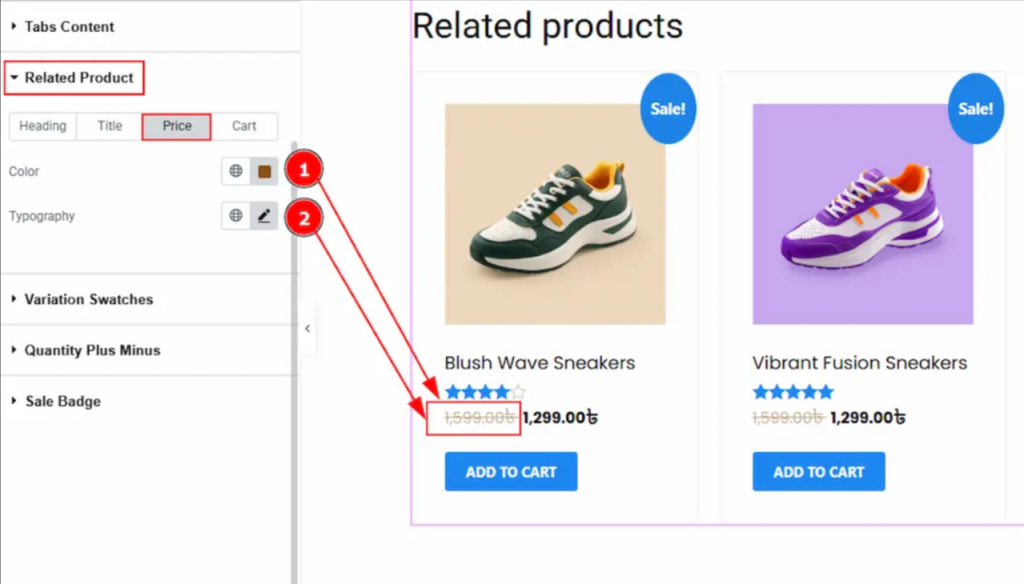
- Colore: Consistent with main product pricing
- Tipografia: Clear, prominent pricing display
Cart Sub Section:

- Colore: Action-oriented colors
- Sfondo: Contrasting backgrounds for buttons
- Imbottitura: Comfortable button sizing
- Tipografia: Clear call-to-action text
4.11 Customize the Variation Swatches Section
Product variations are crucial for user experience. Configure three states:
Andare a Style > Variation Swatches:
General Settings:
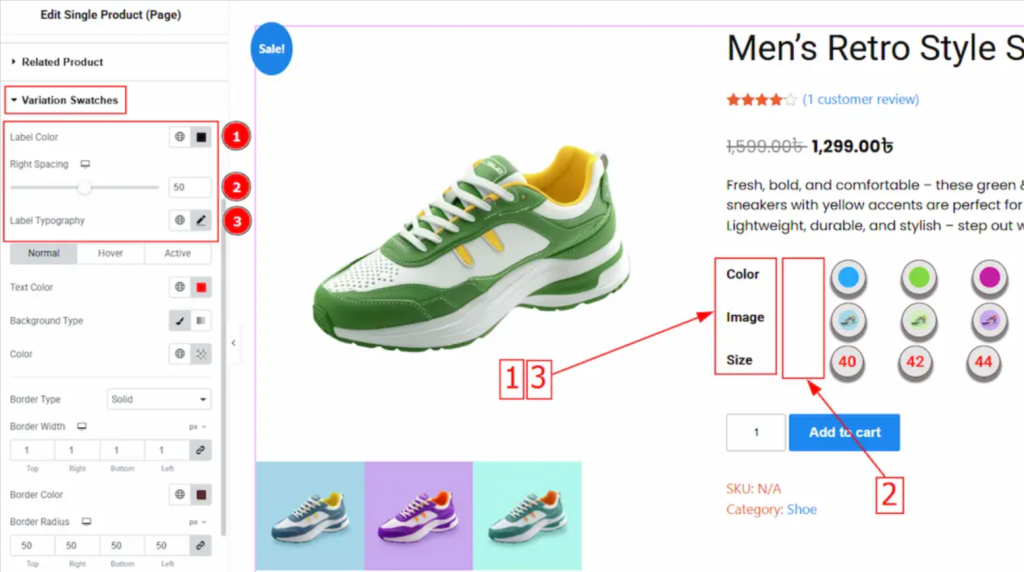
- Label Color: Clear, readable colors
- Right Spacing: Adequate space between labels and swatches
- Tipografia: Consistent with form elements
Normal Tab:
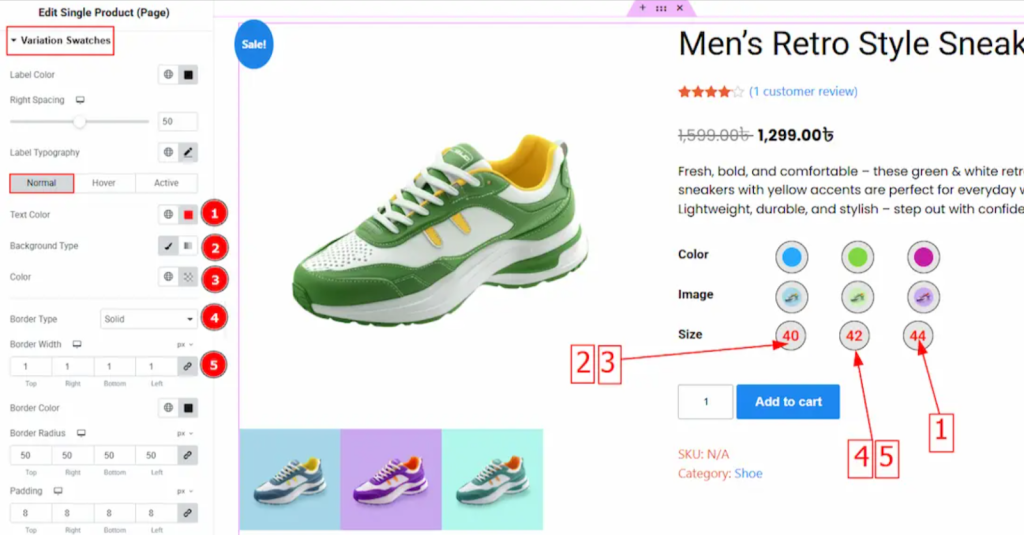
- Text Color: Neutral, readable colors
- Background Settings: Clear swatch backgrounds
- Border Settings: Define swatch boundaries

- Imbottitura: Comfortable selection targets
- Gap: Space between swatch options
- Box Shadow: Subtle depth indicators
- Reset Text Color: Clear reset option styling

Hover Tab:
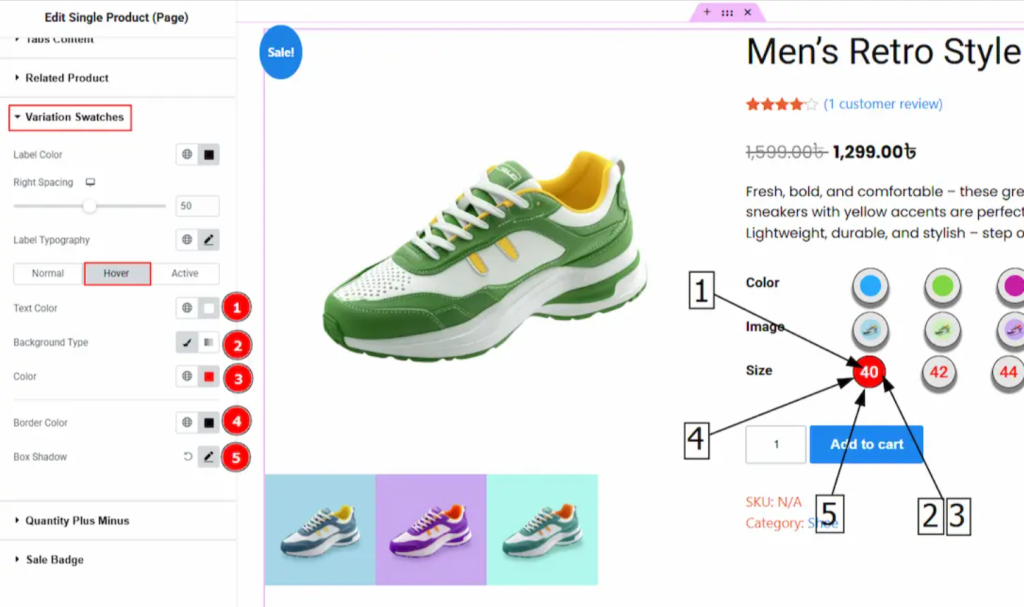
- Text Hover Color: Interactive feedback
- Background Settings: Hover state indication
- Border Hover Color: Selection preview
- Hover Shadow: Enhanced depth on interaction
Active Tab:

- Text Active Color: Clear selection indication
- Background Settings: Strong active state
- Border Active Color: Definitive selection borders
- Active Shadow: Pronounced selection feedback
4.12 Customize the Quantity Plus Minus Section
Quantity controls should be intuitive and accessible:
Vai a Style > Quantity Plus Minus and configure two states:
Normal Tab:
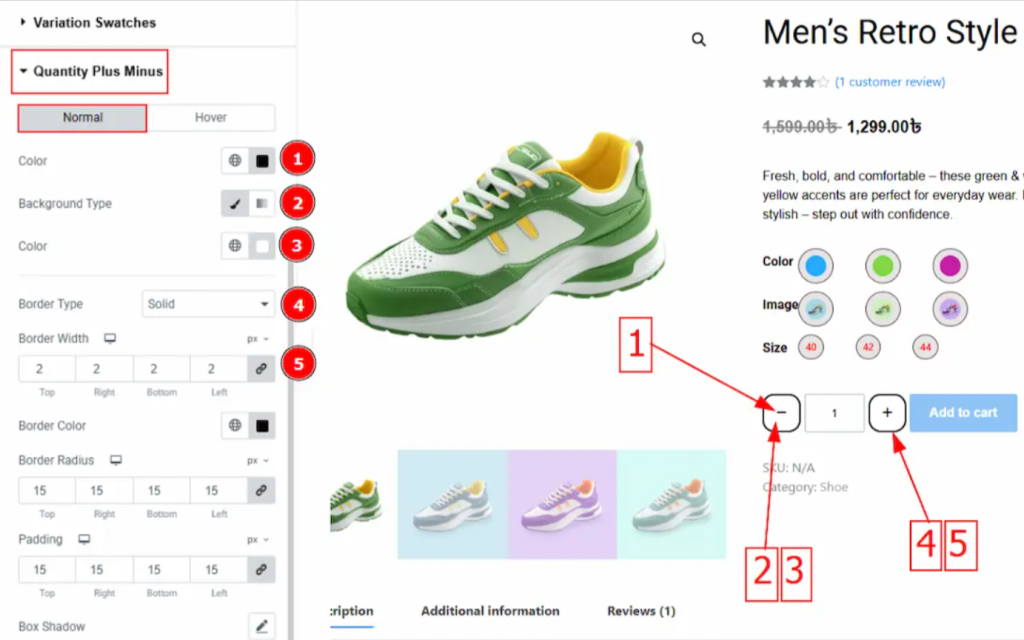
- Icon Color: Clear, clickable colors
- Background Settings: Define button areas
- Border Settings: Clear button boundaries

- Imbottitura: Adequate touch targets (minimum 44px)
- Box Shadow: Subtle button depth
- Icon Size: Clear, readable icons (16-20px)
Hover Tab:

- Icon Hover Color: Interactive feedback
- Background Settings: Hover state indication
- Border Hover Color: Enhanced interactivity
- Hover Shadow: Increased depth on hover
4.13 Customize the Sale Badge Section
Sale badges can increase conversion rates by up to 45% when properly implemented:
Andare a Style > Sale Badge:

- Text Color: High contrast for visibility
- Background Settings: Attention-grabbing colors (red, orange)
- Immagine di sfondo: Optional promotional graphics
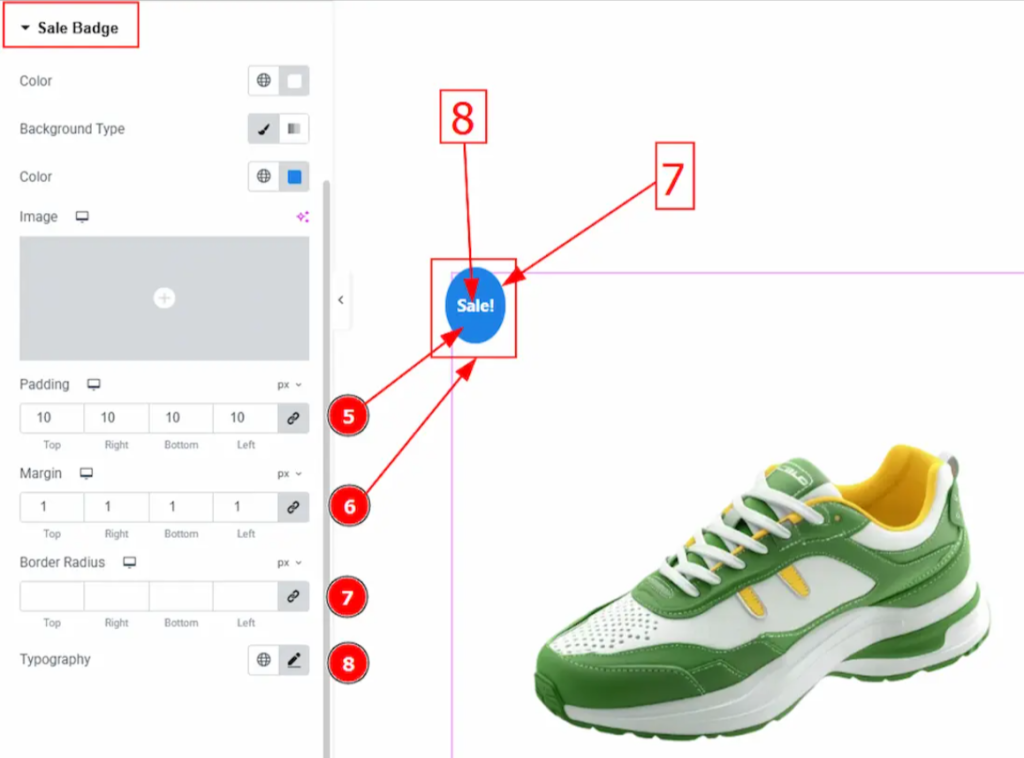
- Imbottitura: Adequate space around text
- Margine: Proper positioning relative to product
- Raggio del bordo: Match your design aesthetics
- Tipografia: Bold, readable sale text
Best Practices for WooCommerce Elementor Customization
When implementing these customizations, consider these proven best practices:
Mobile-First Design
With mobile commerce accounting for 54% of total e-commerce traffic, ensure all customizations are mobile-responsive. Test your edit WooCommerce page results across different devices.
Ottimizzazione delle prestazioni
Page speed directly impacts conversion rates, with a 1-second delay potentially reducing conversions by 7%. Optimize images and minimize widget usage where possible.
A/B Testing
Continuously test different design variations to optimize conversion rates. Even small changes to Elementor shop edit elements can significantly impact sales.
Accessibility Compliance
Ensure your customizations meet WCAG guidelines for accessibility, expanding your potential customer base and improving user experience.
Conclusione
The frustration of not being able to edit WooCommerce shop page with Elementor is now a thing of the past. As we’ve demonstrated, Elementor alone cannot edit the Shop Page due to fundamental architectural differences between static page builders and dynamic e-commerce content.
However, Ultimate Store Kit solves this limitation elegantly by providing specialized widgets that bridge the gap between WooCommerce’s dynamic functionality and Elementor’s design capabilities. This solution eliminates the need for complex coding or expensive custom development.
Domande frequenti
Why is my WooCommerce Shop Page not editable in Elementor?
WooCommerce shop pages are dynamic archive pages, not regular WordPress pages. Elementor is designed primarily for static content and cannot directly interface with WooCommerce’s dynamic product queries. This is why you experience the Elementor shop page editing issue: the page builder simply isn’t designed to handle dynamic e-commerce content without specialized tools like Ultimate Store Kit.
Can I use Elementor Free to customize the WooCommerce Shop Page?
Yes, you can customize the WooCommerce shop page using Elementor Free when combined with Ultimate Store Kit. While Elementor Pro offers additional theme builder functionality, the method outlined in this guide works perfectly with the free version of Elementor, making professional shop page customization accessible to everyone.
Can I use this to edit other WooCommerce pages too?
Yes! Ultimate Store Kit offers widgets for various WooCommerce Elementor integrations, extending beyond just shop pages. You can customize product pages, category pages, checkout pages, and more. The plugin offers comprehensive solutions for all your WooCommerce dynamic content needs.